Star Coral Cookie Toppings Build & Guide
Star Coral is the do-everything Epic support people gear for HP and then wonder why her buffs feel weak. Her whole value is one fat skill — heal, shield, Crit, ATK SPD, Amplify — so the only stat that matters is the one that lets her cast it more: Cooldown. Here's the build: toppings, substats, beascuit, the Sleep immunity niche, and where she earns a slot.

Star Coral is the support that does a little bit of everything, which is exactly why people gear her wrong. They look at "heals allies, shields allies" and reach for HP toppings, the way you would on a dedicated healer — and then her buffs feel limp and they bench her. The misread is treating her as a healer first. She isn't. She's a buff-and-utility battery whose entire value is crammed into one fat skill, and the only thing that makes that skill good is casting it more often. That means the stat that defines her build isn't HP. It's Cooldown.
This is the build sheet for her: toppings, substats, beascuit, treasures, the Sleep-immunity niche that occasionally wins fights, team fit, and where she actually earns a slot versus where a dedicated healer is the better call. Where the community has invented exact roll-targets, I'll give you the direction instead of a fake number — because the wrong number gets copy-pasted forever. Her exact skill values shift with balance patches and skill level, so treat them as the shape of the kit, not the gospel.
Who Star Coral actually is
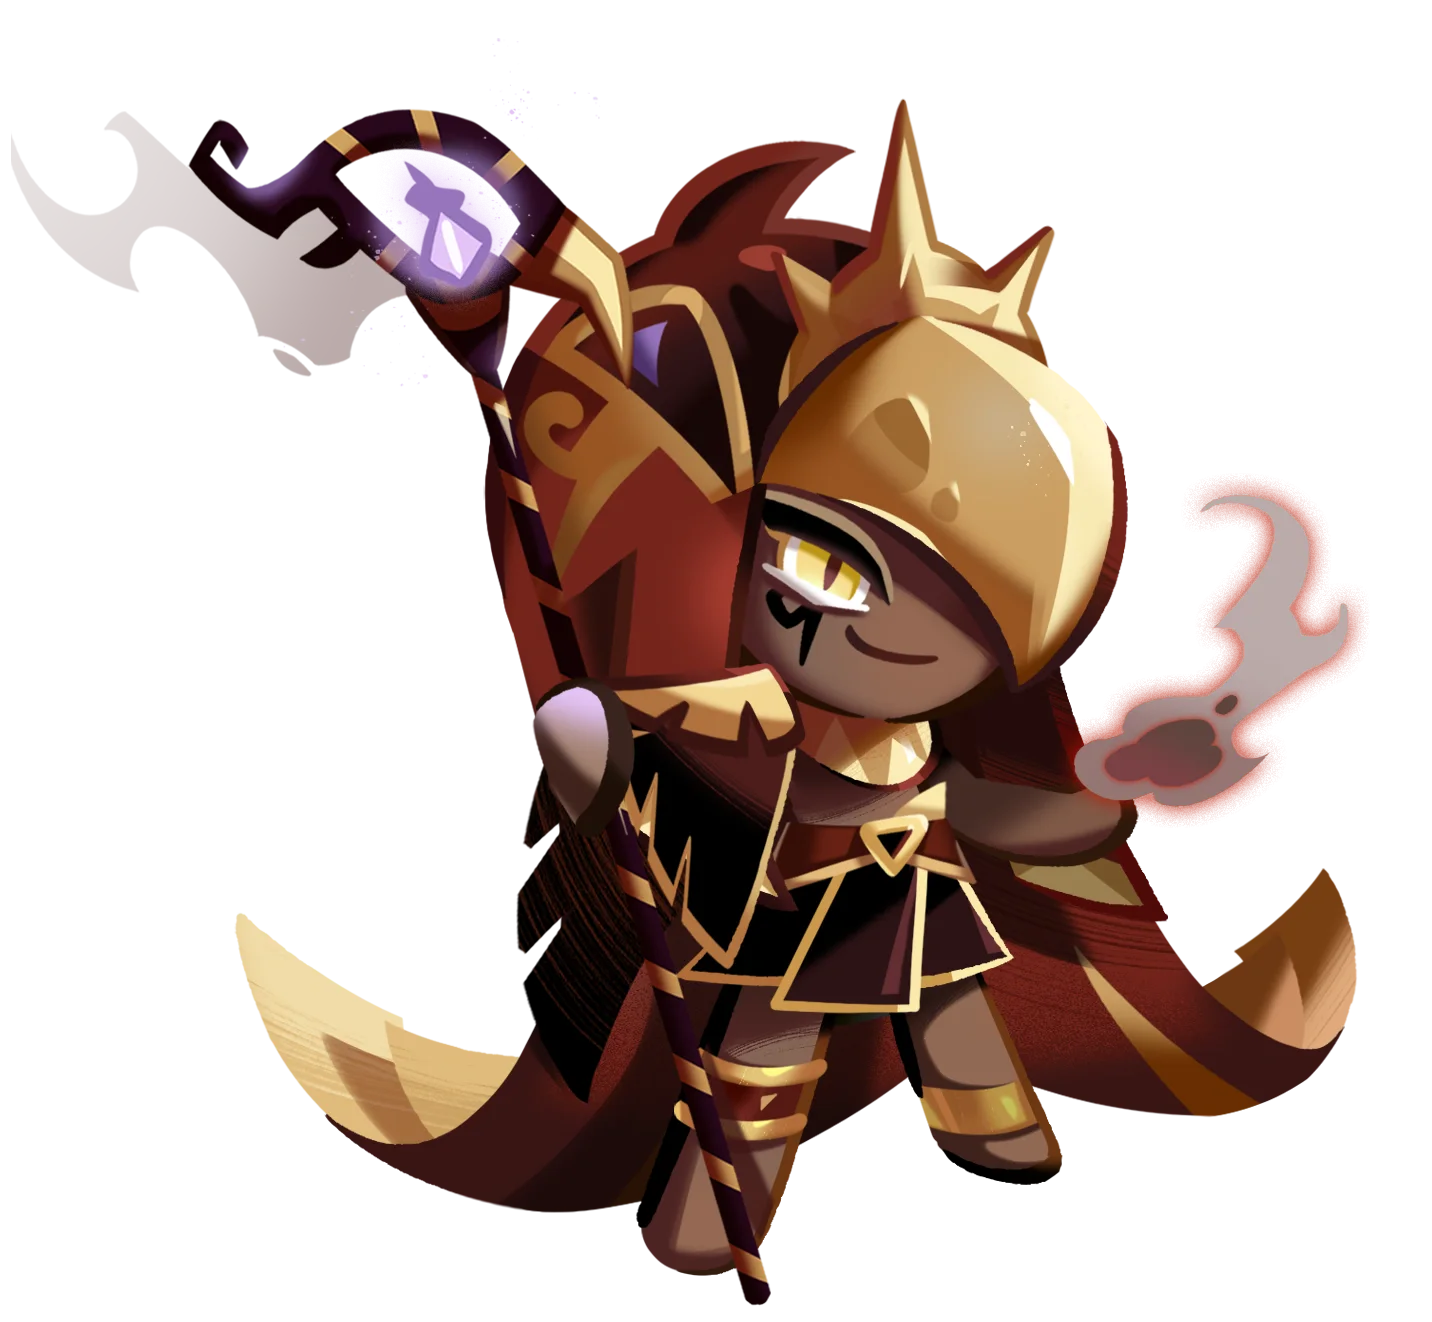
Get the identity right before you spend a topping. Star Coral Cookie is Epic rarity, her class is Support, and she sits on the Rear line — where she stays out of melee and pumps out her kit from the back. She arrived in December 2024 in the Song of the Night Sea update (v5.8), part of that update's ocean-and-night-sea theming.
The thing to internalize: she is a Support, not a Healer, and that classification is honest about what she does. A dedicated Healer's whole job is keeping HP bars full. Star Coral heals as one of several things she does — she also shields, she buffs offense, and she brings a specific status immunity. She's a generalist who saves you a roster slot by doing five jobs at once, not a specialist who out-heals a real healer. Build her to spam that generalist package, and judge her on the total value, not on a healing chart.
One skill, five jobs

Her skill, Twinkling Coral, is one of the more loaded single buttons in the game. When she casts it she summons a twinkling coral and, in one go:
- Heals allies over time
- Grants an HP Shield to the team
- Raises allies' CRIT% for a window
- Raises allies' ATK SPD for a window
- Applies an Amplify Buff (the multiplicative damage boost that stacks with flat ATK buffs)
On top of the skill itself, her Lunar Lantern shines toward enemies for periodic damage and — the niche part — she's immune to Sleep and Drowsy. That immunity isn't relevant in every fight, but against the specific threats that lean on Sleep/Drowsy crowd control, a support who can't be put to sleep is a quietly enormous deal.
Read it all together and the picture is clear: she's a one-button team uplift. Heal, shield, Crit, ATK SPD, Amplify — that's offense buffing, defense buffing, and sustain folded into a single cast. The whole design is "press this as often as possible." Which leads directly to the only stat that matters.
Why Cooldown is the only stat that matters
Here's the fork that decides her entire topping sheet, and it isn't close. Every effect she has is on the skill. The heal, the shield, the Crit buff, the ATK SPD buff, the Amplify — none of it exists between casts. So the value of Star Coral scales almost linearly with how often Twinkling Coral comes back up. More casts = more uptime on every buff she carries = more total value. That's Cooldown, full stop.
Compare that to the HP-stacking instinct. Pumping her HP makes her tankier, but she's a rear-line support nobody's targeting first, and her own survival isn't the bottleneck — her buff uptime is. Every topping slot you spend on HP instead of Cooldown is a slot that makes her live slightly longer while contributing slightly less of the thing she's actually for. That's the trade backwards.
This is why the entire build philosophy for her is "Cooldown, then keep her alive enough to keep casting." Build the uptime, not the health pool.
The standard Star Coral topping build

5x Swift Chocolate (Cooldown). That's the backbone, and for this cookie it isn't a debate.
The standard:
- Toppings: 5x Swift Chocolate (Cooldown) — or the Epic-tier Moonkissed Chocolate equivalent if you have it
- Beascuit: a Cooldown-priority beascuit
- Treasures: cooldown-and-support treasures (more below)
The reason Cooldown wins is everything above: her entire kit lives on the skill, so faster recasts compound across the heal, the shield, and all three buffs simultaneously. The 5-piece chocolate set bonus hands you even more cooldown reduction on top, which is exactly what you want. If you've pulled the Epic Moonkissed Chocolate set, that's the upgrade path — same Cooldown role, higher ceiling — but plain Swift Chocolate is a Common-tier set that does the core job perfectly well, so there's no reason to wait on her.
If you're new to how topping sets and substats interact, the toppings guide covers the fundamentals this build assumes.
Substat priorities without the fake numbers
Substats are where most of a build's quality lives, and where the CRK community most loves to invent exact percentages nobody can verify. No fake "you need exactly 26.4% Cooldown" target here — just the honest priority order:
- Cooldown — the priority, on as many toppings as you can manage. This is the stat that makes every part of her kit happen more often. Push it as high as it'll go before chasing anything else.
- HP and DMG Resist — the survival backup. She doesn't need to be a wall, but a support who dies mid-fight stops buffing, so a little durability on the slots where you missed Cooldown keeps her casting through the rough patches. In Arena especially, enough bulk to survive the opening burst matters.
- ATK — the lowest-value fill. Her Lantern does some periodic damage and her Amplify Buff scales team offense, but she isn't a damage source herself, so ATK is the stat you land on by accident, not the one you chase.
The practical rule: roll for Cooldown first, take a little HP and DMG Resist so she survives to keep casting, and don't sweat ATK. And don't reroll forever for a fraction of a percent of Cooldown — get her into a functional range and go build your next cookie.
Beascuit pick — Cooldown first
The beascuit slot follows the same logic as the toppings: prioritize Cooldown. It's the stat that makes her whole kit happen more often, so it's the stat the beascuit should reinforce. A high-quality beascuit is the ceiling, but any beascuit you can stack Cooldown on does the core work.
Stat priority on the beascuit: Cooldown first, then a mix of HP and DMG Resist for survival, with ATK as the last consideration. A Cooldown-leaning beascuit — a Hearty-style one targeting Cooldown and survivability stats is a common pick — keeps her on the same uptime-first plan as her toppings. Don't bring a pure-ATK beascuit to a support whose damage is incidental; reinforce the thing she's actually for.
Treasures and the Sleep immunity niche

Treasures double down on the plan: anything that reduces cooldowns or adds team utility stacks with her identity. A cooldown-reduction treasure is the obvious fit — more recasts of a five-effect skill is enormous value — and support-amplifying treasures that boost buffs or healing reinforce the rest of the package. The treasures guide covers the current best-in-slot options and how they stack.
Don't sleep on the Sleep/Drowsy immunity, though — literally. It's situational, but it's the kind of niche that occasionally swings a fight outright. Some Beast-Yeast bosses, certain story encounters, and specific Arena comps lean on Sleep or Drowsy to disable your team during the opening — and a support who can't be put under keeps your buffs and heals flowing exactly when the enemy plan is to shut them off. Against a Sleep-heavy threat, Star Coral stops being a generalist and becomes a deliberate counter. It won't matter in most fights, but when it matters, it really matters.
Team comps and where she fits
Star Coral is a slot-saving glue support. You build the team to cash in the breadth she provides:
- Rear line, always. She's a support with no business up front. Keep her at the back where she casts safely. Forward, she just dies and stops buffing.
- A carry to amplify. Her Crit, ATK SPD, and Amplify buffs are wasted without someone to point them at. Pair her with a real damage dealer from the DPS tier list — her offense buffs turn a strong carry into a stronger one.
- A front line to protect. Her shield and heal stretch a front-liner's survival, so a real tank from the tank tier list pairs naturally, and her uptime keeps that protection flowing.
- Decide whether she's the only support. Because she does five things at once, she can be your sole support slot in a comp that wants a sixth damage or utility body elsewhere. But if a fight demands serious sustain, she doesn't out-heal a dedicated healer from the healers ranked list — she complements one or replaces one in lighter content.
For how she stacks up against the rest of the support pool, the support tier list is the reference, and for slotting her into PvE shells, the best PvE teams list covers the comps she fits.
Arena vs PvE: where she earns her slot
The split is worth being honest about, because it changes how you weigh her.
In PvE — Guild Boss, towers, story, Beast-Yeast — she's a clean fit when you want one support that covers a lot of bases and frees a slot for another damage dealer. Her Amplify Buff and ATK SPD speed up clears, her heal and shield cover survivability, and her Sleep immunity is occasionally a hard counter to a specific boss mechanic. Build her Cooldown-heavy and lean slightly more into HP/DMG Resist for the longer fights.
In Arena, she's a buffer first — the Crit and ATK SPD windows can juice an aggressive team's opening, and the shield blunts the enemy burst. The catch is that she has to survive the opening burst to deliver any of it, so a touch more bulk in her substats earns its keep here. She slots into the durable-buff shells the Kingdom Arena meta team lays out, but she's competing with specialist supports for the slot — bring her when her breadth saves you a body, not as an automatic include.
Common Star Coral build mistakes
In rough order of how often they show up:
-
Stacking HP instead of Cooldown. The single most common mistake on her, and it's the build backwards. Her entire kit lives on the skill — Cooldown is what makes all five effects happen more often. HP is a backup, not the lead.
-
Treating her as a dedicated healer. She's a Support. She heals as one of five things, and she won't out-sustain a real healer. Judge her on the total package, not on a healing number.
-
Ignoring the survival floor entirely. The flip side: a support who dies mid-fight stops buffing. Don't go so all-in on Cooldown that she folds to the opening burst, especially in Arena. A little HP/DMG Resist keeps her casting.
-
A pure-ATK beascuit. Her damage is incidental. The beascuit is a Cooldown-and-survival slot, not an offense slot.
-
Forgetting the Sleep immunity exists. It's situational, but against Sleep- or Drowsy-reliant bosses and comps it can be the reason she's the right pick over another support. Know your matchup.
-
Bringing her to a fight that wants a specialist. If a clear demands maximum raw healing or a specific niche buff, the dedicated cookie wins. Star Coral's edge is breadth — use her where the slot-saving matters.
Quick Action Checklist
- Equip 5x Swift Chocolate (Cooldown) as the standard build — Moonkissed Chocolate if you have the Epic set
- Prioritize Cooldown substats above everything else
- Take a little HP and DMG Resist so she survives to keep casting, especially in Arena
- Treat ATK as the lowest-value fill — her damage is incidental
- Run a Cooldown-priority beascuit, with survival stats over ATK
- Lean on cooldown-reduction and support treasures to push her uptime further
- Remember her Sleep/Drowsy immunity — it's a situational hard counter worth slotting for
- Keep her on the rear line, never forward
- Pair her with a carry to amplify and a tank to protect; decide whether she's your only support
- Build her Cooldown-heavy for PvE, with a touch more bulk for surviving the Arena opening
Frequently Asked Questions
Keep Reading
Related Guides

Oyster Cookie Toppings Build: Cooldown Is Not Cooldown
Everyone tells you to slap 5x Swift Chocolate on Oyster Cookie and move on. They're right, but almost nobody can tell you why — and the real reason changes how you read every single roll. Her cooldown stat isn't buying you a faster skill. It's buying you an army.

Crimson Coral Cookie Toppings Build: Solo Front Or Bust
Crimson Coral Cookie has a build-defining condition that no topping spread can fix: if she is not the only Front cookie on your team, roughly half her kit silently switches off. Get the roster right first, then we can talk about toppings.

Black Lemonade Cookie Toppings Build — Zap Engine, Geared Right
Black Lemonade Cookie is the rock star who quietly became one of the best Electricity enablers in the game. Here's the toppings build that keeps her whole band playing.
Smoked Cheese Cookie Toppings Build — The Earth Enabler Done Right
Smoked Cheese Cookie stole his queen's Soul Jam in the story, then came back as the Epic who makes her hit harder. Here's the build that keeps his smoke — and her damage — rolling.

CRK Tier List May 2026 — PvE & PvP Rankings (Post-Timeline of Fate)
Timekeeper rewrote the Arena rulebook, Ash Salt is bullying World Exploration, and Eternal Sugar finally dropped a tier. Here is the May 2026 CRK tier list, sorted for PvE, PvP, and Guild Battle, with the F2P investment picks that actually matter.
CRK Toppings Guide (2026) — Every Set + Reroll Strategy
Most players lose more power to bad sub-stats than to missing the right Cookies. Here is every topping type, the sub-stat thresholds that matter, the best set for each role, and the reroll math that tells you when "good enough" actually wins.