Fortnite Piece Control Guide: How to Take and Hold the Wall
Piece control is the whole reason good builders win fights they're losing on aim. It's the skill of owning the wall, cone, or floor between you and the enemy — taking it, replacing theirs, and refreshing it before they can punish. Here's how to actually do it.

Every Fortnite build fight you've ever lost while out-aiming the other guy came down to the same thing: you didn't own the wall. Piece control is the unglamorous skill underneath all the flashy edits and 90s — it's who controls the build pieces between two players, and it decides who gets the free shot and who eats it. You can have perfect aim and still lose, because a clean shot through a wall you don't control is a shot you never get to take.
This guide is piece control broken all the way down, separate from box-fighting tempo and editing speed: the pieces you actually fight over, how to take a wall, the cone-on-wall that high-level players spam, refreshing walls to hold what you took, turtling when you're losing, and what it actually means to win the build battle. None of this rotates with the season — the walls, cones, and floors have behaved the same way for years. Get these habits into your hands and you stop trading and start controlling.
Piece control is the whole game
Here's the one idea everything hangs on: in a build fight, whoever placed the piece between you most recently controls it. Your wall sits on your side of the gridline; theirs sits on theirs. When you slam a fresh wall over the contested spot, your piece is now the one facing the enemy — and a piece you own, you can edit, peek, and reset on your own timing. A piece they own, you have to replace first. That fraction of a second is the entire advantage in close-range Fortnite.
So piece control is a loop, not a single move: take the wall, do your damage through it, hold it by re-walling instantly when they take it back. The player who wins that loop more often wins the fight, full stop. Aim only cashes in after you've won the piece. This is why two players with identical aim can have wildly different win rates — one is fighting for the wall, the other is just shooting at it.
Two mental shifts separate people who get this from people who don't:
- Stop thinking "shoot the enemy," start thinking "own the wall, then shoot." The shot is the last step, not the first.
- You contest pieces on reflex, not on thought. If you're consciously deciding to re-wall, you're already a beat late. That's what the drills at the bottom are for.
The three pieces you fight over

Piece control happens across three build pieces, and each plays a different role in the fight:
- The wall is the main event. It's the vertical piece directly between you and the enemy, and 90% of piece control is the fight over this one wall — taking it, holding it, replacing theirs. When people say "take the wall," this is the piece they mean.
- The cone (the roof/pyramid piece) is the protector. Placed over your head it stops anyone above from dropping or editing onto you, and placed on a wall it locks that wall down — more on that in a second. The cone is what turns a wall you took into a wall you keep.
- The floor is the level-changer. Controlling the floor under and above you decides who can drop down on whom. If an enemy boxes below you, the floor between you is the contested piece; taking it lets you edit down onto them.
You're rarely fighting over all three at once. In a flat 1v1 it's almost entirely the wall, with a cone going on top to protect it. When height enters the fight, the cone and floor matter more because now someone can come at you from above. Knowing which piece is contested in the moment is half the skill — newer players keep re-walling a side that's already safe while the enemy edits in from a piece they ignored.
Taking a wall: the core skill

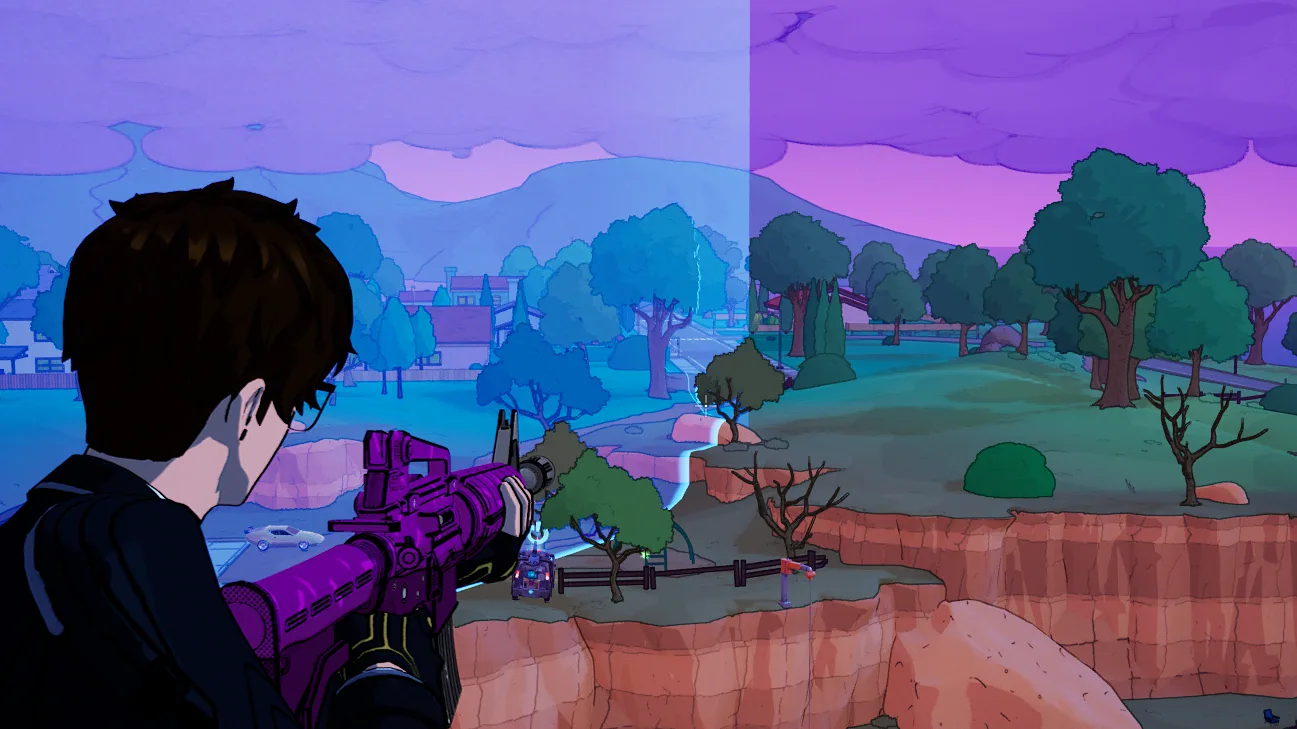
"Taking a wall" means placing your wall directly over the enemy's existing wall so yours replaces theirs. The instant your piece goes down, you own that wall — you can edit a hole, peek, and shoot, and they can't, because now it's your piece they have to replace before they can do anything. This single action is the mechanical heart of piece control, and it happens dozens of times in one fight.
The take-and-edit loop:
- Wall over their wall, then edit immediately. Slam your wall on the contested gridline, then instantly edit a door or window into your fresh wall to peek and shoot. You've effectively stolen the angle from them.
- Confirm the take before you commit to the edit. A take that doesn't register — because you were a hair too far, or they re-walled at the same instant — means your edit opens their wall and exposes you. Clean takes beat fast-but-missed ones until the speed is automatic.
- Don't shoot the wall, ever. Bullets into a structure do basically nothing; the wall absorbs it and goes right back up. You damage players, in the half-second your edit is open. Spraying a wall is wasted ammo and a wasted tempo beat.
The whole reason wall-takes matter: a wall you placed is editable the instant you want it; a wall they placed has to be taken first. Win the take and the damage comes free. Lose it and you're always a beat behind, reacting to their peeks instead of forcing your own.
The cone-on-wall: the piece control staple

The cone-on-wall is the move that separates players who've heard of piece control from players who actually have it. Here's the technique: after you take a wall, you place a cone directly on top of and against that wall. The cone sits flush over your wall, and it does two things at once — it protects the top of the wall from someone editing down onto you, and it makes the whole piece much more annoying for the enemy to take cleanly, because now they have to deal with the cone and the wall instead of just slapping a wall down.
Why high-level players spam it:
- It locks your take. A bare wall is easy for the enemy to replace. A wall with a cone snugged on top is a fortified piece — the cone covers the seam and the top edge, so a lazy re-wall from them doesn't fully take it back.
- It buys you free edits. With the cone protecting the top, you can edit your wall aggressively — door, window, peek, reset — without worrying about someone dropping in over the top while your edit is open.
- It's the foundation of a clean box. Cone over wall, wall, wall, wall, floor — that's a protected box where every piece reinforces the next, instead of four lonely walls anyone can take.
The cone-on-wall isn't optional at higher levels; it's the default way you hold a piece you just took. If you only add one thing to your piece control from this guide, make it this: take the wall, then immediately cone it. It's the difference between "I have the wall for a second" and "I have the wall and they can't easily get it back."
Refreshing walls: holding what you took
Taking a wall is half the job. Holding it is the other half, and that's where refreshing walls comes in. Refreshing a wall means replacing your own wall with a new full-health one before it breaks — you re-place over your existing piece so the wall in front of you is always near full HP. In a sustained fight where the enemy is shooting your wall down, the player who refreshes keeps a wall up; the player who doesn't gets their wall blown out and suddenly has no cover.
How to refresh and hold:
- Re-wall the instant they take it. Piece control at speed is a rapid trade of "my wall, your wall, my wall." The moment the enemy slaps a wall over yours, take it right back. Whoever is faster on the retake controls the tempo and gets the free edits.
- Refresh before it breaks, not after. If the enemy is spraying your wall, drop a fresh wall over it before the old one pops. Waiting until it shatters means a window where you have zero cover — that's the window they kill you in.
- Watch your mats while you trade. Every wall and cone costs materials. A refresh war you're losing on mats is a fight you need to change — drop a level, tunnel out, or break off — before you go broke holding a piece. A builder with no mats is just a player standing in the open.
The mindset: the wall in front of you should always be one you placed and one that's healthy. The second either of those stops being true, you've lost piece control, and you're now reacting. Refreshing is the maintenance that keeps you the one with the initiative.
Turtling when you're on the back foot
Not every fight starts with you on top. Turtling is the defensive side of piece control — when you're getting pressured, low on shield, or stuck below an enemy with height, you box up tight and play purely for the retake until you can swing the fight back. It's not hiding; it's holding piece control defensively while you stabilize.
How to turtle without just dying slowly:
- Box up and cone the top. Four walls, a floor, and a cone over your head. The cone is non-negotiable here — it stops the enemy editing down onto you, which is exactly how turtling players get cracked.
- Retake every piece they take. Turtling is active. They take your wall, you take it back. They cone over you, you take the cone. You're not waiting them out passively — you're contesting every single piece so they can never get a clean edit into your box.
- Use the breather, then swing. A turtle buys you a moment to reload and heal. Top off, then look for their mistake — an over-extended edit, a mat-out, a bad cone — and take a piece aggressively to flip the fight. Turtling forever just lets a third party clean you up.
Turtling is what you do when you've lost the initiative but not the fight. Done right, it's the bridge back to control: you weather the pressure, retake your pieces, and wait for the opening to go back on offense.
Winning the build battle
A build battle — the back-and-forth where two players are both building, taking, and editing — is just piece control sustained over many exchanges. You win it by stacking small piece-control advantages until the enemy runs out of pieces, mats, or patience. Here's what winning it actually looks like:
- You're always the one editing in, never the one defending. When you keep piece control, you keep forcing aggressive edits into their box while you sit safe behind your own coned wall. They react; you act.
- You corner them out of options. Sustained control means tunneling toward them with protected pieces, taking the contested wall, and editing in. A cornered builder has fewer walls, fewer mats, and fewer escapes every exchange.
- You don't over-build. Winning the build battle isn't placing the most pieces — it's placing the right piece at the right moment. Spamming builds burns mats and gives the enemy easy pieces to take. One clean wall-take and cone beats five panicked walls.
- You close fast. A drawn-out build battle is a dinner bell for a third party. Once you've got control, use it to finish — don't admire your piece control for ten seconds while someone rotates onto both of you.
The honest summary: the player who controls the pieces controls the fight. Boxing, the cone-on-wall, refreshing, and turtling all exist for one reason — to get and keep the build pieces between you and the enemy. Win that, and the kill is just paperwork.
Common piece control mistakes
The fastest way to get better is to stop doing the things that hand the enemy your pieces:
- Shooting the wall instead of the player. A wall eats bullets and goes right back up. Damage players through your edits, never structures.
- Taking a wall and forgetting to cone it. A bare wall is a wall the enemy takes right back. Cone the take or you don't really have it.
- Refreshing too late. Wait until your wall breaks and there's a window with no cover — that's the window you die in. Refresh before it pops.
- Re-walling the wrong side. Contesting a piece that's already safe while the enemy edits in from the one you ignored. Track which piece is actually contested.
- Turtling passively. Sitting in a box without retaking pieces just lets the enemy edit in or a third party arrive. A turtle is active defense, not a hiding spot.
- Going broke on a losing trade. If your mats drain faster than theirs in a refresh war, change the fight or break off. No mats, no piece control.
Drills to build the habit
Piece control is muscle memory, and muscle memory comes from focused reps in Creative, not from hoping it clicks in ranked. Put time into these:
- Wall-take reps. On a free-build island, drill taking a wall and immediately coning it — wall over wall, cone on top — until the take-and-cone is a single reflex motion.
- Refresh drill. Place a wall, take damage on it (or a bot does), and practice refreshing it before it breaks so a full-health wall is always in front of you.
- Piece control 1v1 maps. Creative has dedicated piece-control and 1v1 maps with real opponents — that's where the wall-trading reps happen against a human who's also fighting for the piece. Lose a lot here so you stop losing in ranked.
- Turtle-and-swing reps. Practice boxing up under pressure, retaking every piece, then swinging out — so defensive piece control is automatic when you're on the back foot.
There's no shortcut here. Players who control pieces well have thousands of take-and-cone reps in their hands. Twenty focused minutes a day beats two unfocused hours, and within a couple weeks the take-cone-refresh loop stops being something you think about and becomes something you just do.
Quick Action Checklist
The habits that win the build battle:
- Think own the wall, then shoot — the shot is the last step, not the first
- Take the wall by placing yours over theirs, then edit in for the free peek
- Cone every wall you take — the cone-on-wall locks the piece and protects the top
- Refresh your wall before it breaks so a full-health, you-owned wall is always in front
- Re-wall instantly when they take it — win the my-wall / your-wall trade on speed
- Turtle actively when pressured: box, cone, retake every piece, then swing
- Shoot players, not walls — damage only lands through an open edit you control
- Don't empty your mats on a losing trade; reset or break off
- Drill the take-cone-refresh loop in Creative until it's reflex
Frequently Asked Questions
Keep Reading
Related Guides

Fortnite Third-Partying Guide: When to Push, When to Hold
Third-partying is the most reliable way to win a fight without earning it — you let two players gut each other, then collect. But the same logic points back at you the second you start shooting. Here's how to be the third party instead of the corpse two of them split.

Fortnite Duos & Trios Strategy: How to Win in Small Teams
Duos and Trios aren't just Squads with empty slots. With fewer guns, every knock swings the math harder, every res is riskier, and one bad split loses the game. Here's how to play 2s and 3s — roles, comms, trading, reboots, shared loot, and third-partying as a small unit.

Fortnite Weak Spots & Aiming Guide: Where to Aim
Two players land the same shots and one does way more damage. The difference isn't aim — it's where they're aiming. Here's the where: headshots and weak spots, crosshair centering, pre-aiming, tracking vs flicking, and aiming the gaps in someone's build.
Fortnite Tunneling Guide: Cross Open Ground Without Dying
Tunneling is how good players cross open ground while being shot at and live to fight in the next zone. It's the move-and-rebuild rhythm that turns a death-march across a field into a moving box nobody can crack. Here's how to actually do it.
Fortnite Weapon Tier List: How to Rank Any Loot Pool
Any Fortnite tier list is stale the second a patch drops. So instead of memorizing this season's gun names, learn how to rank weapons by class and role — the framework that's S-tier in every season.

Best Fortnite Settings for PC & Console
Half your settings menu is noise; a handful of options decide whether you can see, aim, and build. Here's what to change on PC and console, why, and the one number nobody else can pick for you.