Pokopia Habitat Guide: Comfort Levels and Environment Level
Four tiles of tall grass is a complete habitat, and it will pull in a Bulbasaur. But natural habitats hard-cap how happy a resident can get, and comfort is what feeds Environment Level. Here is the system underneath the cute.
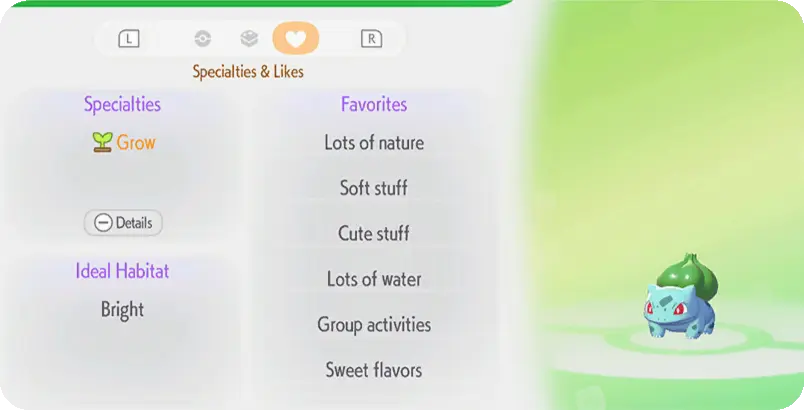
Habitat 001 in Pokopia is four tiles of tall grass. That is the entire recipe, and it will attract Bulbasaur, Charmander, Charizard, Squirtle, Oddish and Geodude. You can build it in your first twenty minutes with a single skill.
That accessibility is deliberate, and it hides how much depth sits behind it. There are 209 habitats in the base Habitat Dex, not counting event habitats added through updates, and they scale from four blades of grass to elaborate specific arrangements. The tableside delivery cart habitat, for instance, wants a Push Cart, a Chic Table, two Chic Chairs, a Small Vase and a plate of food, and it exists to attract exactly one Pokemon: Empoleon.
Attracting a Pokemon and making it happy are two different problems, though, and the second one is where most players plateau. Comfort is a separate system layered on top of habitats, and your island's Environment Level is the sum of your residents' comfort scores. Environment Level gates shop items, blueprints, and which rarer species will even consider moving in. So comfort is not decoration for its own sake — it is the progression currency.
Habitats are the whole game
The loop reads like this. You build a habitat. A wild Pokemon notices and moves in. You befriend it. It teaches Ditto a move, which expands what you can build, which lets you construct habitats you previously could not, which attracts species you previously could not reach.
Because of that chain, habitat construction is not a side activity you do once the "real" progression is done. It is the progression. A player with 40 residents has meaningfully more building capability than a player with 10, independent of playtime.

How habitats actually work
A habitat is a specific combination of items placed within a small area. Meet the recipe and the game recognizes it; a matching Pokemon can then move in. Recipes fall into two broad families:
- Natural features. Tall grass variants, flower beds, water features, elevated ground, trees, and terrain types like moss, lava, or hot springs. These are built with your terraforming skills and cost almost nothing in crafted materials.
- Furniture and structures. Tables, chairs, beds, appliances, and themed arrangements that read as a cafe, a gym, a shop, or a performance stage. These cost crafted items and are where the elaborate recipes live.
Most species accept multiple habitats, so you are rarely locked out by one missing ingredient. The Habitat Dex tracks which recipes you have discovered and which Pokemon each one draws.
Read the hints instead of guessing
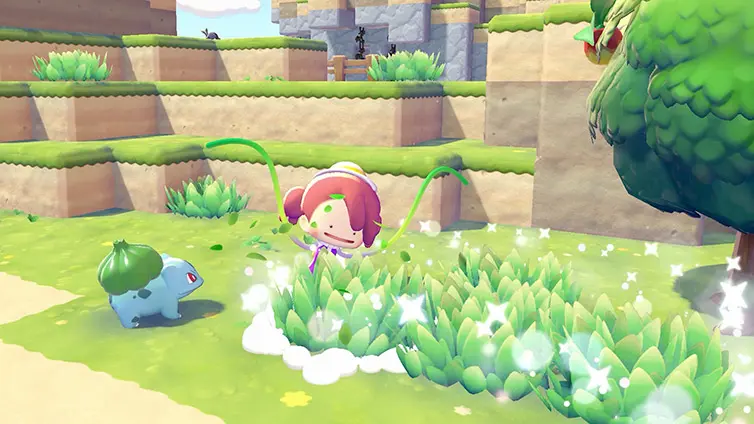
You do not have to brute-force the 209 recipes. While exploring, you will find traces of Pokemon on the ground. Interact with a trace and you get a hint about a habitat, which registers in your Habitat Dex.
This is the intended discovery path and it is easy to walk straight past, because the traces are visually subtle. Make a habit of interacting with anything that sparkles or looks disturbed. Sparkles near objects give habitat hints; sparkles in water often yield items instead.
Worth knowing: shiny spots appear more frequently on Sundays. If you want a concentrated hint-and-material farming session, Sunday is the day.
The four comfort tiers
Once a Pokemon lives with you, it has a comfort rating. Walk up to it, press A, and select Check Comfort, and it will answer with one of four ratings:
- Iffy
- Average
- Nice
- Great
Everyone starts at the bottom. Moving a resident up the ladder is entirely down to what you build around it.
The faster way to audit this at scale is the PC inside the Pokemon Center. Opening the Environment Level details screen gives you a bird's-eye view of every resident and where each one currently sits, which beats walking the island interrogating Pokemon one at a time. Once your population climbs past a couple dozen, this screen is the only sane way to find your weak spots.
The five preference categories
Comfort is driven by five preference categories, and every species has its own targets in each:
| Category | What it means |
|---|---|
| Furniture | Specific items the species likes to have nearby |
| Temperature | A preferred temperature range for the habitat |
| Humidity | A preferred moisture level |
| Light | Preferred brightness; some species want it dark |
| Food | Preferred flavors |
Hoothoot wanting darkness is the classic example — a beautifully lit build is actively wrong for it. This is the main reason a habitat that works brilliantly for one resident scores poorly for its neighbor.
Both the Pokedex entry and the Habitat Dex entry list a species' preferred ranges and favorite items. Read the entry, check the workbench, craft the specific things it wants. There is no hidden formula here, just a lookup most players never bother doing.
Your terraforming skills are the levers for the environmental categories. Water Gun and Suck Up Liquids move humidity. Lighting fixtures and placement move light. Biome and terrain choices move temperature.
Natural habitats vs houses
This is the distinction that separates a big island from a high-scoring one.
Natural habitats — grass, flowers, water — are quick, cheap, and effective at attracting residents. But they cap comfort, because there is no interior to furnish. You simply cannot satisfy enough of the five categories in an open field.
Houses cost more and give you room to work. The minimum build is four walls two blocks high, a door, and three pieces of furniture. You can also use building kits instead of placing every block by hand, though kits require you to assign a Pokemon with the relevant specialty, such as Bulldoze or Crush, to complete the project.

The efficient strategy is a two-phase approach. Early on, blanket the island with natural habitats to grow your population fast, because population equals abilities. Later, go back and convert your residents into proper houses to push comfort into Nice and Great territory.
A practical tip: build a house for Ditto too. It unlocks quick travel from the main menu, which pays for itself within a day.
Environment Level and what it unlocks
Environment Level is calculated by summing the comfort scores of every resident on your island. Two paths raise it — more residents, or happier residents — and you want both.
Hitting Environment Level milestones unlocks shop items, new crafting blueprints, and the ability to attract rarer species. That last one creates a genuine feedback loop: comfort raises Environment Level, which unlocks better furniture, which raises comfort further.
The version 1.1.0 update in June 2026 added environmental level tracking that shows daily comfort fulfillment, which makes it much easier to see whether a change you made actually helped. If you are coming back to the game after a break, that screen is the fastest way to find what regressed.
Electricity, the system nobody reads about
Some furniture requires power. Electricity comes from generators you build - mini generators, windmills, waterwheels and furnaces - and it is distributed through power lines you place. Pokemon are not a grid: a Pokemon with the Generate specialty can power a machine on the spot, but that is a specialty, not Electric typing, and the electricity guide has the generator table and the full specialty list.
This catches people out because a habitat can look complete while its powered items sit dead. If a resident's comfort is stuck lower than the build seems to justify, check whether its appliances are actually connected.
Version 1.1.0 raised the electricity item cap from 512 to 1,024, which is a meaningful ceiling lift for anyone running a large, heavily powered town.
A repeatable habitat workflow
- Terraform the plot first. Clear and shape with Rollout and Strength before you place anything you care about. Rollout is destructive and imprecise — see our Ditto transformations guide for the full skill list.
- Build the cheapest matching habitat to get the resident to move in.
- Befriend it and check its comfort to read its five preferences.
- Upgrade the natural habitat to a house — four walls, a door, three furniture pieces minimum.
- Craft its specific favorites from the Pokedex entry and place them inside.
- Tune the environment — humidity with Water Gun or Suck Up Liquids, light with fixtures.
- Connect power if anything needs it.
- Re-check comfort and confirm on the Pokemon Center PC that Environment Level moved.
Run that loop per resident rather than building ten habitats and hoping. It is slower per Pokemon and considerably faster per point of Environment Level.
New here? Start with our Pokopia beginner guide for the early-game order of operations.
Quick Action Checklist
- Build natural habitats early for population; habitat 001 is just four tall grass.
- Interact with traces on the ground to register habitat hints in the Habitat Dex; hunt them on Sundays when shiny spots are more common.
- Use Check Comfort on residents and read the Pokedex and Habitat Dex entries for their five preferences.
- Remember the tiers: Iffy, Average, Nice, Great — everyone starts at Iffy.
- Convert favorites to houses (four walls two blocks high, a door, three furniture pieces) to break the natural-habitat comfort cap.
- Tune temperature, humidity, and light, not just furniture.
- Build a house for Ditto to unlock quick travel from the main menu.
- Check power lines on any habitat with appliances before blaming the decor.
- Audit everything from the Pokemon Center PC Environment Level screen rather than walking the island.
Frequently Asked Questions
How many habitats are in Pokemon Pokopia?
What are the comfort levels in Pokopia?
How do you increase Environment Level in Pokopia?
What does a house need in Pokemon Pokopia?
Why is my Pokemon comfort not increasing in Pokopia?
Keep Reading
Related Guides
Pokopia Electricity Guide: Generators, Poles and Limits
Pokopia hands you a power grid in Bleak Beach and then never explains the numbers behind it. Four generators making 5 to 30 units each, a 20-item ceiling on every pole, a 256-transmitter wall per area, a 1,024 cap on powered items, and a short that kills a whole circuit until you add another generator. Here is the arithmetic, including the one number Serebii's own electricity page has not updated since Ver. 2.0.0.
Pokopia Water Guide: All 5 Water Types and How Flow Works
Pokopia lets you pour rivers, ponds, hot springs and lava wherever you like, and the tutorial explains almost none of the rules. Five liquids, five drinks, a 25-block trench budget, a cliff rule that hijacks a source placed within four tiles of a ledge, and one water type that regrows crafting recipes on its surface every single day.

Pokopia Cooking Guide: All 24 Recipes, Flavors and Mosslax Buffs
Pokopia cooking has no minigame, no timing bar, no skill check. That makes it look like flavor text. It is actually a move upgrade tree bolted to a daily buff dispenser, and most players sleep on the second half entirely.

Pokopia Photo Ops: All 50 Highlight Reel Shots and Frames
Pokopia's Highlight Reel is a 50-shot photo checklist, and it is where most of the game's photo frames come from. Here is every photo op, the Pokemon and prop each one needs, the 15 that pay a frame, and where Serebii and Bulbapedia disagree on the setup.

Pokemon Pokopia Beginner Guide: What To Do In Your First Hours
Pokopia does not punish you for playing badly. It punishes you for building beautifully in the wrong place before you have the tools to move it. Here is the early-game order of operations that saves you a teardown.

Pokopia Paint Guide: All 18 Colors, Patterns and Smearguru
Pokopia's paint system runs through Smearguru, a Pokemon the story never makes you meet. Here is how to unlock it, which berry makes which paint, the recipe for all 18 colors, and where every one of the 116 patterns comes from.