Grace Survival Guide: Beating Marie and the Blood Economy
Grace cannot kill Marie for most of the campaign, and her whole arsenal is two handguns. That sounds like a losing hand until you learn what light and blood actually do.

The first time Marie corners Grace in the Rhodes Hill basement, most players do the reasonable thing and empty a magazine into her. It accomplishes nothing. She regenerates, and you are now down the ammo you needed twenty minutes later.
Grace Ashcroft is the most resource-starved protagonist Capcom has shipped in years — two permanent handguns for an entire campaign, knives that shatter for good, and an unkillable stalker sharing the map with her. But Requiem gives her exactly one advantage, and once you understand it, her half of the game flips from panicked to surgical. This is the advanced layer. If you have not started yet, read the Requiem beginner guide first.
Marie Is a Light Puzzle, Not a Fight
Marie is intolerant to light. That is not flavor text — it is the entire counterplay.
She will not enter brightly-lit rooms. Grace can turn on lights in certain areas of Rhodes Hill Chronic Care Center, and doing so converts those rooms into genuine safe ground while Marie is hunting. A lit room is not a hiding spot she might check. It is a room she will not walk into.
So the correct mental model is not "evade the stalker." It is "manage the lighting state of the map." Every light switch you flip is a permanent bit of map control, and skipping them because you are in a hurry is how a Marie chase turns into a death.
Until a very specific point late in her arc — the water treatment facility near Rhodes Hill — killing her is simply not on the table. Her regenerative ability makes damage meaningless before then. Every bullet you spend on her is wasted.
What Marie Actually Is
Worth knowing, because the files explain the mechanics. Marie is also called "The Girl," "The Shadow Ghost," and Subject 170 — a genetically engineered clone brought to Rhodes Hill by Victor Gideon for t-Virus experimentation, kept in a glass cell alongside another clone, Emily.
In September 2026 she was administered 2.3ml of infected mixed blood. It gave her greatly increased physical strength but failed at its actual goal of memory inheritance. She became unstable, burrowed through the concrete wall of her cell into the basement tunnels, and claimed them. Her light intolerance is a consequence of that mutation — staff records show they resolved to install high-intensity ultraviolet lights in the basement to trap her, and they were eaten before they finished the job.
That unfinished plan is your strategy. You are executing the containment protocol the staff died attempting.
The Camera Choice Changes Her Catch Rate
This is the single most underrated setting in Requiem. The perspective toggle is not cosmetic where Marie is concerned:
- Third person — Grace occasionally stumbles and falls while running, but Marie catches her noticeably less often.
- First person — Grace never stumbles while running, but she is more vulnerable to Marie.
If you are struggling specifically with Marie chases, switch to third person for those sections. You will trade some animation friction for a measurably lower catch rate. You can flip back for exploration if you prefer first-person atmosphere — the toggle lives in the menu and is not a one-time commitment.
Running the Blood Economy Properly
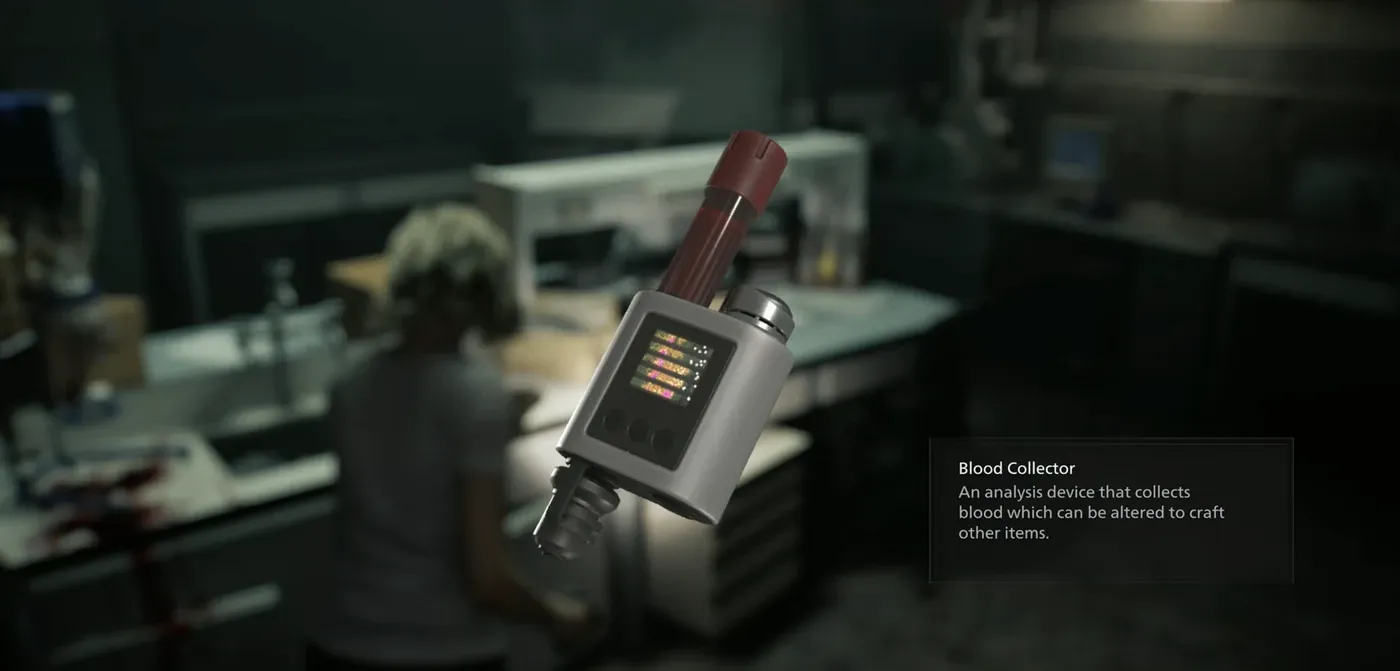
The Blood Collector was built by Anthony Richardson, Rhodes Hill's lead researcher. It harvests infected blood from three sources: killed zombies, buckets, and transfusion bags. That blood, run through a laser microscope, becomes Grace's crafting currency.
The Hundred-Blood Ceiling
The collector holds 100 blood at base. Two special items found during the campaign raise that capacity.
The ceiling is the whole strategic constraint, and here is the mistake almost everyone makes on a first run: they clear a room, then check their collector and find it capped halfway through. Every corpse after that point contributed nothing.
Invert the habit. Craft down before you clear, not after. Walk into a fight with headroom. If you are sitting at 90 and about to enter a room with five zombies, convert something first — you are about to leave 40-plus blood on the floor otherwise.
This also means the two capacity upgrades are among the highest-value pickups in Grace's campaign. They are not stat padding; they are a direct increase to how much of the map you can actually monetize.
What to Actually Spend Blood On
Blood converts into handgun ammo, Med Injectors, Hemolytic Injectors, and more. The priority order that holds up:
- Hemolytic Injectors when you are entering unknown territory or a Marie-active zone.
- Handgun ammo when you are genuinely dry — but remember that ammo you craft to shoot a zombie you could have walked past is a net loss.
- Med Injectors as a floor. Grace has low health and you will get grabbed.
- Ink Ribbons in Classic or Insanity, from an Ink Ribbon Tin plus blood.
The Hemolytic Injector Does Three Jobs
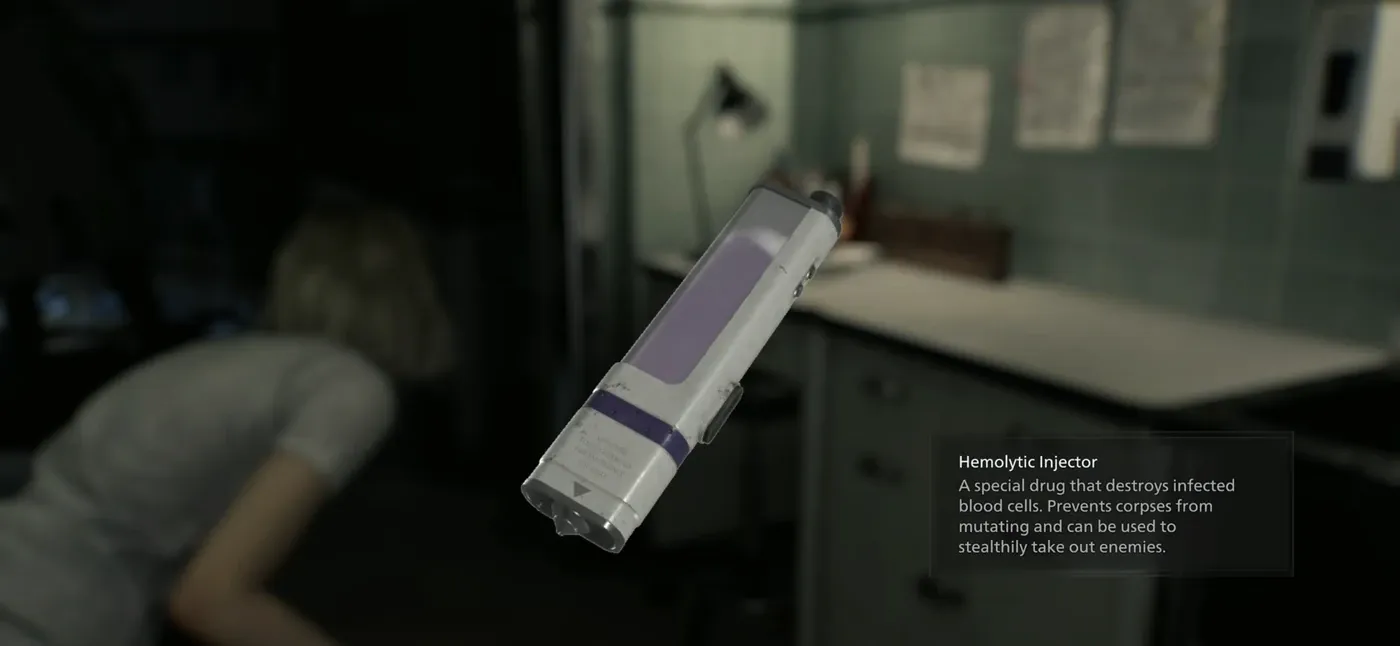
The recipe is 60 Infected Blood plus 1 Scrap. That is 60% of your base collector capacity for a single item, which should tell you how the game values it.
The first one is a pickup, not a craft — it sits on a bench on the east side of the Examination Room on Care Center 1F. It can only be found there once. Everything after that, you make.
It is a drug designed to counter Gideon's specific t-Virus strain by violently destroying infected blood cells. In practice it has three separate uses, and players who only learn one of them are leaving enormous value on the table:
- Stealth one-hit kill. Used from behind on an unaware zombie or Licker, it kills outright. The target convulses and combusts.
- Stagger tool. Used on an enemy that has already spotted you, it stuns and staggers instead. Not a kill, but a free disengage.
- Corpse insurance. Injected into a downed zombie, it suppresses the Blister Head mutation permanently.
That third use is the one that separates good Grace play from great Grace play, because it is preventative. You are spending an injector now to avoid a much worse fight on your backtrack route.
One hard number worth carrying: Chunks require three Hemolytic Injectors to kill outright if you have not meaningfully damaged them by other means. That is 180 blood. Soften them first.
Blister Heads and the Chain Reaction Problem

Blister Heads are Requiem's answer to Crimson Heads. A zombie you put down but leave intact can rise again as one — faster, stronger, more aggressive, with visible exposed brain tissue and a lengthened Licker-like tongue.
The mechanic that makes them genuinely dangerous is contagion. If the head tumor bursts, it releases infected fluid, and any infected that comes into contact with that fluid also becomes a Blister Head. Pop one carelessly in a room with three downed bodies and you have manufactured your own ambush.
Their swollen head is a weak point, so they die fast to aimed shots. But the correct play is almost always prevention:
- Destroy heads on kills you have time to finish.
- Inject corpses in rooms you know you will pass through again.
- Be deliberate about where you burst a blister. Distance from other bodies matters.
As Grace, a Blister Head you never created is worth more than one you killed efficiently.
Weapon and Durability Discipline
Grace's permanent firearms are the B934 and the stronger S&S M232. She carries the Requiem magnum temporarily during one stretch — it is the hardest-hitting thing she ever holds, and the game builds specific encounters around it. Do not burn that ammo on trash mobs.
Melee is where players bleed value. The Makeshift Knife and Hunting Knife both have durability bars and are lost permanently at zero. This is the RE2 remake rule, and it means a knife is not a weapon — it is a defensive consumable. Use it to break grabs, not to save handgun ammo.
Her stats are not fixed. Steroids raise her health and Stabilizers improve her damage, so a late-game Grace is meaningfully stronger than the one who walked into Wrenwood. Pick up every one you find. Charms also exist, granting bonuses to firepower, critical chance, knife damage, and survivability.
A permanent knife and a third handgun, Freya's Needle, both unlock after a first completion — worth knowing if you are planning an Insanity run.
Bottles Are a Real Tool
Empty Bottles are easy to dismiss as clutter. They are not. Grace can fill them to create Molotov cocktails or acid-filled bottles, and she can also simply throw them as distractions.
Distraction throwing is the most ammo-efficient tool in her kit. Pulling a zombie off your route costs one bottle. Killing it costs four handgun rounds and a corpse you now have to inject. The math is not close.
Acid bottles matter specifically because of one enemy type, which brings us to ARK.
Lickers and the ARK Problem
Lickers return in Requiem, and they appear during the ARK segment — Oswell E. Spencer's secret laboratory beneath Raccoon City, which survived the 1998 missile strike.
Leon handles Lickers easily. Grace does not. Her two options are:
- Sneak past them entirely. They are blind and sound-driven, as always.
- Use acid bottles, which deal heavy damage to them.
A Hemolytic Injector from behind also works as a stealth kill on a Licker, same as on a zombie. If you have been hoarding injectors, ARK is where that pays off.
Ink Ribbon Management in Classic and Insanity
On Standard (Classic) and Insanity, Grace needs an Ink Ribbon to save at a typewriter, and autosaves are far less frequent than on Modern.
The relief valve is that Grace obtains a recipe to craft ink ribbons from an Ink Ribbon Tin plus a quantity of blood. So ribbons are not strictly finite — they compete with ammo and injectors for the same currency.
That reframes the decision. Every save is priced in blood. The discipline that works: save after clearing a section and before entering an unknown one, and do not save reflexively after minor progress. On Insanity, where resource scarcity and enemy damage are both maxed, this is the difference between a run that survives and one that softlocks itself into an unwinnable state.
For the other half of the campaign, where the economy runs on kill credits instead of blood, see the Leon combat and Supply Box guide. Everything else lives on the Resident Evil Requiem coverage hub.
Quick Action Checklist
- Do not shoot Marie. She regenerates and cannot be killed until the water treatment facility.
- Flip every light switch in Rhodes Hill. Lit rooms are ground Marie will not enter.
- Switch to third person for Marie chases — she catches Grace less often, at the cost of occasional stumbles.
- Craft before clearing a room so you never cap out at 100 blood mid-fight.
- Prioritize the two Blood Collector capacity upgrades.
- Memorize 60 Infected Blood + 1 Scrap for a Hemolytic Injector.
- Use injectors three ways: stealth kills, staggers, and corpse insurance against Blister Heads.
- Budget three injectors for a Chunk, or soften it first.
- Never burst a blister next to other downed bodies — the fluid converts them.
- Treat knives as grab-breakers only. They break permanently.
- Throw bottles to reroute zombies instead of spending ammo.
- Save acid bottles and injectors for Lickers in ARK.
- On Classic and Insanity, price every save in blood and only spend before unknown territory.
Frequently Asked Questions
Can you kill Marie in Resident Evil Requiem?
How do you avoid Marie in Resident Evil Requiem?
What is the Hemolytic Injector recipe in Resident Evil Requiem?
How do you stop zombies turning into Blister Heads?
How many Hemolytic Injectors does a Chunk take to kill?
Keep Reading
Related Guides

Leon Must Die Forever Guide: Enhancers, Ranks, and Routes
Requiem shipped without a Mercenaries mode. Three months later Capcom dropped one for free, and it is stranger and meaner than the one you were expecting.

Resident Evil Requiem Story and Setting: What Is Confirmed
Requiem is the ninth mainline Resident Evil, and it finally goes back to Raccoon City. Here is what Capcom has actually confirmed about the story, separated from the guesswork.

Resident Evil Requiem Beginner Guide: Your First Five Hours
Requiem is two games wearing one trench coat, and the settings you pick in the first ten minutes shape both of them. Here is what actually matters before you start.

Which Resident Evil Games Should You Play Before Requiem?
You do not need to play nine games to understand Requiem. You need one, maybe two. Here is the honest catch-up list, what each one actually sets up, and what you can skip without missing anything.
Resident Evil Requiem Challenges: All 62 and What CP Actually Buys
Infinite ammo costs 50,000 CP. Forty-six of Requiem's fifty-one story challenges, combined, pay 35,000. The unlock economy is front-loaded onto five brutal runs, and nobody tells you that up front.

Resident Evil Requiem Release Date, Platforms and Editions: What Is Confirmed
When Requiem launched, which platforms it hit, what the three editions actually cost, and the confirmed PC specs — the buyer-facing facts, stripped of the guesswork.