Leon Must Die Forever Guide: Enhancers, Ranks, and Routes
Requiem shipped without a Mercenaries mode. Three months later Capcom dropped one for free, and it is stranger and meaner than the one you were expecting.

Requiem launched in February without a Mercenaries mode, and the internet did what the internet does. Then on May 8, 2026, Capcom dropped Leon Must Die Forever as a free update on PS5, Xbox Series X and S, PC, and Switch 2 — and it is not Mercenaries. It is a no-checkpoint, timer-driven, roguelite-flavored gauntlet where dying does not send you back to a wave, it sends you back to the start.
That structural difference is the whole reason people bounce off it. This is how the mode actually pays you, and how to stop losing runs to a clock instead of a monster.
Mild spoiler warning: this mode is post-campaign content and names a late-game boss. If you have not finished the story, go read the Requiem beginner guide instead and come back.
What Leon Must Die Forever Actually Is
You play Leon. The goal is to reach and kill Victor Gideon before the timer runs out. In between, you cross reworked versions of areas you already know from the campaign — Wrenwood, the care center, Raccoon City — populated with tougher enemy variants.
You start on Main Street in Wrenwood and pick where to go next through glowing red doors. Each area advertises its own recommended difficulty and enemy mix, so the map is a risk menu, not a corridor. There are no checkpoints — death is a full restart.
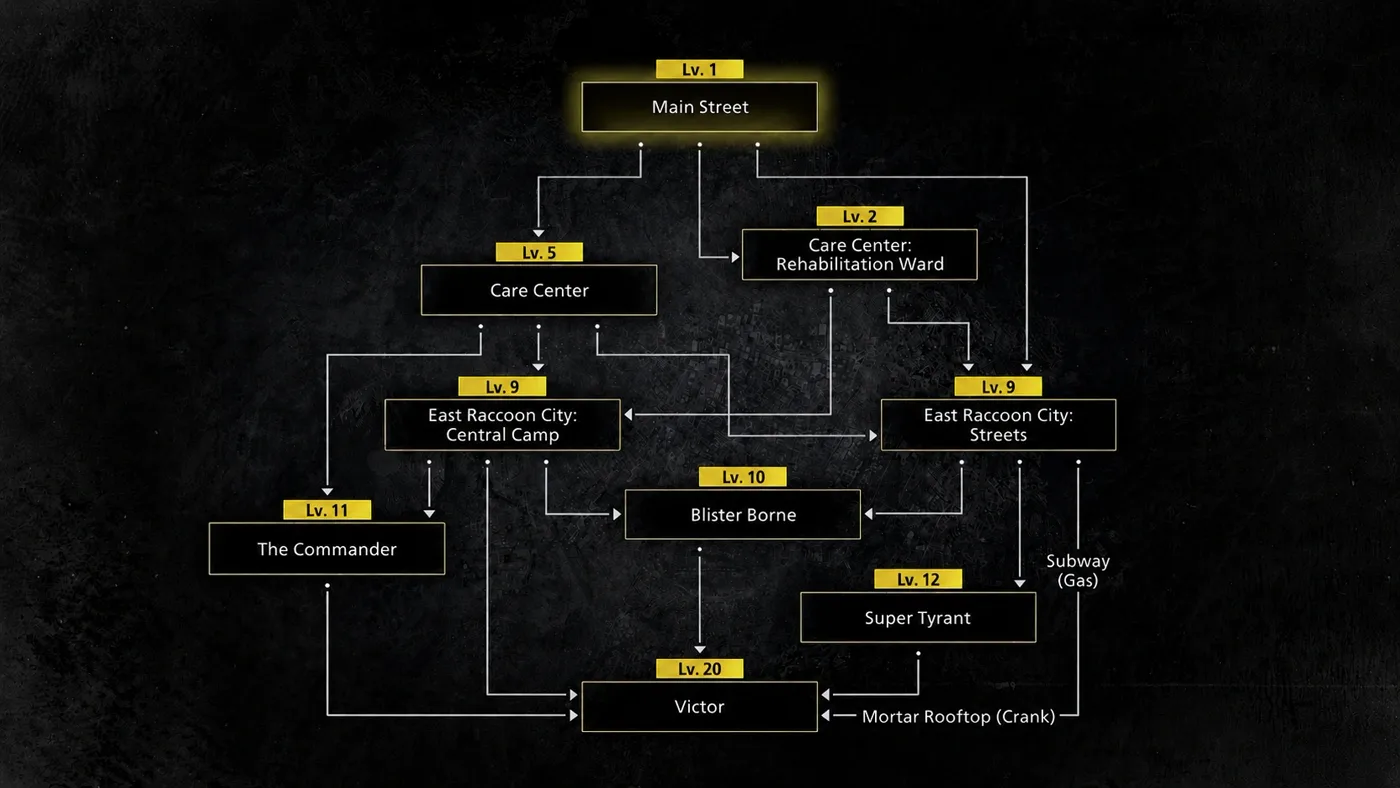
Enemy spawn points, health values, and variants are fixed. That is the single most useful fact about the mode, and it is why it rewards repetition rather than luck. What varies between runs is your build and your routing.
How You Unlock It
Finish the main campaign. That is the entire requirement. The mode then appears under Extra Games at the main menu, alongside the challenge list.
The Timer Is the Boss, Not the Boss
New players die to Victor. Experienced players lose to the clock, which is by far the more common way to end a run. The mode is built around one resource — time — and everything else is a way to buy more of it or spend it faster.
Spinners Are Your Clock
Scattered across the areas are shootable Spinners that extend your remaining time, and their values are not close to equal:
- Midas Spinner — 70 seconds.
- Aurora Spinner (Emerald) — 120 seconds.
- Aurora Spinner (Silver) — 85 seconds.
- Aurora Spinner (Bronze) — 50 seconds.
An Emerald Aurora is worth nearly two and a half Bronze ones. Learn where they sit — spawns are fixed, and a route that grabs two Emeralds is a fundamentally different run from one that grabs two Bronzes. There is also a Basic enhancer, Chronos Shot, giving a 20% chance of +3.0 seconds per kill, described as a hidden feature of Leon's auto chrono watch.
Fixed weapon crates are ranked one to three stars, with contents rolled from a pool tied to that rank. Three-star crates are worth a detour early, when your loadout is still a pistol and a hatchet.
Cloud 9 Turns Kills Into Build Pieces
You begin every run holding the Blood Collector: Cloud 9. It is a direct riff on Grace's device from the campaign — if you never internalized that economy, the Grace survival and blood guide covers the original — except here the collected value is not ammo currency. It is build currency.
Kill enemies continuously to raise the Collector's value, then exchange it for Enhancers, which come in four tiers: Basic, Bronze, Silver, and Gold. Rarer means stronger, and it also means weirder.
Slot Expansions Are the Hidden Priority
You start with 8 enhancer slots, two of them locked. The keys are Slot Expansions, randomly scattered around each area — the one genuinely random element in a mode that is otherwise deterministic.
Two extra slots does not sound like much until you realize the Gold enhancers are designed to be paired with something that patches their downside. Running six slots means running Gold effects naked. Grab expansions on sight.
Enhancers Are Trades, Not Upgrades
This is the part people get wrong. Almost nothing in the enhancer pool is a straight buff. The Basic tier is flat — Handgun +, Long Gun +, Combat +, Throwing +, Concentration + are all small percentage bumps in the 10-15% range, plus two one-shot utilities (Hatchet Repair and Med Injector) that do not occupy a slot at all. Take those two whenever offered; they are free.
Everything above Basic charges you for the power.
The Bronze and Silver Picks Worth Taking
- Sharpshooter — +50% headshot and weak point firepower, -30% otherwise. Only good if you can actually hit heads under pressure.
- Deadeye — +50% with a sight or scope equipped, -30% without. A loadout decision, not a combat one.
- Axe the Axe — +60% firepower while the hatchet is not equipped. Excellent on gun runs, actively harmful on melee ones.
- Parry Recovery — a perfect parry restores 40% of your hatchet durability. This is what makes hatchet builds sustainable.
- Soul Sucker — 10% of max health back on every kill. The most reliable survivability pick in the mode.
- Bulletproof — -50% from gunshots, explosions, and fire, +20% from close combat. Tough Stuff is the exact mirror. Pick based on the area you are routing through, not on instinct.
- Bloodshot (Silver) — +80% firepower, but you take 10% of the damage you deal. A speedrun tool and a suicide note in equal measure.
- Amped Up (Silver) — a recovery item grants temporary total damage and stagger immunity. Chaining items does not extend it.
- Streamlined (Silver) — +1.5% attack per empty attaché case slot. It quietly rewards the same inventory discipline the Leon combat guide preaches for the campaign.
The Three Gold Enhancers
There are only three, and each one is a personality:
- Unyielding Judge — when near death, for 30 seconds: +150% attack, zombies explode on death, and attacks consume no ammo or durability. A comeback button disguised as a passive.
- Phantom Assassin — +100% firepower and a higher chance of firearm finishing attacks, at -50% close combat power. The pure gun build.
- Lone Berserker — +500% close combat power with a chance for any melee hit to become a finisher, at -50% firepower. Powerful attacks will not convert to finishers.
Note that Phantom Assassin and Lone Berserker are mutually exclusive in practice. Pick a lane before you pick a Gold.
Enemy Colors Change the Correct Answer
The mode color-codes its tougher variants, and ignoring that is how good builds still lose:
- Red variants resist gunfire. They can only be critically wounded with explosives, melee, or gas canisters.
- Blue variants are only vulnerable through parrying their attacks.
Read that again with the enhancers in mind. A Phantom Assassin gun build walks into a Blue-heavy room with the wrong answer in its hands. This is the argument for keeping the hatchet relevant even on a shooting run, and it is why Parry Recovery is better than its Bronze tier suggests.
Each stage also fields its own bosses, including Blister Borne, The Commander, and T-501.
The Short Route to Victor
The fastest documented path is short and it is not subtle:
Main Street → Care Center: Rehabilitation Ward → East Raccoon City: Central Camp → Victor.
The strategy that goes with it: loot every weapon chest across those three stages, and avoid essentially every enemy you are not forced to fight before the final level. You arrive at Victor thin on resources, which is fine if you can parry his attacks reliably. If you cannot, that route is a fast way to see the restart screen.
The trade is clear. Fighting builds your Collector and your enhancers; running preserves your clock. The speedrun route bets everything on the parry.
The Five Ranks and the Loadouts They Pay Out
Completing a cycle advances your Forever Rank, up to a maximum of Rank 5. Rank is both the difficulty knob and the unlock track, and the rewards are alternate loadouts with a built-in accessory-exclusive enhancer:
- No-Frills (default) — Alligator Snapper plus Hatchet. No enhancer ability. Described in-game as "The real Leon."
- Wolf Mode (clear Rank 1) — Stiri REVO3 A1 plus Hatchet, with Surveyor: 20% chance of +3.0 seconds per kill, and attack power stacks with each extension, up to +50%.
- Turbo GT (clear Rank 2) — MSBG 500 Shotgun plus Hatchet, with Strategist: strike back quickly after being hit to heal a share of the damage you deal.
- Hot Fuzz (clear Rank 3) — Classic 70 plus Hatchet, with Big Game Hunter: firepower scales up as you hit and down as you miss, capped at +50% and -30%.
- Axe-orcist (clear Rank 5) — Hatchet only, with Maverick: perfect parries recover hatchet durability and stack close combat power to a genuinely absurd +2000%, at -40% firepower and -50% durability loss.

Wolf Mode is the sensible early unlock because Surveyor attacks the mode's actual bottleneck — the clock — and pays you attack power for doing it. Axe-orcist is the trophy: a hatchet, no gun, and a melee multiplier that only functions if your parry timing is perfect.

Challenges Actually Worth Chasing
The mode has its own challenge block that feeds CP into the Special Content shop. The heavy hitters:
- Victor Must Die Now — defeat Victor on Forever Rank 3 or higher. 35,000 CP, the biggest single payout in the mode.
- Leon's Limbo — on Rank 3 or higher, survive 40 minutes and kill 110 enemies before reaching Victor. 15,000 CP.
- Leon's Purgatory — beat Victor on Rank 3 or higher without using any slot expansions. 15,000 CP.
- Leon's Inferno — on Rank 3 or higher, land 5,000 damage on the Super Tyrant in a single hit. 15,000 CP.
- Same City, Different Tyrant — beat the Super Tyrant on Rank 2 or higher. 10,000 CP.
- Going Door-to-Door — use every glowing door across all maps. 5,000 CP, and it is the one that quietly teaches you the map.
Note the shape of that list. Limbo wants you slow and violent, Purgatory wants you underbuilt, and the speedrun route wants you fast and empty. Do not try to farm them in one run.
Quick Action Checklist
- Finish the campaign first. The mode lives in Extra Games and does not exist before that.
- Treat the timer as the boss. Route toward Emerald Auroras (120s) before Bronze ones (50s).
- Take Hatchet Repair and Med Injector on sight — they are one-shot and cost no slot.
- Grab every Slot Expansion. Eight slots with two locked is not enough to run Gold safely.
- Pick a lane: Phantom Assassin for guns, Lone Berserker for melee. Never both.
- Keep a parry answer available. Blue variants are immune to everything else.
- Bring explosives, melee, or gas canisters for Red variants.
- Learn the fixed spawns. Nothing about enemy placement is random, so a lost run is data.
- Speedrun route: Main Street → Rehabilitation Ward → East Raccoon City Central Camp → Victor. Loot chests, skip fights, parry the boss.
- Unlock Wolf Mode early — Surveyor buys the resource you are always short of.
- For where this all sits in the wider fiction, the Requiem story and setting breakdown is the spoiler-light version.
Frequently Asked Questions
How do you unlock Leon Must Die Forever in Resident Evil Requiem?
What is the goal of Leon Must Die Forever?
How do enhancers work in Leon Must Die Forever?
What is the fastest route in Leon Must Die Forever?
How many ranks does Leon Must Die Forever have and what do they unlock?
What are the red and blue enemy variants in Leon Must Die Forever?
Is Leon Must Die Forever the same as Mercenaries?
Keep Reading
Related Guides

Grace Survival Guide: Beating Marie and the Blood Economy
Grace cannot kill Marie for most of the campaign, and her whole arsenal is two handguns. That sounds like a losing hand until you learn what light and blood actually do.
Resident Evil Requiem Challenges: All 62 and What CP Actually Buys
Infinite ammo costs 50,000 CP. Forty-six of Requiem's fifty-one story challenges, combined, pay 35,000. The unlock economy is front-loaded onto five brutal runs, and nobody tells you that up front.

Resident Evil Requiem Beginner Guide: Your First Five Hours
Requiem is two games wearing one trench coat, and the settings you pick in the first ten minutes shape both of them. Here is what actually matters before you start.

Leon Combat Guide: The Supply Box Economy in RE Requiem
Leon has a full arsenal and an in-game store, which sounds generous until you realize the store only takes a currency you have to opt into earning.

Which Resident Evil Games Should You Play Before Requiem?
You do not need to play nine games to understand Requiem. You need one, maybe two. Here is the honest catch-up list, what each one actually sets up, and what you can skip without missing anything.
Resident Evil Requiem Release Date, Platforms and Editions: What Is Confirmed
When Requiem launched, which platforms it hit, what the three editions actually cost, and the confirmed PC specs — the buyer-facing facts, stripped of the guesswork.