PUBG Karakin Map Guide: Black Zone, Breaches & Drops
Karakin is PUBG's 2x2 desert pressure cooker — 64 players, no vehicles, and a Black Zone that deletes whole compounds mid-match. Here's where to drop, how to breach, and how to not get blown up by your own map.
Most PUBG maps want to kill you with other players. Karakin wants to kill you with the map itself. It's the 2x2 km desert island where the buildings you're hiding in can get demolished mid-match, the walls are full of breach points, and there are exactly zero vehicles to bail you out. If Sanhok is speed chess, Karakin is speed chess where the board occasionally explodes.
This is the 5th map PUBG released, and it's the most mechanically distinct one in the rotation — the first map to ship the Black Zone, the first to lean hard on breaching and tunnels, and one of only two maps that drops the lobby to 64 players instead of 100. That smaller count plus the tiny footprint means fights start fast and stay close. People who bounce off Karakin almost always do it because they brought their Erangel patience to a map that punishes standing still. Here's the real guide: the layout, the Black Zone, breaching, the tunnels, the best drops, and how to win an endgame that ends before you're ready for it.
The map that shoots back
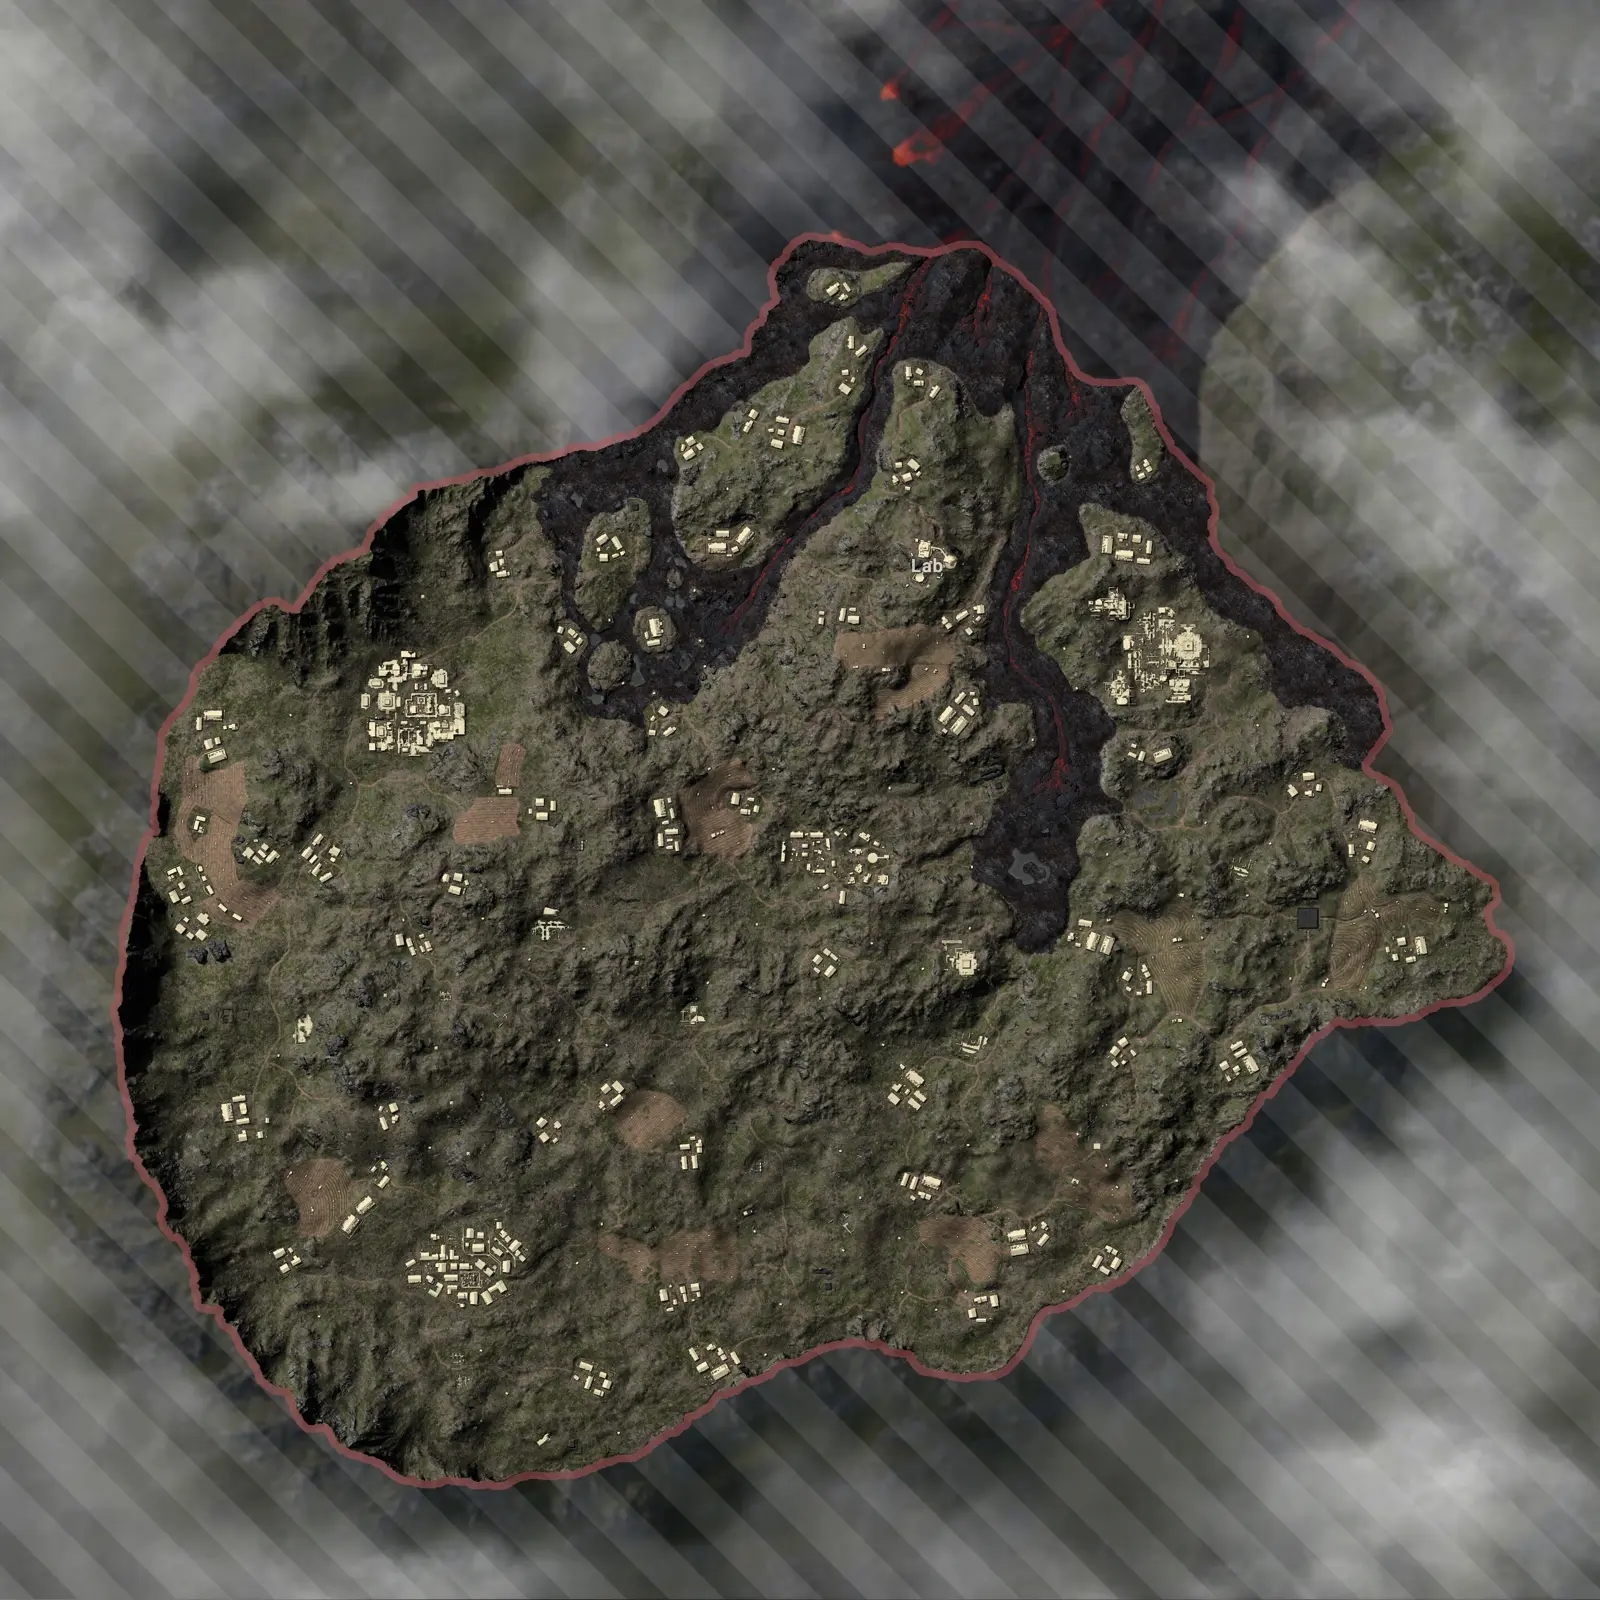
Karakin (codename Rapide) is a 2x2 km island off the coast of North Africa — arid, rocky, dirt and sea, no trees to speak of. It's the same size as the old original Sanhok footprint but it plays nothing like a jungle map. PUBG's own pitch for it was "the tension of Miramar combined with the pace of Sanhok," and that's accurate: open rocky sightlines that reward mid-range gunplay, packed into a space small enough that you're always close to a fight.
The headline difference is the player count. Karakin runs 64 players, not 100, which on a 2x2 map still means a dense lobby but gives you a touch more breathing room than the raw size suggests. Combine the low count with the lack of vehicles and a Black Zone that reshapes the terrain, and you get a map that feels less like a battle royale and more like a fast, brutal raid. You drop, you gear, you fight, and you're usually dead or top-ten inside fifteen minutes.
If you want the broader picture of where this map sits against the rest, our best PUBG maps ranked breakdown puts Karakin in context with the 8x8s and the other small maps.
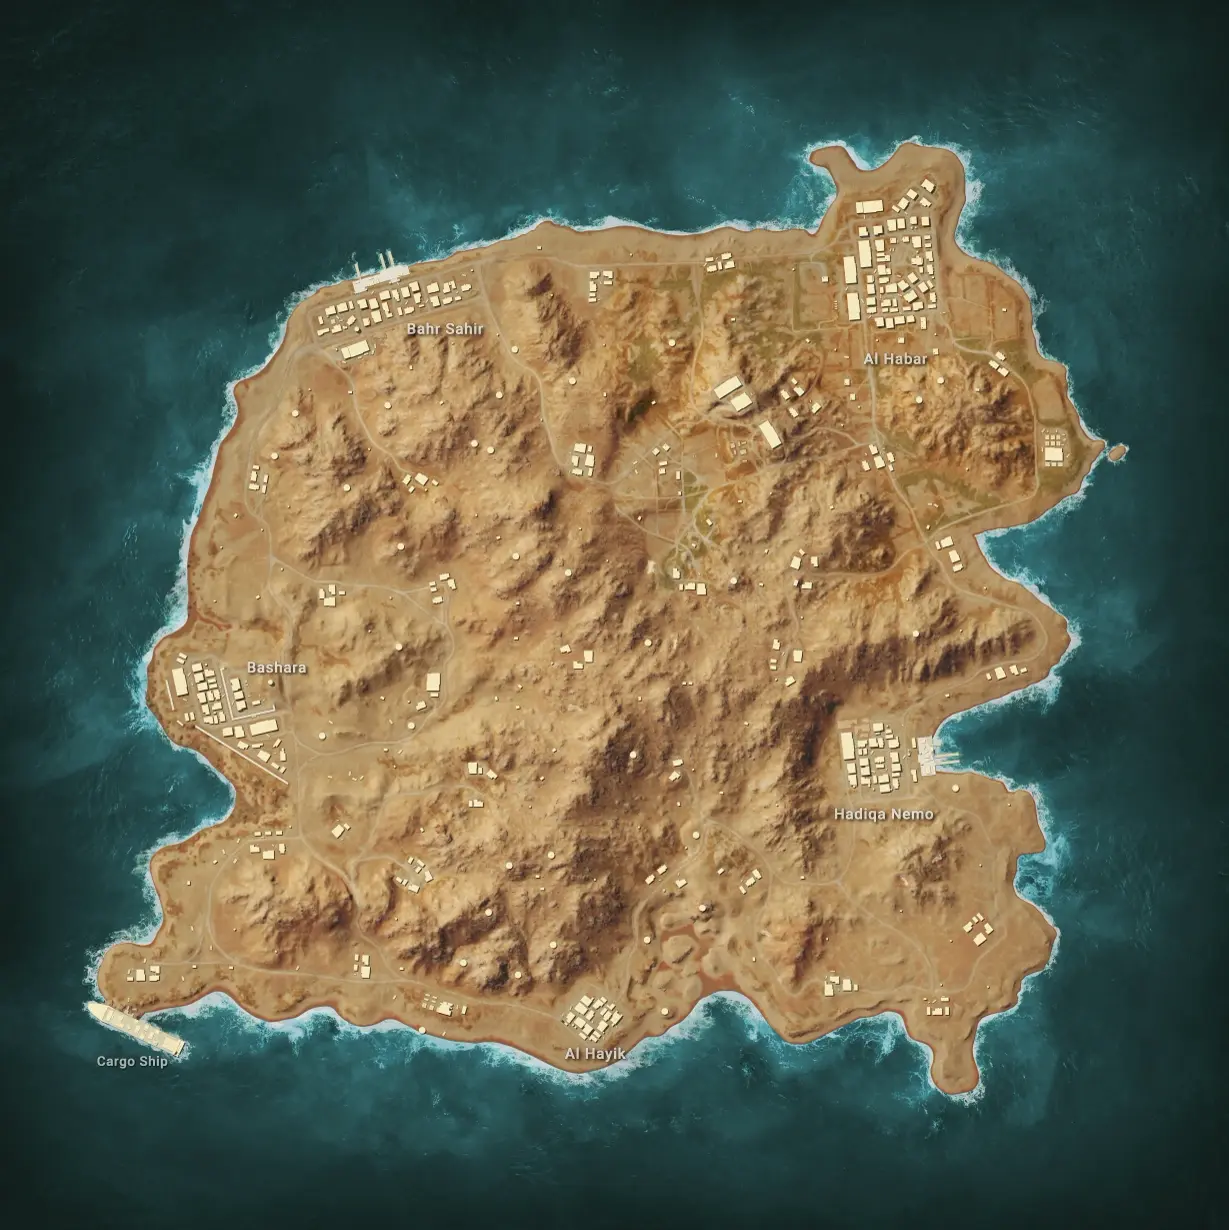
How Karakin is laid out
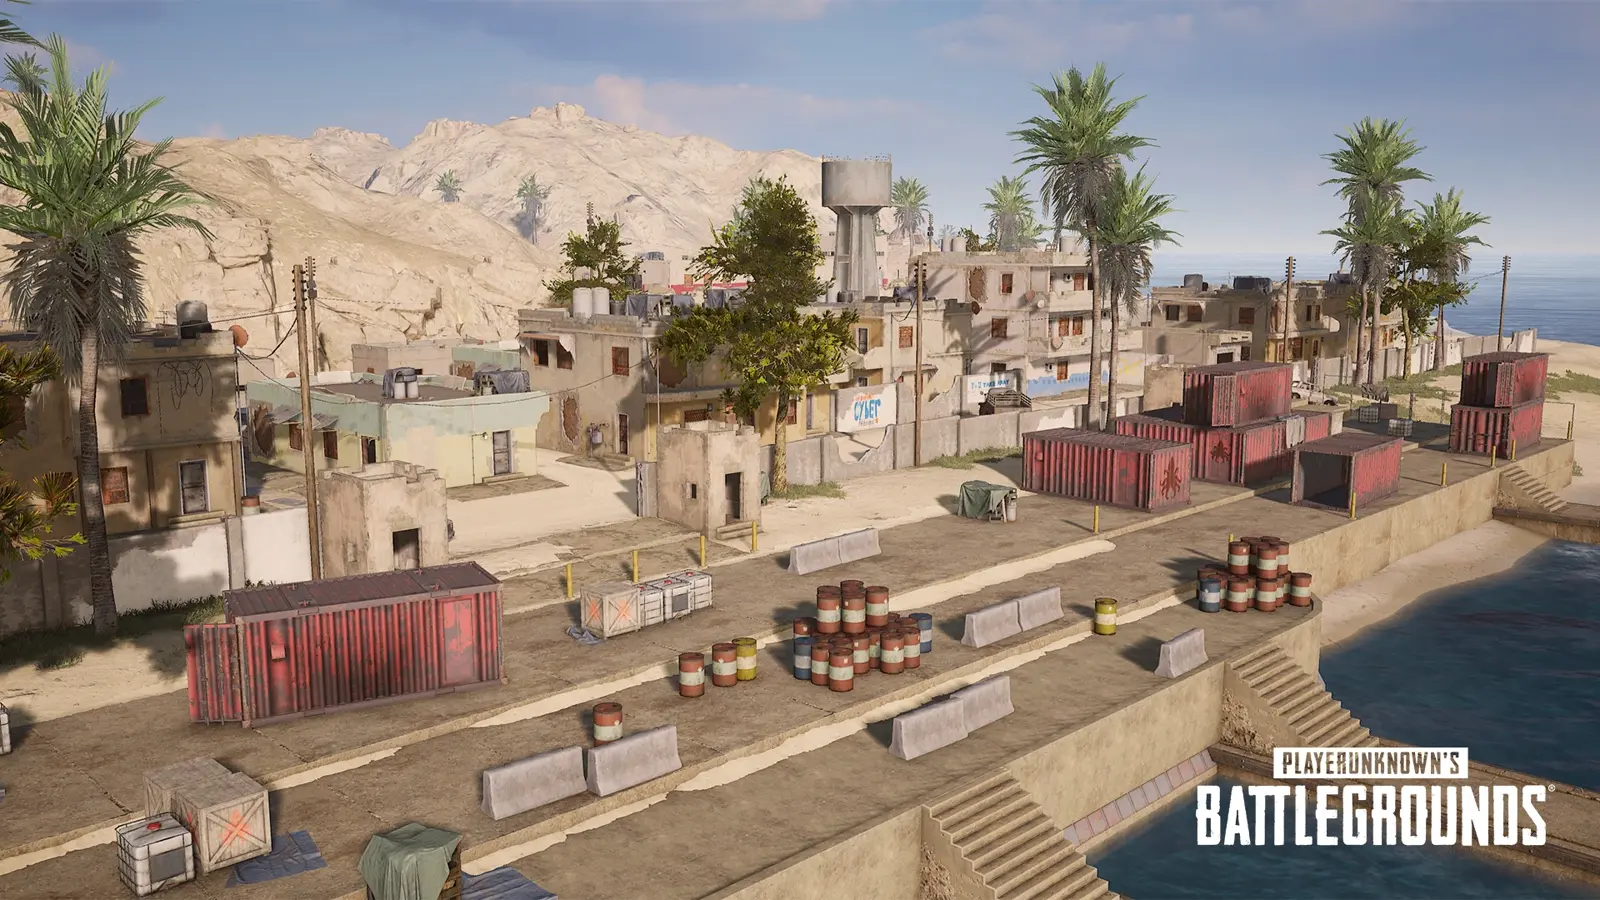
Karakin is built around four main towns and a scatter of smaller compounds, all packed onto a single rocky island cut by canyons and ridgelines. Because there are no vehicles, the layout matters more here than almost anywhere — your drop choice basically decides your first three minutes of rotation, on foot, the whole way.
The named locations you actually need to know:
| POI | Where | What it is |
|---|---|---|
| Al Habar | Northwest | Large coastal town, top-tier loot, frequent early fights |
| Bahr Sahir | Center / south | Big central town, contested, sits near most circles |
| Bashara | East | Dense compound town with strong loot and tunnels nearby |
| Hadiqa Nemo | South coast | Coastal town, good gear, slightly quieter |
| Al Hayik | North | Smaller settlement, decent loot with less traffic |
| Cargo ship | Offshore | Beached ship landmark with concentrated loot |
Between the towns are rocky hills, dry canyons, and the bunkers that lead into the tunnel network. The mental model: a handful of dense desert towns with brutal mid-range sightlines between them, no cars to cross those sightlines, and a tunnel system underneath for the players who know it's there.
The Black Zone, explained
The Black Zone is the thing Karakin is famous for, and it's the first mechanic of its kind PUBG ever shipped. At intervals during the match, a randomly chosen area on the map gets flagged with a black overlay, a warning siren goes off, and then — boom — every building inside that zone gets bombarded and reduced to a demolished shell. Anyone caught inside without overhead cover dies. The layout literally changes every match.
What this means for you in practice:
- Watch for the black overlay and the siren. When a Black Zone is incoming, you get a warning and a clearly marked area. If you're standing in it, you have seconds to get out or get under hard overhead cover. This is the one PUBG mechanic where the safest move is sometimes "leave the building immediately."
- It denies camps. The Black Zone exists specifically to stop teams from turtling in a strong compound all match. If you're holding a building too passively, the map will eventually come for you. Use it as a reason to stay mobile.
- It rewrites cover mid-fight. A compound that was a fortress thirty seconds ago can become a pile of rubble. Demolished buildings still offer some low cover among the debris, but the roof and the walls you were relying on are gone. Re-read every fight after a bombardment.
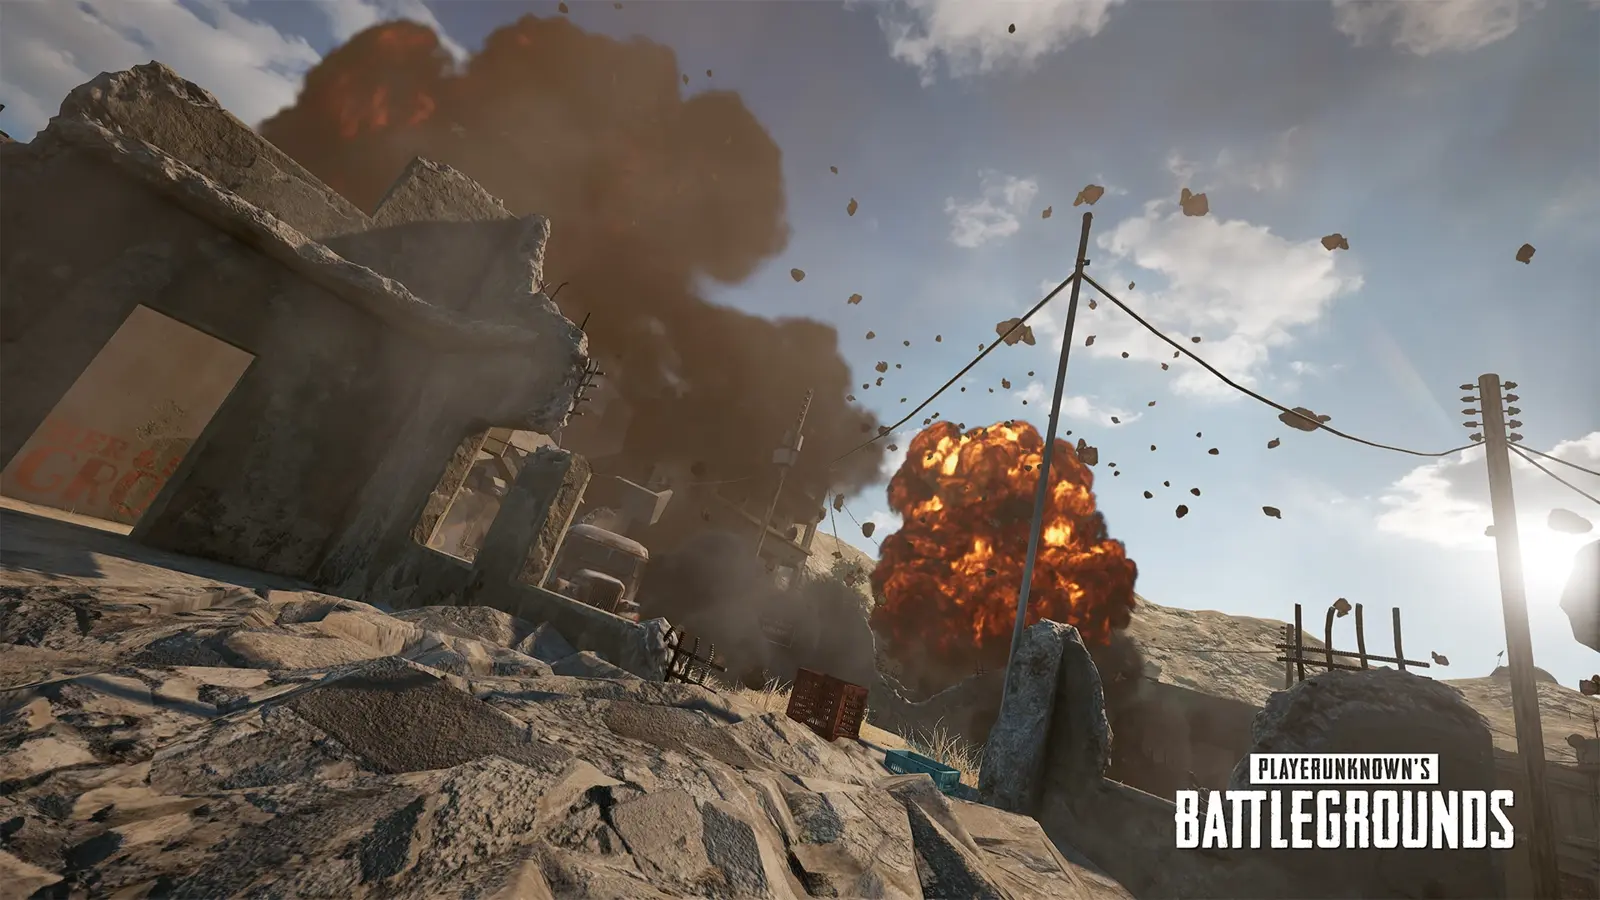
The Black Zone is also why Karakin punishes Erangel habits so hard. On the big maps, finding a strong house and holding it is a legitimate strategy. On Karakin, "find a strong house and hold it" is a countdown to getting bombed. Play it like the floor is lava, because periodically the ceiling is.
Breaching walls and sticky bombs
Karakin is the breaching map. Certain walls in the towns are breach walls — destructible sections you can blow open with explosives to create new entrances, flank routes, and firing angles. PUBG designed them to look distinct so you can tell a breach wall from a solid one without it looking cartoonish, and learning to read them is a real edge.
There are two destruction systems working together:
- Breach walls + Sticky Bombs. The map's signature throwable, the Sticky Bomb, is what you use to blow open breach walls and bunker entrances. Stick it, back off, and you've made a door where the enemy expected a wall. This turns a building defense inside out — the team holding a room can suddenly have a hole opened behind them. Hoard sticky bombs; they're the map's most important utility.
- Drywall and bullet penetration. Some interior walls are thin "drywall" sections you can shoot straight through. They're deliberately designed to look penetrable, so you can spray a known position through the wall, or hear and catch glimpses of enemies you normally couldn't. Don't assume a wall between you and a sound cue is solid cover — on Karakin it might be a drywall section you're already visible through.
The takeaway: Karakin rewards aggression with explosives in a way no other map does. If you're treating walls as fixed cover, you're playing the map wrong. For the wider grenade and utility game that this map cranks up to eleven, our PUBG throwables and utility guide covers how to actually use a full nade loadout.
The smuggler tunnels
Underneath Karakin runs a network of smuggler tunnels, and they're one of the best-kept advantages for players who learn them. You access them through bunkers scattered around the map — but you usually have to blow open the bunker wall with a Sticky Bomb to get in. Once inside, the tunnels let you cross rocky areas under cover, flank a town from below, or relocate without exposing yourself on the open ridgelines.
Two things the wiki makes clear and most players forget: not every bunker leads to a tunnel, and not all the tunnels connect to each other. So the tunnels aren't a free citywide subway — they're individual stealth routes. Use them to:
- Approach a contested town from an unexpected underground entrance instead of walking into the obvious sightlines.
- Break contact and reposition when you're getting pinned in the open, since Karakin has no vehicles to escape in.
- Set ambushes, because most opponents don't check the tunnels and won't expect a flank from below ground.
The trade-off is that you're committing to a fixed route with limited exits, so getting caught in a tunnel by a team that knows where it ends is a death sentence. Treat them as scalpel tools, not highways.
The best drops
On a 64-player 2x2, every named town is contested, but they sort into tiers by how violent the opening minute is.
Al Habar in the northwest and Bahr Sahir in the center are the premier hot drops — big towns with excellent loot density that pull a crowd every match. Bahr Sahir in particular sits close to most circles, so you fight for it and then you're already centered. These are your spots if you want fights and fast gear, and they're where breaching and sticky-bomb play shines because the building-to-building combat is constant.
Bashara in the east is the breacher's playground — a dense compound town with strong loot and tunnel access nearby, which makes it a fantastic spot to practice the map's signature mechanics. It's hot, but the layered buildings and breach routes reward players who've put in the reps.
Hadiqa Nemo on the south coast and Al Hayik in the north are the comparatively calmer options. You'll still likely see a team or two, but you can usually gear up before the full lobby finds you, then rotate in on your own terms. The Cargo ship offshore is a high-loot landmark for squads willing to commit to a contained, vertical fight with limited escape — great gear, but you're exposed getting on and off it.
The honest read, same as every small map: "safe" on Karakin is relative. With 64 players on 2x2 and no cars, the early circle puts teams almost everywhere. The edge towns shift the odds; they don't promise quiet. If you want the cross-map version of this, see our best PUBG landing spots rundown.

The 64-player loadout and tempo
Karakin's gunplay sits between Sanhok and Miramar: mid-range across rocky open ground, with CQC inside the towns. The loot pool has been tuned over patches to fit — PUBG added the G36C and MP5K to the map, increased First Aid Kit and boost-item spawns, and trimmed back DMR, sniper, and Win94 spawn rates. The map wants you fighting at AR and SMG range, not perched on a hill with a bolt-action all game.
How to build and play it:
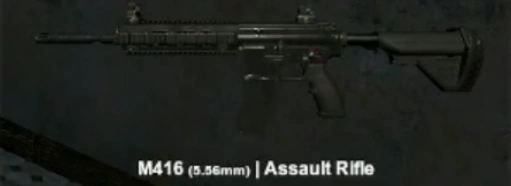
- Run a mid-range AR plus a close-range secondary. An M416 or AKM (or the map's own G36C) with a red dot or 2x to 4x, paired with an SMG like the MP5K for clearing buildings, covers nearly every Karakin engagement. The towns are close; the gaps between them are not.
- Hoard explosives. Sticky Bombs for breaching and bunkers, frags for clearing rooms, smokes for crossing the open ground between towns with no vehicle to hide behind. On Karakin, your utility belt is half your kit.
- Stock meds — they spawn more here. With boosted First Aid Kit and boost-item rates, there's no excuse to be running low. Stay boosted, because the constant fights mean you're always recovering from the last one while running into the next.
- Loot fast, fight faster. Like Sanhok, the gear comes quick and the fights come quicker. Grab essentials, then commit. Bodies are your best loot crates on a map this dense.
Rotations without vehicles
This is the part that breaks newcomers: Karakin has no vehicles. Every rotation is on foot, across open rocky terrain, while the circle closes on a small map. That changes the entire calculus.
- Plan the route, not just the destination. Without a car, you can't out-drive a bad position, so you have to out-think it. Look at the next circle, pick a path that uses canyons and ridges for cover, and start moving early — being caught in the open on Karakin with no vehicle is how most non-combat deaths happen.
- Use canyons and tunnels as your cover lanes. The dry canyons cutting the island are your roads. Move through low ground and break line of sight on the ridges. Where a tunnel runs your direction, it's the safest way to cross.
- Smoke is your vehicle. Since you can't drive across a sightline, you throw smoke across it instead. A good smoke wall is the closest thing Karakin gives you to cover on the move. Carry several.
- Respect the Black Zone while rotating. Don't path your rotation straight through a building you'll want to shelter in if a Black Zone triggers — and never get pinned mid-open-ground when one goes off near you.
Reading the fast endgame
Karakin endgames are short, close, and explosive. The small map, low player count, and lack of vehicles mean the final circles arrive fast and almost always land you in or near a town, which means breaching, grenades, and close-range gunfights decide everything.
What to look for as the circle closes:
- Be set in cover early. With no car to make a late rotation, getting caught out of position in the final circles is fatal. Claim your endgame cover before the scramble — and prefer hard cover that won't get bombed.
- Win the close range with utility. Final fights here are tight. Sticky Bombs to breach a held room, frags to flush an entrenched team, smokes to cross the last gap — the team with the deeper utility belt usually wins. Raw aim matters less than your nades.
- Account for the Black Zone even at the end. A late bombardment can erase the building a team is holding. If you're the one being held out, sometimes the map does the breaching for you — read it and be ready to push the rubble.
- Don't camp; you'll get bombed or pushed. Karakin is allergic to passive play start to finish. The endgame rewards the team that controls space and utility, not the team hiding in the strongest-looking house.
For the universal zone-reading framework that underlies all of this, our PUBG endgame circle strategy goes deeper on circle prediction and final-circle positioning. Karakin just runs that playbook with explosives and no escape vehicle.
Quick Action Checklist
- Play Karakin like the floor is lava — it's a 2x2, 64-player map that punishes camping with the Black Zone
- Drop Al Habar or Bahr Sahir for hot fights and central position; Hadiqa Nemo or Al Hayik to gear with fewer teams
- Watch for the Black Zone warning and siren — get out of marked areas or under hard overhead cover fast
- Hoard Sticky Bombs for breach walls and bunker entrances, and remember thin drywall walls can be shot through
- Use the smuggler tunnels to flank and reposition, but know not all bunkers lead to tunnels and not all tunnels connect
- Build a mid-range AR (M416 / AKM / G36C) plus an SMG (MP5K), and carry a full utility belt
- There are no vehicles — plan foot routes through canyons, smoke across open sightlines, and move early
- Keep boosted — meds spawn more on Karakin — and win the explosive, close-range endgame on utility, not just aim
Frequently Asked Questions
Keep Reading
Related Guides
PUBG Haven Map Guide: The Pillar, Caches & CQC Chaos
Haven is the one PUBG map where the AI shoots back. A 1x1 industrial island, 32 players, an armed faction called the Pillar guarding the loot, and a helicopter with a spotlight hunting you. Here's how to survive it.
PUBG Paramo Map Guide: Volcano, Lava & Heli Drops
Paramo is the PUBG map where the landmarks move between matches, the lava actually kills you, and you ride a helicopter in instead of jumping from a plane. Here's how to read a map that refuses to stay still.

PUBG Deston Map Guide: Drops, Recall & Endgame
Deston is the 8x8 that broke PUBG's rulebook — Ascenders up skyscrapers, gliders off rooftops, a Blue Chip recall system that brings dead teammates back, and swamps that aren't quite land or water. Here's where to drop, how to use the gadgets, and how to read the endgame.
PUBG Rondo Map Guide: Drops, Rotations & Endgame
Rondo is PUBG's 8x8 love letter to Chinese landscape — bamboo groves and karst mountains in one corner, a neon skyscraper city in the other. It looks unlike anything else in the game, and it plays like it too. Here's where to drop, how to rotate, and how to win the endgame.

Best Weapons in PUBG: Tier List
Every PUBG tier list is out of date the moment a balance patch drops. So here's the list, ranked by role, plus the durable logic to re-tier any gun yourself when the next patch shakes things up.
Best PUBG Loadouts & Attachments
A naked M416 and a fully kitted M416 are basically two different guns. Here's how to build the strongest two-gun loadouts in PUBG and the attachment priority that turns loot into recoil control.