Best PUBG Throwables: Grenades, Smokes & Utility Guide
Most players treat throwables as the thing they hold until the bag's full. That's backwards. A cooked frag, a smoke wall, and a well-placed Molotov win more fights than a third AR. Here's how to actually use every PUBG throwable.
Most players treat throwables like the stuff they pick up to fill the bag and then forget about until they die holding three frags they never threw. That's the single most common piece of unused free power in PUBG: Battlegrounds. A grenade you cook and land behind a rock kills a guy that bullets physically cannot reach. A smoke wall lets you cross a road four other squads are watching. A Molotov flushes a camper out of the one corner you can't push. These aren't gimmicks — they're the tools that decide compound fights and open rotations, and they're sitting in your inventory doing nothing.
This is a practical guide to every throwable that matters: how the frag cook timer actually works, how to run smoke rotations, when to burn a room with a Molotov, how to blind a building with a stun, and the situational and map-specific throwables worth knowing. PUBG tunes exact damage and timing values over time and locks some throwables to specific maps, so treat the numbers here as ballpark and the how to use it as the durable part.
Throwables are not pocket filler
The reframe that fixes most players' throwable game: a throwable is a tool for a problem your gun can't solve. Your rifle is great at "enemy I can see in the open." It's useless against an enemy behind hard cover, a teammate you need to revive in the open, a corner you have to push blind, or a road you have to cross under watch. That's the entire job of throwables, and each one solves a different version of it.
So the question isn't "should I carry grenades?" It's "which problem am I likely to face, and what do I throw at it?" A balanced loadout for most fights is roughly two smokes, one or two frags, and a Molotov or stun depending on whether you're attacking buildings. Smokes first — they're the most useful and the most underused, and we'll get to why. Carry them like ammo, not like souvenirs.
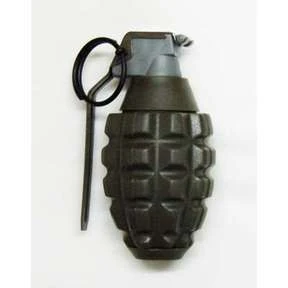
The frag grenade: cooking and arcs
The frag grenade is the heavy hitter — PUBG's highest-damage throwable, and its blast damage isn't reduced by helmets or vests the way bullets are, which is exactly why it kills people hiding behind cover that's beating your rifle. It's available on every map.
The two skills that make a frag lethal instead of decorative:
- Cooking. A frag has roughly a five-second fuse from the moment you pull the pin. If you throw it raw, the enemy hears it land and simply walks away before it goes off — a thrown grenade is a suggestion. Cooking means holding the grenade for a couple of seconds after you pull the pin so it detonates shortly after it lands, giving the enemy no time to escape. Hold it too long and it cooks off in your hand and kills you, so the discipline is "pull, count a beat or two, throw" — practice the timing in the range until it's muscle memory, because there's no undo.
- Arcs and aim modes. PUBG gives you an overhand throw (long, high arc — for distance and lobbing over walls), an underhand throw (a short, soft toss — for dropping a grenade just over a nearby wall or into a window a few meters away), and a roll (sends it along the ground — for bowling it under a vehicle or into the bottom of a stairwell). Use overhand to reach a far compound, underhand to drop it right behind the wall you're stacked on, and the roll to skip the bounce-back that gets you killed throwing into tight rooms.
Where frags win games: digging an enemy out of hard cover (a frag behind their rock does what your bullets can't), denying a doorway or the top of a staircase, and finishing a knocked enemy whose teammates are trying to revive. The cardinal frag sin is throwing one into a small room you're standing next to — it bounces off the doorframe and lands at your feet. Roll it or underhand it, and never throw blind into a wall a few feet away.
Smoke grenades: the most underused item
If you take one thing from this guide: carry smokes and actually use them. The smoke grenade does no damage and that's why people ignore it, but it's the throwable that wins the most fights by making them not happen. It pops a dense cloud that blocks vision for several seconds, and that simple effect solves an enormous number of problems.

What smoke is actually for:
- Crossing open ground. Pop a smoke across the road or field you need to traverse and walk through the cloud instead of sprinting through an open kill lane. The single best use of a smoke is making a dangerous rotation a non-event.
- Reviving safely. Drop a smoke between you and the threat before you pick up a knocked teammate. The revive animation leaves you exposed and unable to shoot; smoke turns a suicidal pickup into a routine one.
- Resetting a fight you're losing. When a gunfight goes bad, a smoke wall breaks line of sight so you can disengage, heal, or reposition instead of trading your way to death in the open.
- Smoke chaining for long crossings. For a genuinely long open stretch, throw a second smoke before the first fully fades and walk the moving wall across — a smoke rotation that keeps you covered the whole way. This is why you carry two or three, not one.
One honest caveat: smoke blinds you too, and good players will pre-fire or push through a smoke they know you're hiding behind. Smoke buys time and breaks line of sight — it is not an invincibility bubble. Use it to move and reset, not to stand still inside and feel safe.
Molotov cocktails: area denial and room clearing
The Molotov is your area-denial throwable. It doesn't have a fuse you cook — it breaks on impact and spreads a pool of fire that burns for several seconds, dealing damage over time to anyone standing in it or passing through. Available on every map. Its whole value is controlling space you can't shoot into.
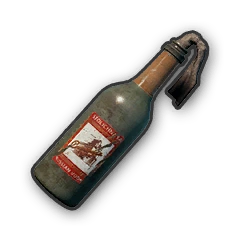
Where the Molotov earns its slot:
- Flushing campers out of corners. An enemy holding the one corner of a room you can't safely peek? Molotov the corner. The fire forces them to move or burn, and now they're peeking on your terms instead of theirs.
- Denying a revive. Throw it on a knocked enemy. Their teammates can't crawl into a fire to pick them up, and the burn finishes the down for you.
- Blocking a doorway or stairwell. A wall of fire across the only entrance to your position buys you the time to heal or reposition — nobody's sprinting through flames to push you.
- Denying ground in the final circle. On a tiny endgame play area, a Molotov on the patch of cover an enemy needs forces them out of it and into the open.
The catch: fire on a wooden floor or in dry grass can spread, and it'll burn you just as happily as the enemy. Don't Molotov the room you're about to push into, and don't drop one at your own feet to "block" a doorway you're standing in. It's for space you want to deny, not space you want to occupy.
Stun grenades: blind the room before you enter
The stun grenade (sometimes labeled a flashbang) does no damage. It detonates with a blinding flash and a disorienting ring that whites out the screen and muffles audio for anyone looking near it — for several seconds, which is an eternity in a gunfight. It has a short fuse like a frag, so you can cook it to detonate the instant it lands.
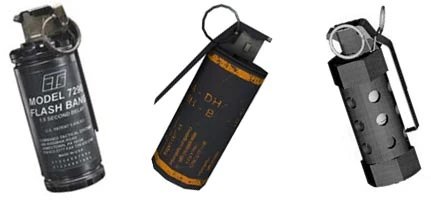
The classic use is breaching a building. Cook a stun, toss it through the door or window of the room you're about to enter, and push in the moment it pops while the defenders are blind and deaf. A stunned enemy can't aim at you and can't hear your footsteps, so you turn a coin-flip room entry into a free one. It's the room-clearing partner to the frag: frag to kill what's behind hard cover, stun to blind what's around the corner you're pushing.
Two warnings. First, it blinds your own team too if they're looking at it, so call "stun out" before you throw and have your squad look away. Second, the stun only works if the enemy is actually facing it — a defender staring at the back wall barely notices. Aim it where they're looking, which is usually the entrance you're about to come through.
The situational and map-specific throwables
Beyond the four staples, PUBG has throwables that are either niche or locked to certain maps. Knowing they exist matters; building a strategy around them usually doesn't.
- Decoy grenade. Detonates into a burst of fake gunfire sounds for several seconds, designed to bait enemies into thinking a fight is happening somewhere it isn't. A genuine mind-game tool for repositioning or drawing a push the wrong way. It appears on a limited set of maps rather than everywhere, so don't plan around finding one.
- BZ grenade. A gas-style grenade that creates a lingering cloud causing disorientation and damage over time to anyone inside it — think of it as a longer-lasting area-denial throwable in the stun/gas family. Useful for holding ground or denying a chokepoint over time. Availability varies by map and mode.
- Sticky bomb. A breaching tool found on Karakin, where the map's destructible walls are a core mechanic. It sticks to a surface and blows a hole in it, letting you breach into compounds from unexpected angles. You can throw it at players in a pinch, but it's a tool for the wall, not the man.
- C4. A heavy demolition charge with a long automatic fuse (around sixteen seconds) and a big blast radius that can penetrate cover. It auto-detonates and can't be triggered early, so it's a deliberate area-denial and breaching tool — cut off a building entrance or force a camped squad out of a position — rather than something you frag with mid-fight. It's limited to certain maps.
The honest takeaway: master the four staples (frag, smoke, Molotov, stun) because they're on most maps and they win most fights. Treat the decoy, BZ, sticky bomb, and C4 as bonus tools you use well when the map hands them to you, not as the core of your kit.
Utility items: blue chips and comeback tools
PUBG's "utility" extends past throwables into the items that bring teammates back and reveal enemies — the stuff that quietly decides squad games. These aren't grenades, but they belong in any honest utility discussion.
- Blue Chip Transmitter. On Erangel, Miramar, and Deston, when a teammate dies fully you can collect their Blue Chip from their loot box and activate the transmitter to recall them — they parachute back in during a later zone phase. The activation takes time and makes noise, locking you in place, so use it from a safe position. The recall window closes in the later phases of the match, so don't sit on a dead teammate's chip forever.
- Blue Chip Detector. A tactical-slot gadget introduced with Deston that pings nearby enemy positions on a delay (not real-time), and on Deston also detects Blue Chips on the ground, in deathboxes, and in vehicle trunks. It's an information tool — worth running when you find one, because knowing roughly where the enemy is beats walking in blind.
- Taego comeback tools. Taego has its own system: the self-AED lets a player who's been eliminated come back on their own, and the Comeback BR is a deathmatch round where eliminated players fight for a slot back into the match. These change how aggressively you can spend a knock on that map, because death isn't necessarily final.
The throughline with all of these: utility is information and second chances. Throwables solve the problem in front of you; the blue-chip and comeback tools decide whether a lost teammate stays lost. Both matter more than the third gun you were going to carry.
Throwables ranked by value
If you're prioritizing what to pick up and carry, here's the order that holds for most players on most maps:
- Smoke grenade — the most useful and most underused; carry two or three.
- Frag grenade — your highest-damage tool, and the only one that beats hard cover and ignores armor.
- Stun grenade — turns a coin-flip room entry into a free one; essential if you push buildings.
- Molotov cocktail — area denial that flushes campers and blocks revives and doorways.
- C4 — heavy breaching and area denial where the map offers it.
- BZ grenade — lingering gas-style area denial; situational and map-dependent.
- Decoy grenade — a fun mind-game tool, low priority, map-limited.
- Sticky bomb — Karakin wall-breaching specialist.
Quick Action Checklist
- Carry two to three smokes and treat them like ammo — they win fights by preventing them
- Cook your frags (pull, count a beat or two, throw) so the enemy can't walk away from them
- Use the roll or underhand throw into tight rooms so the frag doesn't bounce back at you
- Smoke the revive and smoke open rotations; chain a second smoke for long crossings
- Molotov the corner or doorway you can't push to flush campers and deny revives
- Stun and breach — cook a stun into a room and push the instant it pops, after calling "stun out"
- Don't plan around map-specific throwables (decoy, BZ, sticky bomb, C4) — use them well when you find them
- Grab a teammate's Blue Chip to recall them on Erangel, Miramar, and Deston
- Run a Blue Chip Detector when you find one — delayed enemy intel beats walking in blind
Frequently Asked Questions
Keep Reading
Related Guides
PUBG Compound Clearing Guide: Rooms, Angles & Entries
More PUBG players die in doorways than to snipers. Clearing a compound is a skill, not a coin flip — here's how to take a building room by room, angle by angle, without walking into the obvious death.
PUBG Clutch Guide: How to Win 1vX Fights
Your whole squad is down and three enemies are pushing. Most players panic-spray and feed. The clutch player slows down, isolates one enemy at a time, and walks out with the chicken dinner. Here's how to actually win when you're outnumbered.
PUBG Team Communication Guide: Comms That Win Fights
Most squads don't lose fights because they got out-aimed — they lose because four people were playing four different games. Here's how to build comms that actually win fights: callout structure, info discipline, who talks when, and how to IGL without being insufferable.
PUBG Flanking Guide: Win Fights From the Side
A head-on peek war between two decent players is a coin flip. A flank removes the coin. Here's how to get to an enemy's blind side, when it's worth it, and how to close the kill without handing it back.

Best Weapons in PUBG: Tier List
Every PUBG tier list is out of date the moment a balance patch drops. So here's the list, ranked by role, plus the durable logic to re-tier any gun yourself when the next patch shakes things up.
Best PUBG Loadouts & Attachments
A naked M416 and a fully kitted M416 are basically two different guns. Here's how to build the strongest two-gun loadouts in PUBG and the attachment priority that turns loot into recoil control.