PUBG Miramar Map Guide: Drops, Rotations & Endgame
Miramar is the map most players claim to hate and almost none play correctly. Here's a real guide to PUBG's 8x8 desert — where to drop, why the open terrain keeps killing you, how to rotate through the canyons, and how to win the endgame on the cover-starved map.
Ask a random lobby what the worst map in PUBG is and half of them will say Miramar before you finish the question. It's the desert map people queue-dodge, the one that "ruins the rotation," the one where you supposedly get sniped from across the county before you ever see a fight. And almost all of that reputation comes from players treating Miramar exactly like Erangel and then acting surprised when the open desert eats them alive.
Miramar isn't Erangel with a beige reskin. It's PUBG's 8x8 desert — a city-centric Mexican map of dense towns wedged between brutal open plains, hard canyons, and mountains that wall off whole sections of the island. The cover rules are different, the rotations are different, and the endgame rewards a completely different kind of patience. Learn it on its own terms and Miramar goes from "the map I dodge" to one of the most satisfying, skill-expressive maps in the game. Here's the actual guide: the layout, the drops worth taking, why the terrain keeps killing you, and how to read the endgame on the cover-starved 8x8.
The map everyone says they hate
The core Miramar complaint is "you get sniped from nowhere." That's not a map flaw — it's a player flaw. Miramar is built around long sightlines and feast-or-famine cover, so the open desert plain between towns is genuinely lethal if you wander into it without a plan. The players who hate the map are the ones who sprint across open ground the same way they would on Erangel's fields, except Miramar's "fields" are wider, flatter, and ringed by elevation that hands snipers a buffet.
Play it correctly and the long sightlines work for you. Miramar rewards the team that loots up, owns a piece of high ground, and forces everyone else to cross the open ground first. The terrain that punishes the impatient is the same terrain that hands the patient team free kills. Once that clicks, the map stops feeling unfair and starts feeling like the most positional map in PUBG — where where you stand matters more than how fast you can flick.
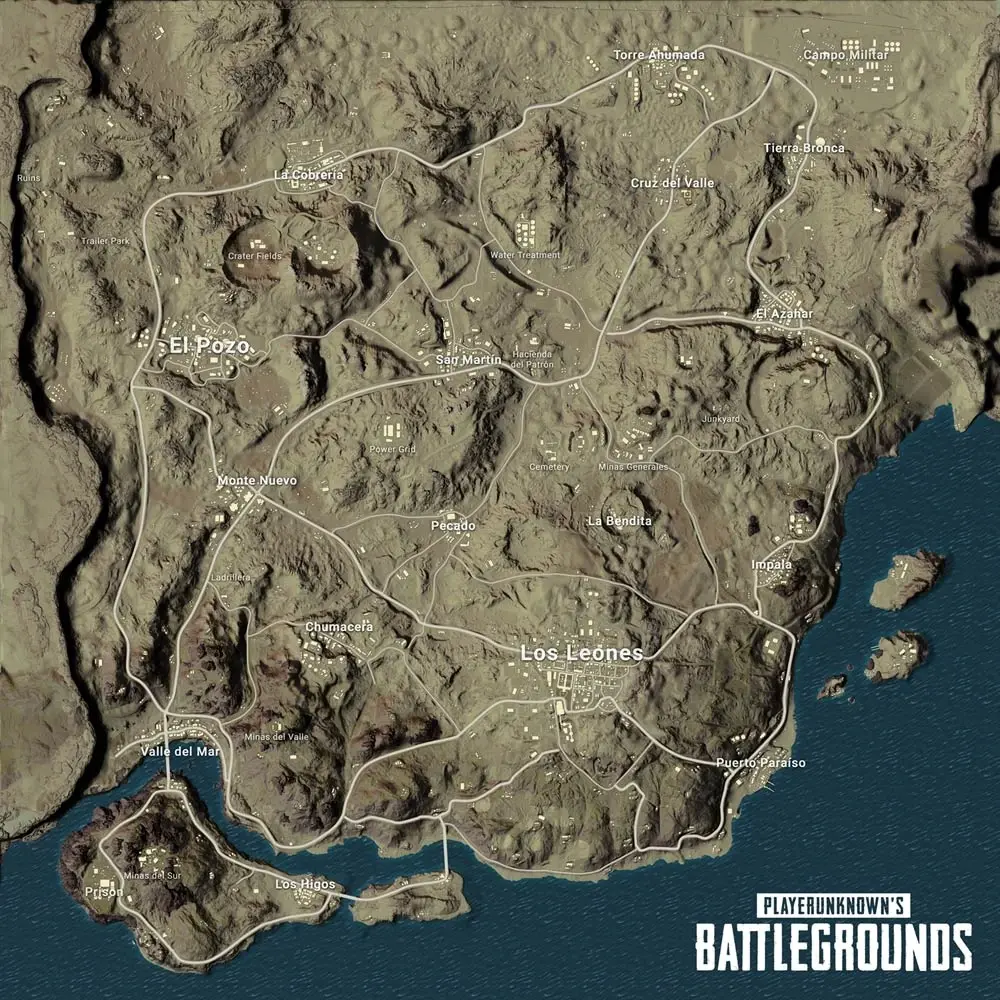
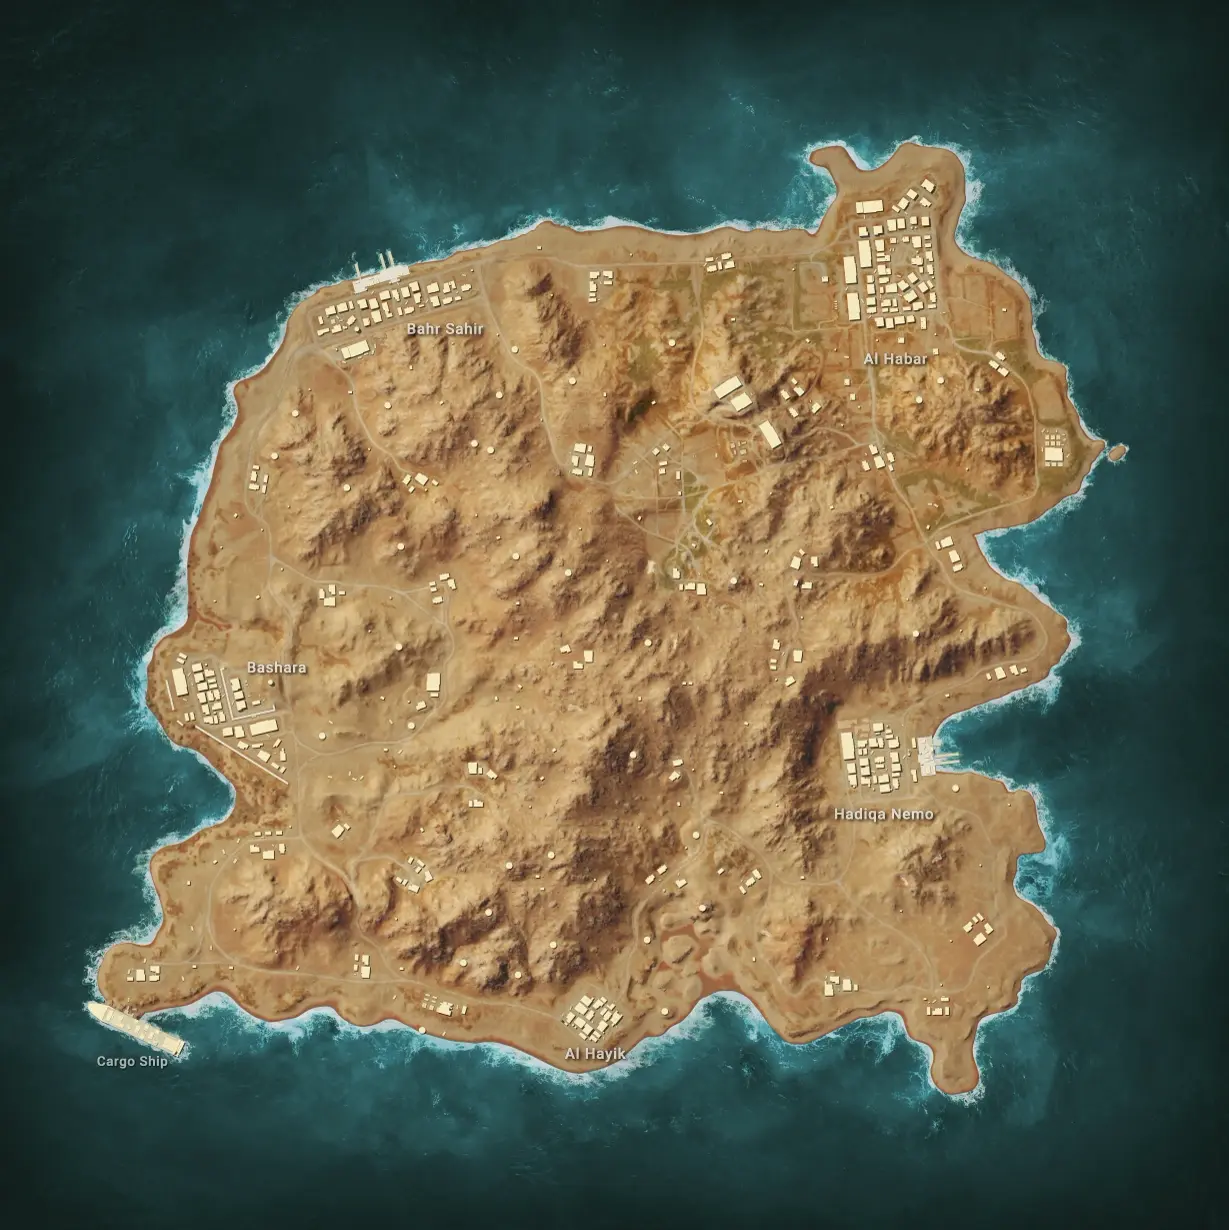
How Miramar is laid out
Miramar is an 8x8 km map, the same footprint as Erangel, but the layout could not be more different. It's a city-centric desert based in Mexico, with dense urban areas sitting in pockets of harsh, open terrain. The whole island is cut off from the west and north-east by enormous canyons and mountains, with a wall to the north, and there's a separate island to the southeast that's home to the Prison and smaller villages. That geography — towns as cover-islands inside a sea of open desert — is the entire personality of the map.
The named locations you actually need to know:
| POI | Where | What it is |
|---|---|---|
| Los Leones | South | The biggest city on the map — sprawling, multi-block, top loot |
| Pecado | Center | The iconic hot drop — boxing arena plus casino, dead-center |
| Hacienda del Patrón | North-center | A compact hilltop estate landmark with dense, rich loot |
| San Martin | Central-west | Large town with strong loot, central enough to fight over |
| El Pozo | West | Big town with an arena, solid loot, frequent traffic |
| Chumacera | Southwest | Mid-size town, often quieter |
| La Cobreria | North-center | Mid-size town near the map's middle |
| Valle del Mar | East coast | Coastal town, more out of the way |
| Monte Nuevo | Northwest | Town tucked toward the western canyons |
| Prison | Southeast island | Smaller, committal spot on its own island |
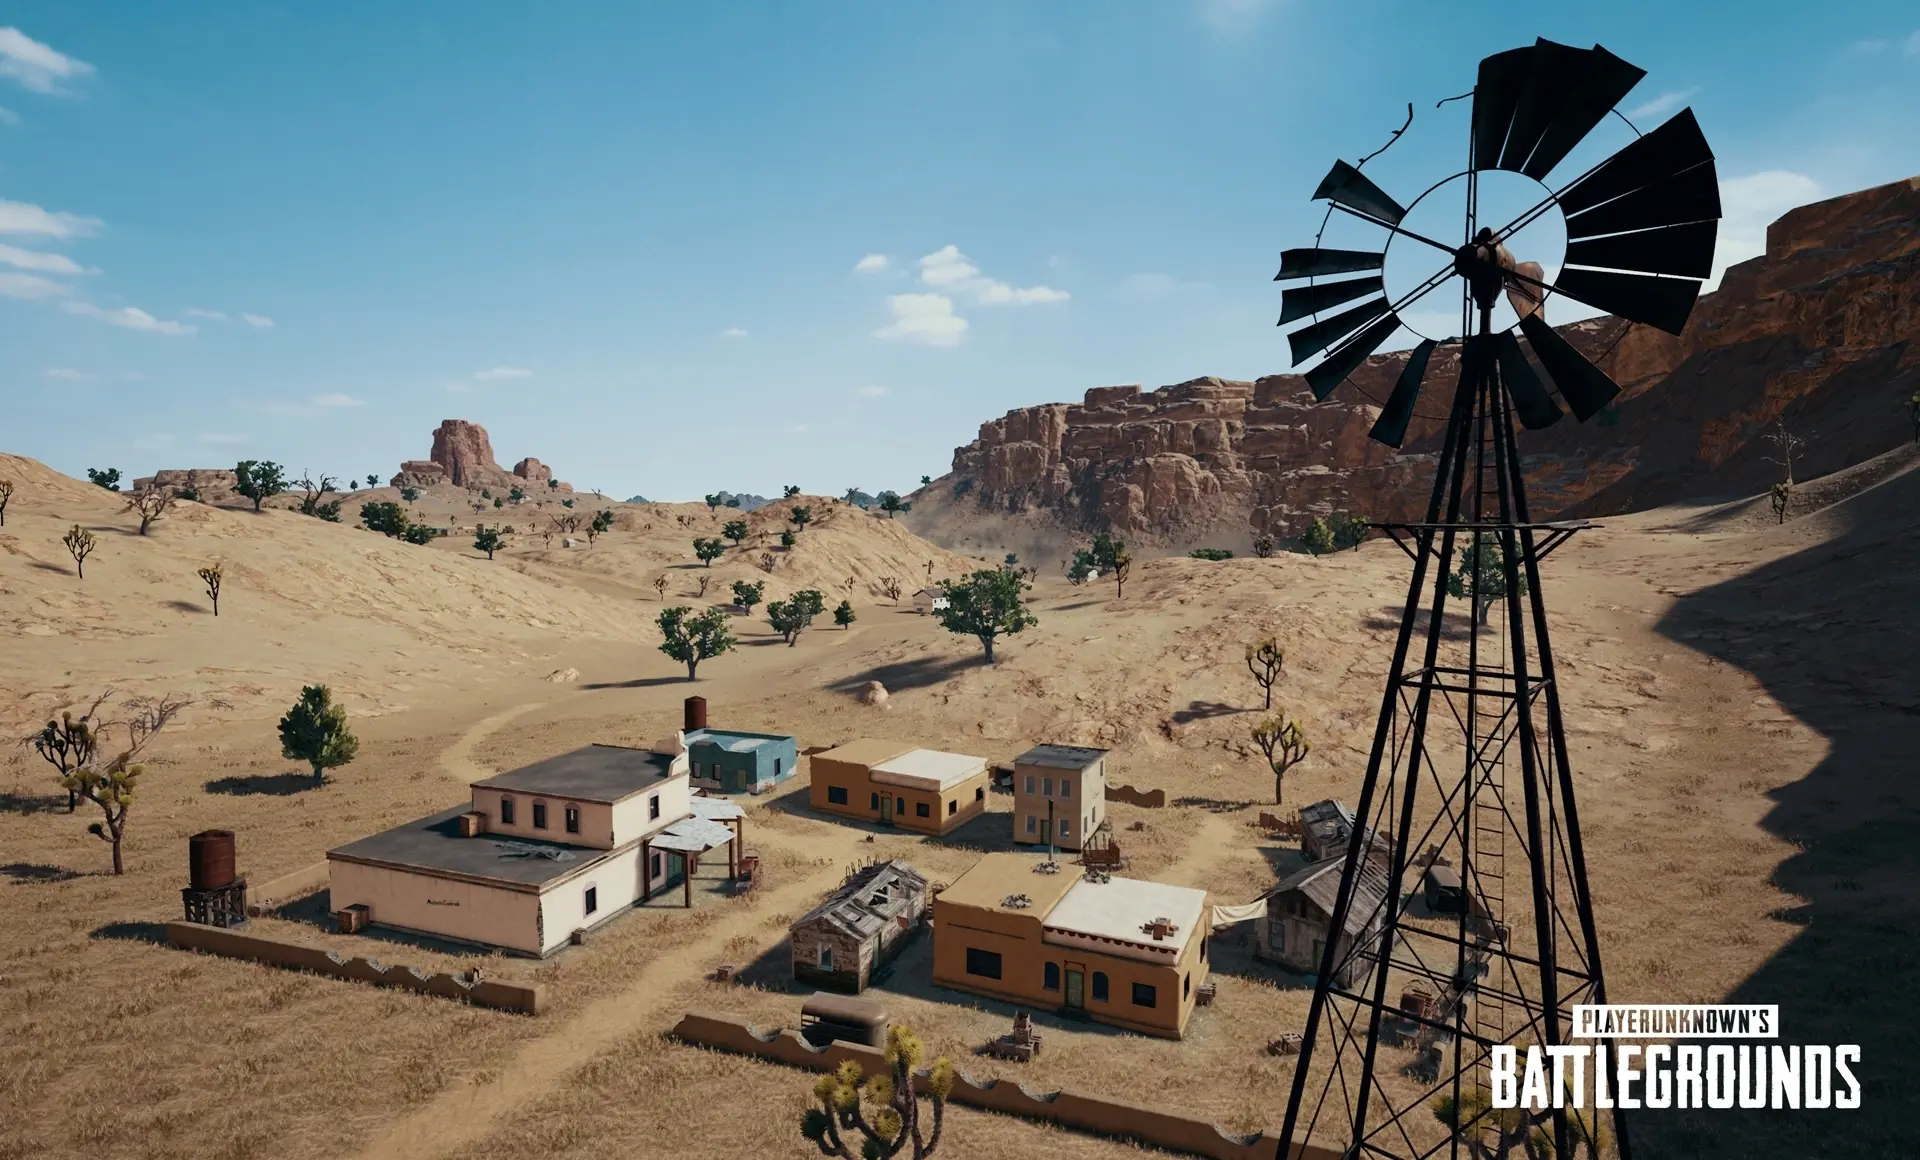
Everything between those is open desert, rocky hills, dry riverbeds, and the occasional cluster of villas. The mental model: dense loot-towns scattered like islands across an open, elevated desert, with canyons and mountains forcing your rotations through predictable gaps.
The hot drops
Want fights immediately? These are where a big slice of the lobby commits and the early game turns into a brawl.
Pecado is Miramar's signature hot drop. It sits near the center of the map, so it's reachable from most flight paths, and it packs a boxing arena and a casino into a tight footprint — exactly the kind of multi-level CQC playground that produces frantic early fights. Drop here to get your reps in close range. Land on a roof or an edge building, grab a gun before anything else, and clear methodically instead of sprinting into the middle and getting third-partied.
Los Leones is the biggest city on Miramar, down in the south, and it can absolutely run hot. The loot is excellent and there's enough of it to kit multiple squads, but it's huge — you can land on one edge and gear up in relative calm while the fights cluster elsewhere, or you can dive the dense core and brawl. It's the closest thing Miramar has to a "drop hot or drop safe, your call" city.
Hacienda del Patrón is the high-value gamble. It's a compact estate built on a hill with dense, rich loot crammed into a small area, which means everyone who drops it lands on top of each other. Win the early scrap and you walk out kitted with a commanding hilltop position; lose the coin flip and you're dead in ninety seconds. Take it when you trust your aim and want max gear fast.
The safe loot drops
If your goal is placement and RP rather than a highlight clip, you want to land alive, gear up, and be set before the first circle. These spots get you geared without the whole lobby on your head.
San Martin in the central-west is one of the most useful drops on the map — a large town with strong loot that's central enough to matter but rarely as packed as Pecado. Gear up fully here and you can rotate almost anywhere.
El Pozo on the west side is a big town with its own arena and solid loot. It draws some traffic but it's roomy enough that you can often loot a section in peace before deciding whether to fight or roll out.
Chumacera, La Cobreria, Valle del Mar, and Monte Nuevo are the quieter options. Chumacera in the southwest and Valle del Mar on the east coast in particular tend to be lower-traffic — you'll usually gear up uncontested or against just one team. The trade is a longer, more exposed desert rotation toward the center, so only take the edge towns if you've got a vehicle lined up or an early circle that's already kind to you.
The open-terrain problem
Here's the thing the haters are actually mad about, stated honestly: Miramar's open desert is a kill zone, and there's a lot of it. The plains between towns are wide, flat, and overlooked by hills and rocky outcrops, so crossing them in the open mid-game is how you die to someone you never saw. This is real. It's also completely manageable once you stop pretending it isn't there.
The fixes:
- Plan rock to rock, not town to town. Miramar's cover is the scattered boulders, ridgelines, and dry creek beds. Route your movement through them deliberately. The straight-line sprint across the flat is the single most common Miramar death.
- Carry the optics for the map. This is a long-range map — a 4x or 6x and a DMR or AR earn their slot far more here than on Sanhok. If you're going to get shot at from distance, you want to be able to shoot back.
- Use smoke like it's mandatory, because it is. When you have to cross open ground and there's no rock to chain to, a smoke grenade is the difference between a rotation and a funeral. Pop it, cross behind it, don't admire the view.
- Don't be the highest contrast thing on the hill. Skyline yourself on a bare ridge and you're a black silhouette against the desert sky to every scope in range. Stay below crests, move along the slope, not over the top.
Rotations, canyons, and mountains
Miramar's terrain doesn't just expose you — it funnels you. The enormous canyons and mountains that wall off the west and north-east mean you can't just beeline to the circle; you're pushed through valleys, passes, and a handful of usable roads. Smart teams know where those gaps are and watch them, which makes Miramar rotations a genuine puzzle rather than a straight drive.
The rotation rules that matter here:
- Commit to the circle early. Because the terrain channels movement, being late on Miramar is far worse than being late on Erangel — you can get pinched in a canyon with no side exits. Read the first circle and start moving before everyone else is forced through the same gap.
- Respect elevation over distance. The shortest path to the circle is often a high, exposed ridge; the safe path is the longer one through low ground and cover. Take the longer, lower route more often than your instincts want.
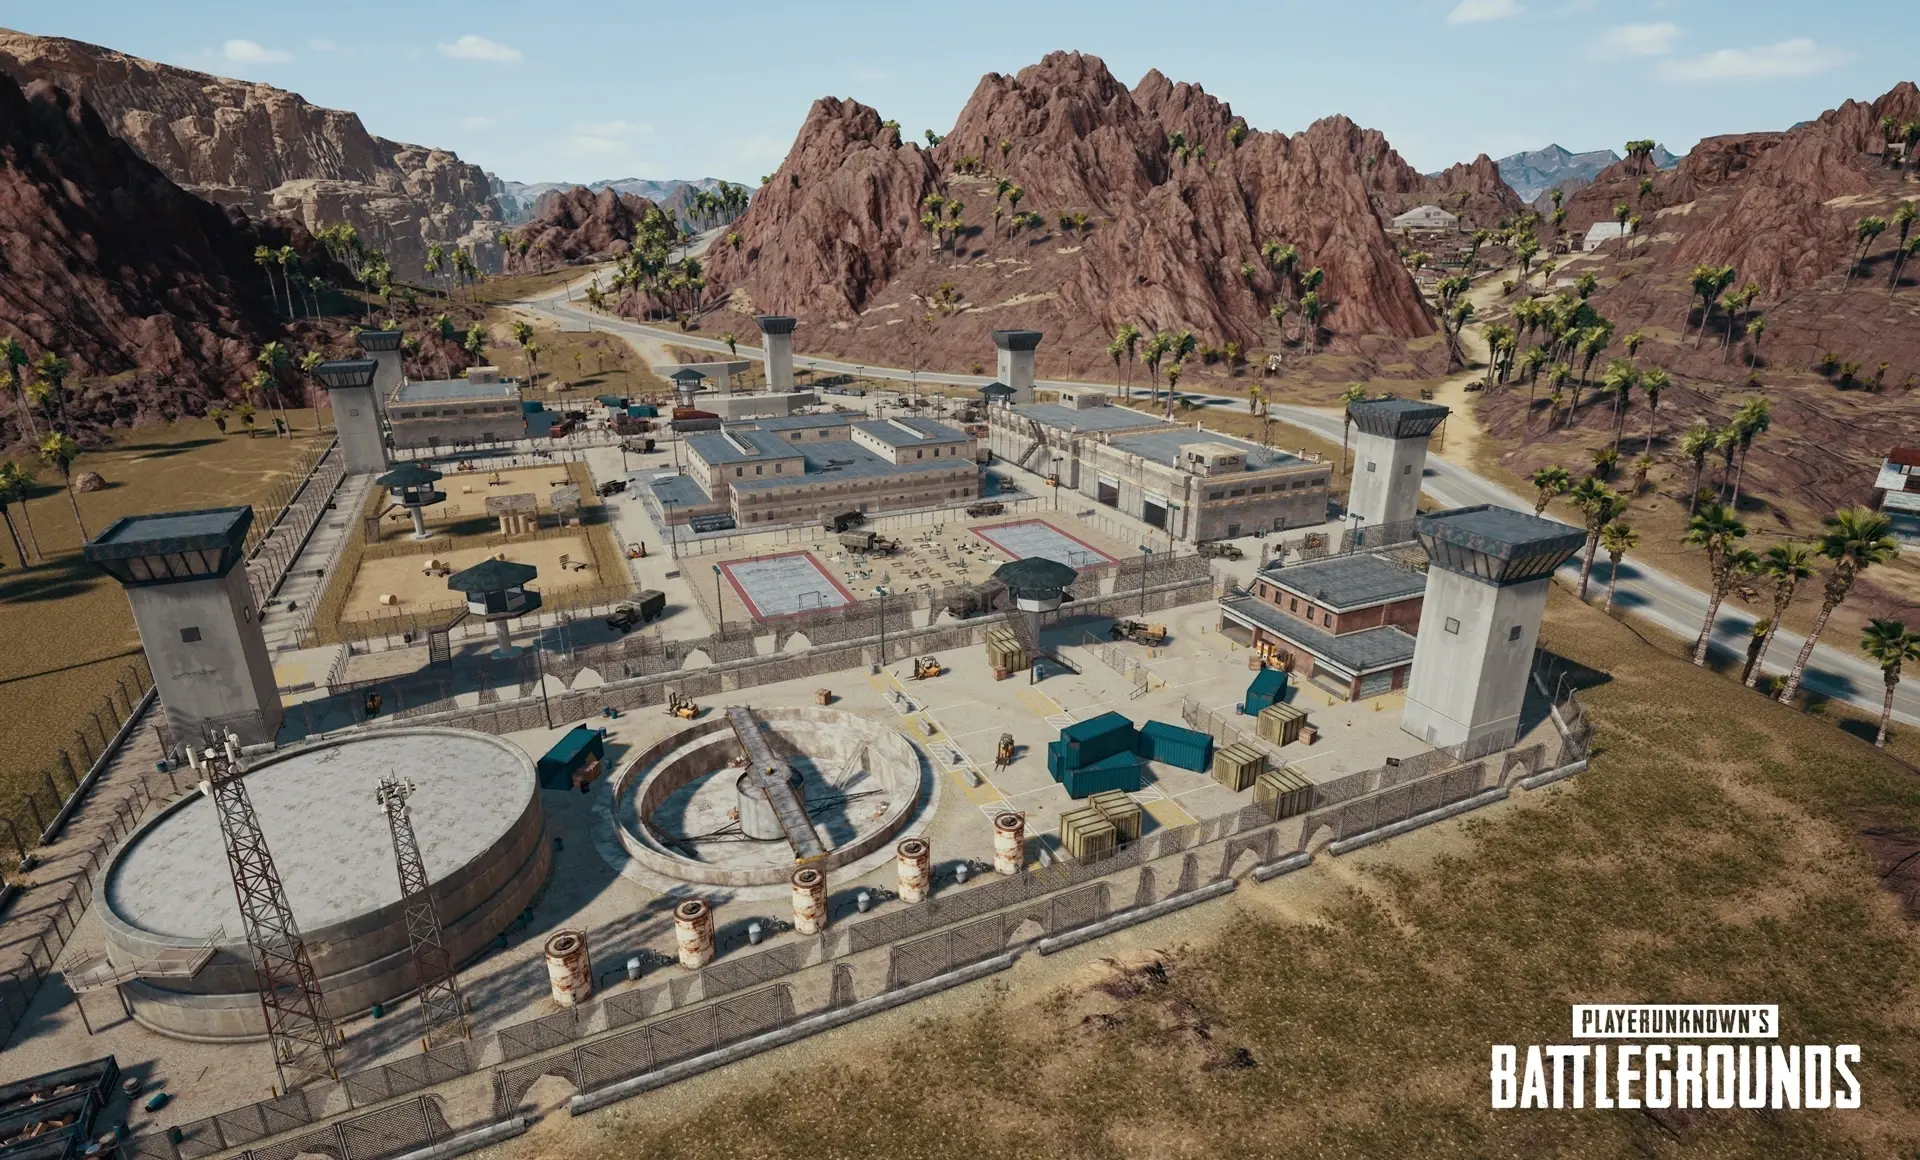
- The southeastern prison island is a trap if the circle leaves. The Prison and its little island are committal in the same way Erangel's military base is — great if the zone stays, brutal if it pulls inland and you have to cross back over open ground. Drop there only with an early circle read or a vehicle staged to leave.
Vehicles are not optional here
On a map this open and this big, a vehicle isn't a convenience — it's survival gear. Miramar spawns the usual desert-friendly roster, and crucially it has more vehicle spawns built into its rural sprawl than the green maps, because the developers know you can't foot-rotate this terrain.
The Miramar vehicle rules:
- Grab one immediately on any edge drop. Chumacera, Valle del Mar, Monte Nuevo, the prison island — all of them have a brutal walk to the center. A vehicle turns a deadly desert march into a quick, low-exposure drive.
- Use the vehicle as mobile cover, then ditch it. On open ground a moving car is sometimes the only cover you've got, but a parked car with the engine running near the final circles is a beacon. Drive to cover near the zone, kill the engine, finish on foot.
- Mind the rollover terrain. Miramar's hills and dunes will flip a fast vehicle that crests them wrong, and a flipped car in the open desert is a death sentence. Take the slopes at an angle, not straight up and over at full speed.
Reading the endgame terrain
Miramar endgames are won by the team that solved the cover problem before the final circles, not during them. Late zones here often pull onto open or semi-open ground broken up by rocks, low walls, and the edges of towns, which means the winning position is almost always a piece of high ground or hard cover with eyes on the open approaches.
What to look for as the circle closes:
- Claim cover and elevation early. The good final-circle positions on Miramar are scarce — the rocks, the compound walls, the hilltops. Get to one before the zone forces a scramble, because there isn't enough cover for everyone and the teams left in the open lose.
- Make the desert do your work. If you hold covered high ground and the circle forces other teams to cross open desert to reach you, you're holding the best hand on the map. Patience plus elevation plus the open ground as a kill-box is the whole Miramar endgame.
- Keep your long optics on. Final circles can stay open enough that a 4x or 6x still matters at the death, unlike the close-quarters scrambles you get on small maps. Don't swap to a red dot just because the circle is shrinking.
- Watch the rocks, not the buildings. Late Miramar zones often leave the towns behind, so the rocks and folds in the terrain become your cover and theirs. The team still thinking "I need a building" gets caught in the open when the circle settles on bare desert.
If you want the broader zone-reading framework that applies to every map, our PUBG endgame circle strategy goes deeper on circle prediction and final-circle positioning. Miramar is just the map where solving cover early pays the biggest dividend.
Quick Action Checklist
- Stop playing Miramar like Erangel — the open desert punishes the field-sprint habit hardest
- Drop Pecado or Hacienda del Patrón for fights; San Martin, El Pozo, or Chumacera to gear up safely; Los Leones plays either way
- Carry long optics (4x/6x) and a DMR or AR — this is a long-range map
- Route rock to rock and ridge to ridge; smoke any open crossing you can't chain cover across
- Commit to the circle early — the canyons funnel rotations and being late gets you pinched
- Grab a vehicle on every edge drop, use it as mobile cover, then kill the engine near the zone
- Only take the Prison island with an early circle read or a staged vehicle to leave
- In the endgame, claim covered high ground early and let the open desert funnel enemies into your scope
Frequently Asked Questions
Keep Reading
Related Guides
PUBG Haven Map Guide: The Pillar, Caches & CQC Chaos
Haven is the one PUBG map where the AI shoots back. A 1x1 industrial island, 32 players, an armed faction called the Pillar guarding the loot, and a helicopter with a spotlight hunting you. Here's how to survive it.
PUBG Karakin Map Guide: Black Zone, Breaches & Drops
Karakin is PUBG's 2x2 desert pressure cooker — 64 players, no vehicles, and a Black Zone that deletes whole compounds mid-match. Here's where to drop, how to breach, and how to not get blown up by your own map.
PUBG Paramo Map Guide: Volcano, Lava & Heli Drops
Paramo is the PUBG map where the landmarks move between matches, the lava actually kills you, and you ride a helicopter in instead of jumping from a plane. Here's how to read a map that refuses to stay still.

PUBG Deston Map Guide: Drops, Recall & Endgame
Deston is the 8x8 that broke PUBG's rulebook — Ascenders up skyscrapers, gliders off rooftops, a Blue Chip recall system that brings dead teammates back, and swamps that aren't quite land or water. Here's where to drop, how to use the gadgets, and how to read the endgame.

Best Weapons in PUBG: Tier List
Every PUBG tier list is out of date the moment a balance patch drops. So here's the list, ranked by role, plus the durable logic to re-tier any gun yourself when the next patch shakes things up.
Best PUBG Loadouts & Attachments
A naked M416 and a fully kitted M416 are basically two different guns. Here's how to build the strongest two-gun loadouts in PUBG and the attachment priority that turns loot into recoil control.