Minecraft Maps & Cartography Guide: Zoom, Walls & More
Maps are the navigation system Minecraft never bothered to explain. Here is how they actually work: the 9-paper vs locator-map split, the cartography table that zooms for an eighth of the paper, the five zoom levels up to 2,048 blocks, explorer maps from cartographers, and how to tile maps into a wall-sized world map.
Minecraft will hand you a sprawling, procedurally generated world and then offer you exactly zero navigation tools out of the box. The map is the fix, and it is wildly under-used because the game never explains the parts that matter — the difference between a plain map and a locator map, why the cartography table is an eight-to-one paper exploit, or how to staple a dozen maps into a single wall-sized world map. People wander back to a torch trail when a level-4 map would have shown them the whole region at a glance.
This guide untangles the entire cartography system: crafting maps, the cartography table and what each slot does, the five zoom levels and exactly how many blocks each covers, explorer maps from cartographer villagers, and the item-frame and banner tricks that turn a stack of paper into a real navigation rig. Everything is checked against the Minecraft Wiki, including the Java-versus-Bedrock split that trips up half the tutorials online.
Why maps still matter
Even with newer tools like the locator bar, a physical map is the only thing that draws you a top-down picture of terrain — coastlines, biome edges, your base, the ravine you keep falling into. It is the difference between knowing a teammate's direction and knowing the actual shape of the land between you and them. Maps are cheap (paper is sugarcane), they update passively while you hold or carry them, and at high zoom one map can cover a chunk of world bigger than most players ever explore on foot. If you build, trade, or run a multiplayer base, you want maps.
Crafting a map (and the locator catch)
Here is the single most-confused point in all of map crafting, so let's kill it first: the plain-map-versus-locator-map split is a Bedrock thing. On Java, your map always shows your position.
- Java Edition: craft an empty map from 9 paper in a 3×3 grid. That's it — there is no separate locator map, and the white player-position pointer is always on. Java players who go hunting for a "compass + paper" recipe are chasing a Bedrock mechanic that doesn't exist for them.
- Bedrock Edition: you get two versions. An Empty Map (no position marker) is 9 paper, or just 1 paper at a cartography table. An Empty Locator Map (adds the white player pointer) is 8 paper + 1 compass, with the compass in the center. You can also add a compass to an existing Bedrock map later to upgrade it.
Either way, the map starts blank. Use it (right-click / use control) to activate it, and it draws the area you are standing in. A fresh map is zoom level 0: one pixel per block, covering a 128×128-block area. One catch worth knowing — the map does not center perfectly on you. The world is divided into a fixed invisible grid of 128×128 squares and the map snaps to whichever square you activated it in, so where you first use it determines the borders, not your exact footstep.
The cartography table
The crafting grid can do everything maps need, but the cartography table does it cheaper and with a clean UI. You craft it from 2 paper + 4 planks (any wood) — paper across the top, planks filling the block below.
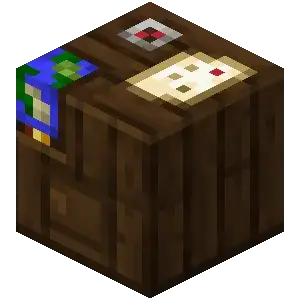
Drop a map in the top slot and an ingredient in the bottom slot to do one of four things:
- Zoom out: map + 1 paper → bumps the map up one zoom level. This is the headline feature — the crafting grid needs 8 paper to zoom one level, so the table is literally eight times cheaper per step.
- Clone/copy: map + 1 empty map → a duplicate that stays synced with the original (both update as either is carried around). Perfect for handing copies to teammates.
- Lock: map + 1 glass pane → a locked map. Locked maps freeze their contents — they stop updating, can't be zoomed, and their banner markers survive even if the banners are destroyed. Great for a permanent record of a build.
- Add a marker (Bedrock): Bedrock players can add a compass marker here too; Java handles markers via banners instead.
If you map seriously, build a cartography table. The paper savings on a single full zoom-out pay for it instantly.
Zoom levels explained
A map has five zoom levels, 0 through 4 (shown in-game as 0/4 up to 4/4). Each level doubles the side length, so the area quadruples each step:
| Level | Scale | Blocks per side | Area |
|---|---|---|---|
| 0/4 | 1:1 | 128 | 128 × 128 |
| 1/4 | 1:2 | 256 | 256 × 256 |
| 2/4 | 1:4 | 512 | 512 × 512 |
| 3/4 | 1:8 | 1,024 | 1,024 × 1,024 |
| 4/4 | 1:16 | 2,048 | 2,048 × 2,048 |
A maxed-out level-4 map covers a 2,048 × 2,048-block region — roughly four million blocks of surface on one piece of paper. The trade-off is detail: at level 4 each pixel represents a 16×16 area, so individual blocks blur into color blobs. The sweet spot for most bases is level 2 or 3 — big enough to see the whole neighborhood, sharp enough to navigate. You zoom one level at a time, and you can't zoom back in; once a map is at level 4 it stays there, so don't over-zoom a map you wanted detailed.
Explorer maps from cartographers
You don't have to make every map yourself. Cartographer villagers sell pre-marked explorer maps that point you straight at two of the game's best structures:
- Ocean Explorer Map — sold by a Journeyman cartographer (tier 3) for roughly 13 emeralds + 1 compass. It marks the nearest ocean monument (the home of guardians, prismarine, and sponges).
- Woodland Explorer Map — sold by a Master cartographer (tier 5) for roughly 14 emeralds + 1 compass. It marks the nearest woodland mansion, which is otherwise a brutal find.
An explorer map starts mostly blank with a marker on the target structure, and it fills in terrain as you travel toward it — even passively from your inventory. Note that buried treasure maps are NOT a cartographer trade: those come from shipwreck and ocean-ruin chests, not villagers. If you're chasing the structures these maps point to, our ocean monument guide and woodland mansion guide cover what's waiting at the X.
Locator vs explorer vs regular maps
The terminology gets muddy, so here's the clean version:
- Regular map — the one you craft. On Java it always tracks you; on Bedrock the plain version has no marker.
- Locator map — a Bedrock-only map with the white player pointer added (8 paper + compass). On Java this is just what a normal map already is.
- Explorer map — a special pre-marked map from a cartographer (or treasure), starting blank with a structure marker and revealing terrain as you approach.
So a Java player only ever deals with "regular" and "explorer." A Bedrock player juggles all three. If a tutorial tells a Java player to craft a locator map, the tutorial is wrong for their edition.
Item frames and map walls
This is where maps go from handy to genuinely cool. Put a map in an item frame and it renders full-size on the wall, and it shows a green marker at the item frame's own location (in Bedrock the framed map must be a locator map for this). Your usual white pointer doesn't show on a framed map — only that green "you-are-here" dot when you're inside the mapped area.
Tile several frames together and you get a map wall: a seamless, room-sized view of your world. The trick is alignment. Because maps snap to a fixed world grid by zoom level, adjacent maps only line up if they are the same zoom level and were created from grid-aligned coordinates — for zoom-level-1 maps, that means starting points at multiples of 256 blocks. Get it right and a 2×2 grid of level-2 maps shows a clean 1,024 × 1,024-block region; get it wrong and your maps overlap or leave gaps. Unexplored chunks render transparent, so the picture fills in as you explore. Glow item frames work too if you want the wall lit, and Java's invisible-frame option (use a glow ink sac trick) makes the maps look like they're floating seamlessly.
Banners on maps
One of the most slept-on navigation tools — and it's Java-only. Place a banner in the world, then use a held map on it to stamp a colored marker onto that map at the banner's exact location. The marker matches the banner's base color, and if you name the banner (in an anvil) before placing it, that name shows up under the marker on the map. Use the banner again to remove the marker.
This turns a map into a labeled atlas: a red banner at "Mob Farm," a blue one at "Trading Hall," a black one at "Nether Portal." Lock the map at a cartography table and the markers stay even if the banners get destroyed. Bedrock players don't get this feature, so the workaround there is building recognizable wool landmarks or using the compass-marker option at the cartography table. For more on banners themselves — patterns, looms, and shields — they tie into the villager trading guide since cartographers sell banner patterns.
Java vs Bedrock map notes
The two editions diverge more on maps than almost any other system, so know your platform:
- Position marker: Java maps always show it; Bedrock splits into plain (no marker) and locator (8 paper + compass) maps.
- Cartography table: both editions zoom (1 paper), clone (1 empty map), and lock (1 glass pane). Bedrock adds a compass-marker function; Java uses banners for markers instead.
- Banner markers: Java only. Bedrock can't stamp banners onto maps.
- Framed map markers: both show a green location marker, but Bedrock requires the framed map to be a locator map.
- Zoom levels and block coverage (0–4, up to 2,048 blocks per side) are identical across editions.
Quick Action Checklist
- Craft an empty map: 9 paper (Java always tracks you); on Bedrock add a compass for a locator map
- Use the map to activate it — it draws the 128×128 grid square you're standing in
- Build a cartography table (2 paper + 4 planks) — it zooms for 1 paper vs the grid's 8
- Zoom up to level 4 (2,048 blocks per side) for region maps; stop at level 2–3 for detail
- Clone maps (map + empty map) to hand synced copies to teammates
- Lock maps (map + glass pane) to freeze a permanent record
- Buy explorer maps from cartographers — ocean (journeyman, ~13 emeralds) and woodland (master, ~14 emeralds)
- Frame maps for a green location marker; tile same-zoom, grid-aligned maps into a wall
- On Java, use a held map on a named banner to stamp a labeled colored marker
- Remember buried-treasure maps come from shipwrecks/ocean ruins, not cartographers
Frequently Asked Questions
Keep Reading
Related Guides
Minecraft End Cities Guide: Elytra, Shulkers & End Ships
Killing the dragon is the tutorial. The real endgame loot — the elytra, shulker shells, and a stack of enchanted gear — lives on the outer End islands. Here is how to get out there, clear an End city without floating off a tower into the void, and walk away with the only wings in the game.
Minecraft Archaeology Guide: Sniffer, Brushes & Trail Ruins
Archaeology turns mining's most ignorable blocks — plain sand and gravel — into loot tables. With one brush, the right structures, and a steady hand, you pull pottery sherds, a Sniffer egg, and armor trims out of the ground. Here is the whole system, with the real loot tables.

Minecraft Banner Guide: Loom Patterns, Shields, and Maps
Banners are the deepest decoration system in Minecraft, and most players never get past a plain colored flag. Here is how the loom, all ten pattern items, shield decoration, and map markers actually work.
Minecraft Biomes Guide: Every Biome Worth Finding
Minecraft has over sixty biomes and most of them are scenery. These are the ones with a reason to visit — the resources, the structures, the mobs you can only get there — plus the rare biomes worth a long expedition.
Minecraft Survival Guide for Beginners — Surviving Your First Days
You have about ten minutes of daylight before the sun sets and the world tries to kill you. Here is exactly what to do with them — punch a tree, build a tool chain, and get a roof over your head before the zombies arrive.
Best Minecraft Enchantments, Ranked — The Ones Worth Your XP
Mending is the enchantment that ends the grind — gear that repairs itself forever. Everything else is a fight over your XP and anvil uses. Here is what actually earns a slot, ranked, with the real max levels.