Super Mario 64 Wet-Dry World Guide: All 7 Stars and the Water Level Trick
Wet-Dry World hands you the difficulty dial before you even land. The height you enter the painting at sets the water level, and five Crystal Taps let you move it after. Here is how to set it per star, where the eight red coins hide, and the mistake that strands you downtown.
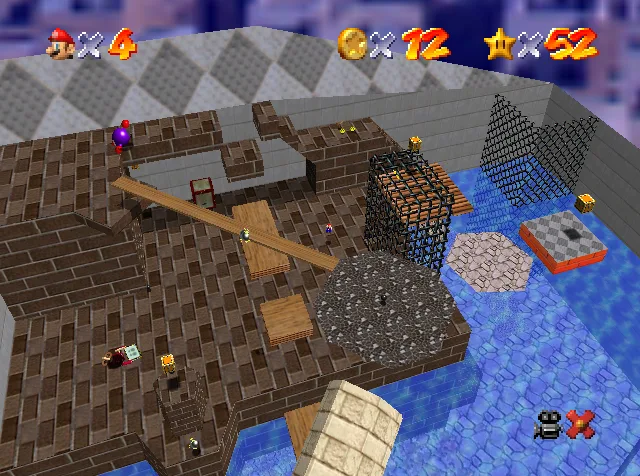
There is a stone sign in Wet-Dry World that most players sprint straight past. It tells you exactly how the course works and it does it in riddle form, which is why nobody listens: "The city welcomes visitors with the depth they bring as they enter."
That is not flavor text. It is the manual. The height at which Mario passes through the painting sets the starting water level of the entire course — enter low, the ruins are drained; enter high, half the level is underwater and floating platforms are suddenly within jump range. Then, once inside, five Crystal Taps let you move that water on demand. Six of Wet-Dry World's seven stars get dramatically easier or harder based on a number you commit to before you land.
Here is how to set the water for every star, where all eight red coins hide, and the one move that permanently strands you in the flooded town.
The difficulty dial is the painting itself
The rule is blunt: the lower on the painting you enter, the lower the water; the higher you enter, the higher the water. Walk in at ground level and you get the drained version. Jump so Mario clips the top of the canvas and you get high tide.
That single choice reshapes the map. The uptown is a stack of layered platforms with floating wooden boards riding on the water surface. Raise the water and those floats climb with it, turning a three-jump climb into a swim-and-step. Drain it and you expose blocks, warps and a whole lower tier that high tide hides.
It also changes what can hurt you. The flame throwers lining the platforms cannot spit fire while they are submerged, so raising the water is a legitimate way to switch off a hazard. Skeeters skate on the surface itself, so where the water sits decides where they patrol. That is a real trade: high water disarms the flame throwers but puts you in swimming range of everything else.
Same starting platform, two entry heights:
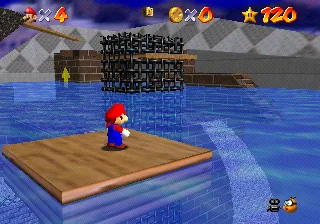
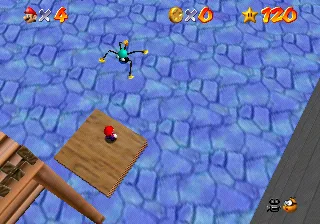
If you botch the entry, do not tough it out. Back out of the course and re-enter at the height you actually wanted. It costs you ten seconds and saves you a wasted lap.
Getting in: course 11 on the second floor
Wet-Dry World is the eleventh course, and its painting — the one with the Skeeter on it — hangs in the second-floor gallery of the Mushroom Castle, alongside the entrance to Tall, Tall Mountain.
Getting to that floor is a chain, not a star count. You need 30 Power Stars to open the basement room that holds Dire, Dire Docks, you clear "Board Bowser's Sub" there to move the blue portal and expose the entrance to Bowser in the Fire Sea, and beating that fight is what unlocks the second floor. If any of that is fuzzy, the beginner guide walks the castle progression and the boss guide covers the Fire Sea fight.
One heads-up: the sixth star here requires the Vanish Cap, so if you have not flipped the blue switch, read the cap guide and do that first. The other five missions do not need it.
The Crystal Taps are the real controls
The entry height is your opening bid. The Crystal Taps — Nintendo's guides also call them crystal switches or diamonds — are how you change your mind mid-level. Touch one and the water instantly rises or drains to that tap's height, dragging every floating platform with it. There are five in the uptown, plus two more down in the flooded town. The ones that matter:
- On the large stone structure. Reached by hitting the Purple Switch on the wooden bridge behind your starting position, which spawns a platform up to it. This is your "about halfway" setting and the key to star one.
- Beneath the bridge. Ground level, surrounded by breakable blocks, and easy to touch by accident.
- Beside the fence at the start, right next to the elevator shaft.
- At the top of the tall steps, north of the bridge behind the big stone structure, with an Amp circling it. That white stepped structure has an inset corner at ground level hiding a warp to the course's cannon — and that warp only activates when the water is at its absolute lowest.
- On the fourth tier, right of the gap in the platforms, with a Chuckya waiting to your left.
Note the tension that creates. The Bob-omb Buddy who opens the cannon sits on an isolated sky platform, reachable by triple jump, backward somersault or side somersault off a nearby float — but only at maximum water, because that is what lifts the float into range. The warp to the cannon needs minimum water. So the efficient order is: enter high, somersault out to the Bob-omb Buddy, open the cannon, then drop the water with a tap and take the warp. Backwards costs you a lap.
The six stars, mission by mission
Six named missions plus the 100-coin star. No boss in this course, which is why it lives or dies on routing.
Shocking Arrow Lifts!
Arrow Lifts are gray blocks with blue arrows that only move once you stand on them. Step on, the lift travels its path, holds at the far end for two seconds, then returns — and repeats two seconds after that. There are five, and they exist nowhere else in the game.
The intended route: press the Purple Switch on the bridge, ride the platform to the Crystal Tap on the big stone structure to bring the water to roughly the middle, swim north to the floating wooden platforms and hop up to the smaller platform where the lifts sit. Ride them across while dodging the Amp, land on the far platform (there is a flame thrower on it), and punch the yellow block to pop the star.
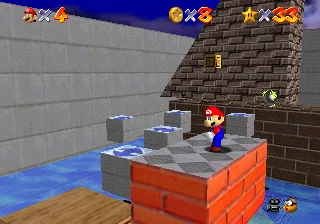
What makes this star worth learning properly is that there are four documented ways to skip the lifts entirely, and all four are just water-level choices:
- Water below the platforms. Long jump straight across to the star platform. The lifts never enter the picture.
- Water at next-to-maximum, set by the Crystal Tap at the opposite end of the course. Jump up out of the water directly under the yellow block and break it from below. N64 only — this does not work on DS.
- Water at its lowest. Take the warp by the Crystal Tap to the cannon platform, then jump off down to the yellow block.
- Water at the highest you can get on entry. Swim to the cannon platform above the block and ground pound through it.
Four routes to one star, all decided by a dial you set at the door. That is the whole course in miniature.
Top o' the Town
Climb to the roof of the uptown. Either raise the water until the layered platforms are in reach, or do it the honest way with Heave-Hos and triple jumps — a Heave-Ho throw is a free elevator if you can stand still long enough to get grabbed.
On the top layer, dodge the Chuckya (never fight it near an edge; it throws you), then walk the long narrow board while two Amps orbit along its length. At the far end there is a flame thrower to time past and a jump onto the spinning platform. The star is inside a yellow block above the next platform along.
Secrets in the Shallows & Sky
Five hidden secret points, each flashing a number when you touch it. Scavenger hunt, not platforming test, and the five spots are fixed:
- Behind the structure with the cannon on top — push the pushable block aside; the secret is under it.
- Above that same spot — use the block you just pushed to reach the yellow block overhead. The secret is inside it.
- The second layer's wall — another pushable block. Push it into the hole.
- The third layer — a yellow block on a small pillar with an Amp and a ring of coins circling it. The secret is inside the block.
- The top of the elevator shaft — inside the yellow block up there. Hit the nearby Purple Switch to spawn the platforms that get you up.
Collect all five and the star appears back on the bridge at the start of the course. Two of the five are yellow blocks and one is under a pushed block, so a drained-to-medium water level is the friendliest setting here — high tide hides the low ones.
Express Elevator--Hurry Up!
The one star that genuinely demands the water be at its lowest.
Drain the water, break the block covering the hole at the bottom of the elevator shaft (absent in the DS version), then climb to the third tier — the Heave-Ho on the second tier throws you up. At the shaft, hit the Purple Switch to spawn platforms and ride them to the top.
Now the trick. Step onto the elevator panel opposite the star, which makes it drop. Jump off down to the bottom of the shaft and ground pound on the way down to cancel the fall damage. The instant you land, wall kick, backward somersault or climb onto the inside of the descended platform before it starts rising. Ride it back up and the star is yours. Slow off the landing and the platform leaves without you — that is the whole shaft again. If your wall kick timing is unreliable, the movement guide covers the frame window.
Go to Town for Red Coins
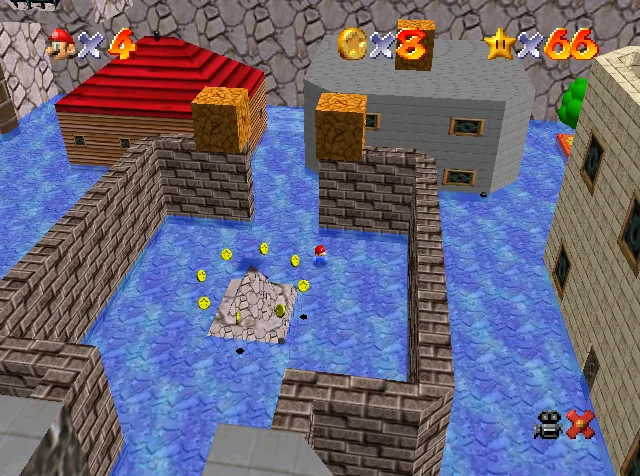
All eight are in the flooded downtown, and getting there is half the mission. Two ways in on N64: enter the painting at its highest point so the water rises enough to jump the tall mesh fence in front of your start, or fire yourself in over the fence with the cannon. Behind it, swim down through the tunnel — the gates are partly closed and your air is draining, so do not sightsee.
Underwater, dive straight down and hit the downtown Crystal Tap to drain the place. Seven of the eight coins are inside breakable blocks; only one sits in the open.
- On top of the small building in the plaza (the only one not in a block)
- On the stairs leading up to that building
- Two on top of the wall around the plaza, one on each side of the gap
- On the roof of a brown building
- On the roofs of two gray buildings, one of them with a red roof
- On the roof of a white building — chain wall kicks between the caged fence and the building, or jump across from the top of a tree
The two rooftops directly in front of the downtown entrance want a wall kick (or Luigi's backward somersault on DS). Climbing the tree in the garden by the yellow block and somersaulting off the top onto the gray roof is the cheapest solution to that pair. Once all eight are banked, the star spawns at the Star Marker in the plaza.
Quick Race Through Downtown!
The course's last star on N64, and the one with a hard prerequisite: you need the Vanish Cap unlocked before you can finish it.
Get downtown the same way, drain it with the Crystal Tap, then grab the Vanish Cap from the blue block left of the plaza. The timer is now live, hence "quick race." Run back to the alley, slam the Purple Switch, then sprint to the wire fence in the corner right of the plaza — while transparent you run straight through walls, which is the whole point. Inside the cage, use the block the switch created to climb the structure and take the star.
Cleaner line if your wall kicks are good: from inside the fence you can wall kick up to the star without pressing the Purple Switch at all, which deletes the detour and most of the timer pressure.
Downtown is a one-way trip
This is the gotcha that eats runs, and almost no guide leads with it. If you touch a Crystal Tap in the downtown area on N64, you cannot get back to the uptown. The cage blocking the path out stays shut. Only DS Luigi, with a Power Flower, can phase back through.
Since draining downtown is exactly what both downtown missions require, plan around it: go down, do everything you intend to do down there, then exit the course deliberately. Do not go fishing for uptown coins afterwards.
Two of the level's four 1-Ups are free while you are there — one appears after you run a lap around the spiked platform in the plaza, one sits in a box between two trees. And the downtown flame throwers never fire in normal play, because they are always at least partly submerged.
The 100-coin star
Nintendo's own Player's Guide gives this one a name: Blue Coin Collecting. That is a hint about the route.
The course holds 152 coins total — 107 in the uptown and 45 downtown. The uptown alone clears the 100 threshold with seven coins of slack, which means you never have to combine a downtown trip with a coin lap. Given that downtown is one-way, that is not a small mercy, it is the whole strategy.
The Blue Coin Block on the second layer is the biggest single chunk, the coin ring on the third layer is another easy handful, and the breakable blocks under the bridge pay out on top. Pair the lap with "Secrets in the Shallows & Sky," which already drags you across every tier of the uptown. Seven coins of margin is tight enough that you should treat it as a sweep, not a sprint. The 100-coin stars guide has the per-course breakdown.
Version differences worth knowing
The DS remake diverges enough here to break an N64 route:
- DS adds a seventh mission, "Soaked Silver Stars," a silver-star hunt in the uptown with no N64 equivalent. Its Star Sphere replaces the lone Bob-omb Buddy platform, and the Buddy itself moved up near the fourth tier.
- Fewer hazards. DS cuts one of the two Amps on the narrow board in "Top o' the Town," removes the flame thrower at the end of it, and deletes the downtown flame throwers entirely. The spinning platform also turns noticeably slower.
- Luigi trivializes the gatekeeping. His Power Flower phases him through the mesh cage at any water level and back out again, killing both the entry puzzle and the one-way-trip problem.
- The underwater-block skip is gone. Breaking the "Shocking Arrow Lifts!" yellow block from below in near-max water works on N64 and not on DS.
The Shindou-based re-release in Super Mario 3D All-Stars plays as the N64 version does, so every route above holds there. For the full release-by-release breakdown, see the version differences post.
One piece of trivia worth having: the skybox behind the ruins is built from altered photographs of Shibam in Yemen, with the red building near the top being the Mosque of Muhammad Ali in Cairo. The community spent years assuming it was Casares, Spain. It is not.
Mistakes that cost you the run
- Walking into the painting without thinking about height. You just chose your water level. Choose it on purpose.
- Touching a downtown Crystal Tap and then trying to leave. On N64 that is a trip back to the castle.
- Attempting "Quick Race Through Downtown!" without the Vanish Cap. You will make the whole swim for nothing.
- Fighting the Chuckya on the top tier near a ledge. It picks you up and throws you, and the drop is the full height of the uptown.
- Forgetting the elevator ground pound. Falling down the shaft without one costs health you need for the swim later.
Wet-Dry World is not a hard course once you stop treating the water as scenery. It is a puzzle box with a difficulty slider on the outside, and the players who find it miserable are almost always the ones who entered at whatever height they happened to be standing at. Set the dial, then play the level.
Quick Action Checklist
- Reach the second floor: 30 stars for the basement, clear "Board Bowser's Sub," then beat Bowser in the Fire Sea.
- Unlock the Vanish Cap first, or you cannot finish the course.
- Enter the painting low for drained, high for flooded — clip the top of the canvas for maximum water.
- "Shocking Arrow Lifts!": mid water via the bridge Purple Switch and the stone-structure tap, or take one of the four skips.
- "Top o' the Town": raise the water or Heave-Ho up, cross the Amp board, spinning platform, yellow block.
- "Secrets in the Shallows & Sky": two pushable blocks, three yellow blocks; star returns to the starting bridge.
- "Express Elevator--Hurry Up!": lowest water, break the shaft block, drop with a ground pound, wall kick onto the platform fast.
- Downtown missions: enter high or use the cannon, swim the tunnel, drain with the tap — and finish everything before you leave.
- Run the 100-coin star entirely in the uptown, where 107 of the level's 152 coins live.
Frequently Asked Questions
How does the water level work in Wet-Dry World?
How many Crystal Taps are in Wet-Dry World?
How do you get to the downtown area in Wet-Dry World?
Where are the eight red coins in Wet-Dry World?
Why can I not get back out of downtown in Wet-Dry World?
Where should I collect the 100-coin star in Wet-Dry World?
Do you need the Vanish Cap for Wet-Dry World?
Keep Reading
Related Guides
Super Mario 64 Swimming Guide: Tap A, Don't Hold It
Holding A is the slow way to swim in Super Mario 64. Here is the stroke rhythm the code rewards, how the stick steers, how to jump out of the water, what each current does, and the eight seconds of free speed hiding in two clams.
Super Mario 64 Lives and Game Over: What You Actually Lose
A Game Over in Super Mario 64 is a file reload: you keep everything you saved and lose everything you did not. Here is when the game actually writes your file, exactly what a Game Over rolls back, the five courses where a fall is free, and every way to earn a life, from the coin tally to the Monty Mole streak that never runs dry.
Super Mario 64 Music: Every Track and Where It Plays
Super Mario 64 scores 15 courses with seven songs, and only one of them belongs to a single course. Here is which track plays in every course and secret level, the five levels whose music rearranges itself as Mario moves, what triggers the boss music and the jingles, all 36 soundtrack tracks under their 1996 and current names, and where to listen today.
Super Mario 64 Bowser Levels Guide: All 24 Red Coins
Bowser in the Dark World, the Fire Sea and the Sky each hide one Power Star behind eight red coins on the obstacle course in front of the fight. Here is the route through all three, where every red coin sits, and what else the level data holds.
Super Mario 64 Beginner Guide: Your First 30 Power Stars
Super Mario 64 does not gate you on difficulty, it gates you on Power Stars. Here is exactly which doors need what, which stars are fastest to grab, and the route that gets a first-timer from one star to thirty without wandering the castle in circles.
Super Mario 64 120-Star Reward: Yoshi and the Castle Roof
Super Mario 64 does not announce your 120th Power Star. The reward is outside: a cannon grate that stops loading, Yoshi on the castle roof, and a gift that quietly resets the next time you load your file. Here is what 120 stars changes, checked against the wikis and the decompiled code.