Super Mario 64 Tiny-Huge Island Guide: All 7 Stars and the Two-Painting Trick
Tiny-Huge Island is one island built at two scales, and the middle of its three paintings is a fake. Here is which painting to enter for each of the seven stars, where the three Shrinker Pipes take you, the two-step Wiggler puzzle, and why the lake holds the most dangerous water in the game.
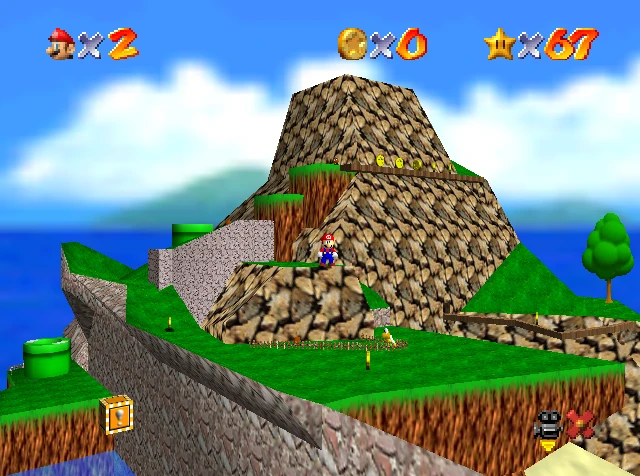
Behind a star door on the second floor of the castle hang three paintings of the same island, and the middle one is a fraud. It is pure decoration — wall dressed up as a portal. The small painting on the left and the big one on the right are both real, and the room is built with forced perspective so all three look the same size until you are close enough to feel played.
Which real painting you jump through is the entire course. Enter the small one and the island is tiny: Mario towers over the terrain, Goombas scatter around his ankles, and half the level's openings are too small for him to squeeze into. Enter the big one and the same island is enormous: the Goombas now stand taller than he does, the Piranha Plants breathe fire, and something in the lake can swallow him in one bite. Tiny-Huge Island is the thirteenth course, Super Mario 64's love letter to Giant Land from Super Mario Bros. 3, and every one of its stars is secretly a routing question: which scale does this mission need, and where is the nearest pipe?
Here is the answer for all seven stars, plus the two-step Wiggler puzzle and the one hazard in this course that skips damage entirely and just takes the life.
Two paintings, one island
The gimmick is not that Mario changes size. Mario never changes. The island exists at two scales — same mountain, same lake, same bridges, same holes in the ground, one version built at dollhouse scale and one at cathedral scale — and the painting you enter decides which version you land on.
Everything on the island scales with it. On the tiny side, the Goombas are Micro-Goombas you can barely see before you step on them, the Piranha Plants are harmless sprouts, and there is a Koopa Troopa so small it does not even carry a usable shell — one jump and it is gone. The iron balls rolling out of the mountainside are the only things that still command respect.
On the huge side, the same cast turns hostile. The Micro-Goombas become Grand Goombas that shrug off punches and kicks completely and take two wedges of health per hit — only a stomp puts them down. The sprouts become fire-spitting Piranha Flowers. A Lakitu circles the lake lobbing Spinies. And the lake itself has a tenant we will get to.
Same starting field, two scales:
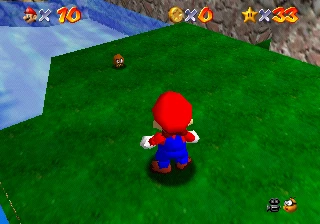
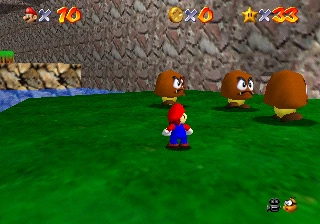
The practical rule: check which painting your mission wants before you jump. Entering the wrong one does not fail anything, but it means crossing most of an island to reach a pipe, and on the huge side that crossing runs through everything on the enemy list.
Getting in: the star door on the second floor
Both paintings hang in a room behind the star door to the left of Wet-Dry World's painting on the castle's second floor. The unlock chain is the same one that gates that whole gallery: 30 Power Stars open the basement room with Dire, Dire Docks, clearing "Board Bowser's Sub" exposes the entrance to Bowser in the Fire Sea, and winning that fight earns the key to the second floor. The beginner guide walks the castle progression and the boss guide covers the Fire Sea fight itself.
One genuinely nice thing about this course: no cap prerequisites. Unlike its neighbor Wet-Dry World, which locks a star behind the Vanish Cap, Tiny-Huge Island has no cap blocks at all. Every star is available with nothing but movement.
The Shrinker Pipes are the fast travel
Scattered around the island are green Shrinker Pipes. Hop into one and you pop out at the same spot on the other-scale version of the island. They are the course's entire transit system, and learning where they sit is most of the routing.
The three that matter:
- Near the start, beside the Purple Switch — the pipe you use in the very first mission, and the anchor for the Five Itty Bitty Secrets star.
- Near the mountain's peak — the hinge for both "The Tip Top of the Huge Island" and the Wiggler puzzle.
- In Windswept Valley — the windy gorge on the far side of the mountain, next to where Koopa the Quick sets up his rematch.
There is also one cannon, and it comes with a scale joke built in. The Bob-omb Buddy who opens it lives on the tiny side, across the small bridge from the start. The cannon you can actually climb into is on the huge side — on the tiny island, the cannon is nothing but a little hole in the turf, because at that scale Mario cannot fit inside his own artillery. Talk to the Buddy early; the cannon is the comfortable route to the red coins later.
The six stars, mission by mission
Six named missions plus the 100-coin star. Wiggler is the only boss, and he does not show up until the finale.
Pluck the Piranha Flower
The course opens with its own tutorial on pipe logic. Enter the tiny painting, hop across the platforms near the start, and drop into the first Shrinker Pipe. You surface on the huge side, where five giant Piranha Flowers guard the area around the pipe. Each one erupts from the ground as you get close and starts spitting fire; each one dies to a single hit. Punch them as they rise, before the flames start arcing, and do not stand downhill of a firing line. When the fifth one shrivels, the star appears right next to the pipe you came out of.
You can technically start from the huge painting instead, but then you are walking the long way around the island to reach the same spot. The pipe route is the mission.
The Tip Top of the Huge Island
The smart version of this climb does almost all of the work at tiny scale. On the tiny island, the mountain is barely a hill — giant Mario walks up in a few jumps, past sprout-sized hazards. Near the summit sits the second Shrinker Pipe. Take it, and you emerge near the top of the huge mountain with only the final stretch left: a set of large platforms and a bridge, with a strong wind gust on one big platform that you can ride upward if you jump into it. The star waits in the yellow block near the peak.
Climbing the huge mountain from the bottom instead is the honest-work option, and it is dramatically worse: longer, windier, and patrolled. Let the tiny island do the climbing for you.
Rematch with Koopa the Quick
Koopa the Quick is back, and according to the Super Mario Wiki this island is actually his homeland — you beat him on his home turf. He waits on the huge side, in the field past the hole where the iron balls roll out, bragging about his new Koopa Mach 1 Sprint shoes. The finish line is the flagpole down in Windswept Valley, and the route runs past the iron-ball spawn hole, down the ramp and the ledges, and across the bridge with the wind howling over it.
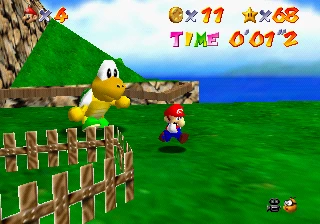
Two things decide this race. First: long jump everywhere the terrain allows — if your long jump is inconsistent, the movement guide is the fix, and this race is the payoff. Second: do not touch a Shrinker Pipe mid-race. Entering any of them scrubs the attempt and you start over with a hike back to Koopa. The wind bridge is the one section worth slowing down for; getting shoved off it costs far more time than crossing it carefully.
Five Itty Bitty Secrets
The cleverest mission in the course, and the one that makes the two-scale conceit click. On the tiny island, all five of the island's openings — things that are full-size features on the huge side — are holes too small for giant Mario to enter. So instead of entering them, you touch them. Each registers a secret with a number flash:
- The far end of the small doorway arch near the start of the course.
- The hole where the cannon would be on the huge island — at this scale, a divot in the grass.
- The entrance to Wiggler's cave in the mountainside.
- The hole the iron balls roll out of.
- The small hole underwater in the pool at the summit — swim down and touch it.
Collect all five and the star spawns on the floating island to the north. You do not need to fly there: hit the Purple Switch near the first Shrinker Pipe and cross the block bridge it spawns before it disappears.
Wiggler's Red Coins
All eight red coins live in a cave in the huge island's cliffside — the chamber beneath Wiggler's lair. Getting in is the actual puzzle, and there are three doors, all on the huge side:
- The cannon. If you opened it via the tiny-side Bob-omb Buddy, blast up to the tree on the cliffside and cross the bridge into the cave. Easiest by a wide margin.
- The jump. From Windswept Valley, where Koopa the Quick stands, a big jump reaches the cliff and the bridge.
- The shell. Steal the shell from the Koopa Troopa on the beach and ride it up the hillside, hopping as you go. Stylish, fastest, least reliable.
Inside, the eight coins are spread across the cave's platforms. Seven come to you with basic climbing; the highest one wants either a wall kick or a hand-over-hand swing along the wire net on the ceiling. Bank all eight and the star appears at the Star Marker between the two pillars.
Make Wiggler Squirm
The finale is a two-scale puzzle with a boss at the end, and the order of operations is strict.
Step one happens tiny. Climb to the summit pool — a puddle at this scale — and ground pound the small hole underwater. The entire pool drains straight down into the cavity inside the mountain. That cavity is Wiggler's home, and you have just flooded it.
Step two happens huge. Take the Shrinker Pipe, climb to the huge summit, and drop through the hole the water was covering. The wiki is explicit about the gate here: if the water has not been drained on the tiny side, you cannot enter the hole. No drain, no boss.
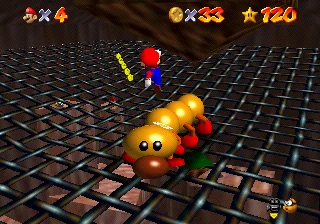
Inside, Wiggler is soaked, furious, and pacing his flooded living room. The fight is three stomps on his body, and it escalates: after each hit he stops to yell at you, then moves faster, and by the third phase he is charging and jumping at you outright. On the N64, touching any part of him costs three wedges of your eight-wedge health bar, so two mistakes plus a stray Grand Goomba earlier is a lost life. Circle, wait for him to commit to a straight line, and drop on him from above. Three hits and he shrinks down, hands over the star, and the course's story — you literally flooded a guy's house and then jumped on his head — resolves in your favor.
The lake will eat you
Every Super Mario 64 player has a Bubba story. Bubba is the giant purple fish in the huge island's lake, and it does not deal damage — being eaten costs a life instantly, regardless of how much health you have. Full health bar, fresh 1-Up, does not matter. On the N64 it also cannot be killed. It is the only enemy of its kind in the game, and it turns the course's biggest body of water into a no-go zone.
Its pattern, per the wiki: it drifts sluggishly until it notices Mario, then accelerates hard, aims, and lunges mouth-first with the same chomp sound a Piranha Plant makes. It can even lunge out of the water at you if you swim on the surface. Getting behind it works if you are caught mid-swim, but the real strategy is simpler — stay out of the deep water. The only prize down there is a single underwater 1-Up near Bubba's patrol, which is the game offering you a life to risk a life. Decline.
The lake's supporting cast — the Lakitu raining Spinies around the shoreline and the Koopa on the beach — are minor by comparison, though the Koopa matters as the shell donor for the red coin climb.
The 100-coin star: Stomp the Giants
Nintendo's Player's Guide names this course's 100-coin star "Stomp the Giants," and it is a literal instruction. Ground pounding a Grand Goomba pays out a Blue Coin worth five; jumping on one pays a single yellow coin; punching one pays nothing at all, because they are immune to punches and kicks. The giants are walking blue coin blocks, and the ground pound is the only correct input.
The distribution decides your route: the course holds 192 coins, with 158 on the huge side and only 34 on the tiny side. There is no version of this run that lives on the tiny island. Enter huge, ground pound every Grand Goomba you meet, sweep the red coin cave (eight red coins is 16 coins of value on their own), and the threshold arrives before you run out of island.
One asterisk that makes this course quietly famous among coin-collection sickos: one of those 192 coins — part of a line of five spawned on the huge side — appears in an illegal position embedded in a slope and cannot be collected in normal play. The wiki flags it as completely impossible to obtain. So Tiny-Huge Island's true collectible total is 191, and a perfect-coin run here means 191, not 192. For the per-course 100-coin routes across the whole game, the 100-coin stars guide has the full breakdown.
Version differences worth knowing
The DS remake reshuffles this course more than most:
- The mission list changes shape. "Five Itty Bitty Secrets" is cut entirely. Its slot goes to "Klepto the Condor" — Klepto, imported from Shifting Sand Land, circles the post in the middle of the tiny side's water carrying a star you have to take off him. A second new mission, "Switch Star on the Island," adds a Switch Star in Wiggler's cave, bringing the DS course to seven missions.
- Bubba got nerfed. On DS it swims at a slower, constant speed, turns in slow arcs, no longer leaps out of the water, and misses more. Still a one-bite kill; much easier to refuse.
- Wiggler got fairer. Only his head deals damage on DS, and he turns red in his final phase so you can read the anger state directly.
- The red coin cave opens up. The cliffside bridge is slightly larger, and Luigi's Backward Somersault reaches the entrance with no cannon and no shell.
- Koopa rebranded. His shoes are now "Supa Koopa Sprint sneakers," and the rematch is officially Mario's — other characters need Mario's cap to race.
The Super Mario 3D All-Stars release is based on the N64 Shindou build, so every route in this guide holds there. The full release-by-release rundown is in the version differences post.
One piece of trivia for the road: the Tiny-Huge Island painting hangs in the foyer of Peach's Castle at Super Nintendo World in Universal Studios Japan, and viewed from the right angle its Big Goomba morphs into a hidden picture of Bowser Jr. Twenty-five-plus years on, the course is still doing perspective tricks.
Mistakes that cost you the run
- Entering whichever painting is closer. The wrong scale means crossing the whole island to a pipe. Check the mission first; re-entering costs ten seconds.
- Swimming the huge lake like it is Jolly Roger Bay. Bubba does not do damage. It does lives.
- Punching Grand Goombas. Zero effect, and their counter-hit takes two wedges. Stomp or ground pound, nothing else.
- Touching a Shrinker Pipe during the Koopa rematch. The race resets and Koopa does not move back for free.
- Dropping to the summit hole before draining the pool. The entrance stays sealed until the tiny-side ground pound. Drain first, always.
- Farming coins on the tiny side. Thirty-four coins live there. The other 158 are on the huge side with the blue-coin-dispensing giants.
Quick Action Checklist
- Reach the second floor: 30 stars, clear "Board Bowser's Sub," beat Bowser in the Fire Sea; the star door is left of Wet-Dry World's painting.
- Left small painting = tiny island (Mario is the giant). Right big painting = huge island (Mario is the snack). Middle painting = wall.
- Open the cannon early via the Bob-omb Buddy on the tiny side, across the small bridge.
- "Pluck the Piranha Flower": tiny painting, first Shrinker Pipe, punch five Piranha Flowers as they rise, star at the pipe.
- "The Tip Top of the Huge Island": climb the tiny mountain, pipe near the summit, finish on the huge side, star in the yellow block at the peak.
- "Rematch with Koopa the Quick": huge side, race to the Windswept Valley flagpole, long jump everything, no pipes mid-race.
- "Five Itty Bitty Secrets": tiny side, touch the five scaled-down openings, Purple Switch bridge to the floating island star.
- "Wiggler's Red Coins": huge side, in via cannon, valley jump, or shell; eight coins in the cave, star between the pillars.
- "Make Wiggler Squirm": drain the summit pool tiny, swap scales, drop in huge, stomp Wiggler three times.
- 100 coins: huge side only — ground pound Grand Goombas for blue coins and sweep the red coin cave.
Frequently Asked Questions
How do you unlock Tiny-Huge Island in Super Mario 64?
What do the Shrinker Pipes do in Tiny-Huge Island?
How do you fight Wiggler in Super Mario 64?
Where are the 8 red coins in Tiny-Huge Island?
Can you kill Bubba in Super Mario 64?
How many coins are in Tiny-Huge Island?
What is different in Tiny-Huge Island on Super Mario 64 DS?
Keep Reading
Related Guides
Super Mario 64 Swimming Guide: Tap A, Don't Hold It
Holding A is the slow way to swim in Super Mario 64. Here is the stroke rhythm the code rewards, how the stick steers, how to jump out of the water, what each current does, and the eight seconds of free speed hiding in two clams.
Super Mario 64 Lives and Game Over: What You Actually Lose
A Game Over in Super Mario 64 is a file reload: you keep everything you saved and lose everything you did not. Here is when the game actually writes your file, exactly what a Game Over rolls back, the five courses where a fall is free, and every way to earn a life, from the coin tally to the Monty Mole streak that never runs dry.
Super Mario 64 Music: Every Track and Where It Plays
Super Mario 64 scores 15 courses with seven songs, and only one of them belongs to a single course. Here is which track plays in every course and secret level, the five levels whose music rearranges itself as Mario moves, what triggers the boss music and the jingles, all 36 soundtrack tracks under their 1996 and current names, and where to listen today.
Super Mario 64 Bowser Levels Guide: All 24 Red Coins
Bowser in the Dark World, the Fire Sea and the Sky each hide one Power Star behind eight red coins on the obstacle course in front of the fight. Here is the route through all three, where every red coin sits, and what else the level data holds.
Super Mario 64 Beginner Guide: Your First 30 Power Stars
Super Mario 64 does not gate you on difficulty, it gates you on Power Stars. Here is exactly which doors need what, which stars are fastest to grab, and the route that gets a first-timer from one star to thirty without wandering the castle in circles.
Super Mario 64 120-Star Reward: Yoshi and the Castle Roof
Super Mario 64 does not announce your 120th Power Star. The reward is outside: a cannon grate that stops loading, Yoshi on the castle roof, and a gift that quietly resets the next time you load your file. Here is what 120 stars changes, checked against the wikis and the decompiled code.