The Tetris Effect Zone Guide: Ultimatris, the Attack Table, and When to Press It
Zone is sold as a get-out-of-jail button, and used as one it pays a fraction of what it could. The published Zone Bonus Attack table says the same lines can be worth 40 garbage rows or 80, depending only on when you pressed it.

The official pitch for the Zone is four words long and it has quietly cost people thousands of rows of damage. Enhance describes it as a way to "stop time and stack line clears at the bottom of the Matrix. Save yourself from a game over or just rack up bonus points."
Both halves of that are true, and they pull in opposite directions. Saving yourself means triggering the moment you are in trouble; racking up points means triggering when the meter is full and then staying in as long as you can. The published attack table is emphatic about which one pays: the same number of lines, banked at the same skill level, can be worth 40 garbage rows or 80 depending on nothing but when you pressed the button.
This is a guide to the Zone in Tetris Effect and Tetris Effect: Connected: the mechanic itself, the named clear ladder that goes up to something called a WTFtris, the Zone Bonus Attack table, and the handful of places where Zone quietly works against you.
Zone is not a panic button
The meter charges off line clears. How many lines it takes for each quarter of the meter depends on where you are: the difficulty you picked in Journey Mode, or the phase you are in during Zone Battle. In Zone Marathon the number is published flat — the meter fills by one quarter every 8 line clears, so a full meter is 32 lines of ordinary play.
That is the part worth internalising before anything else. A full Zone meter costs you 32 clears in Zone Marathon. It is the most expensive resource in the game, and it is single-use.
What Zone actually changes
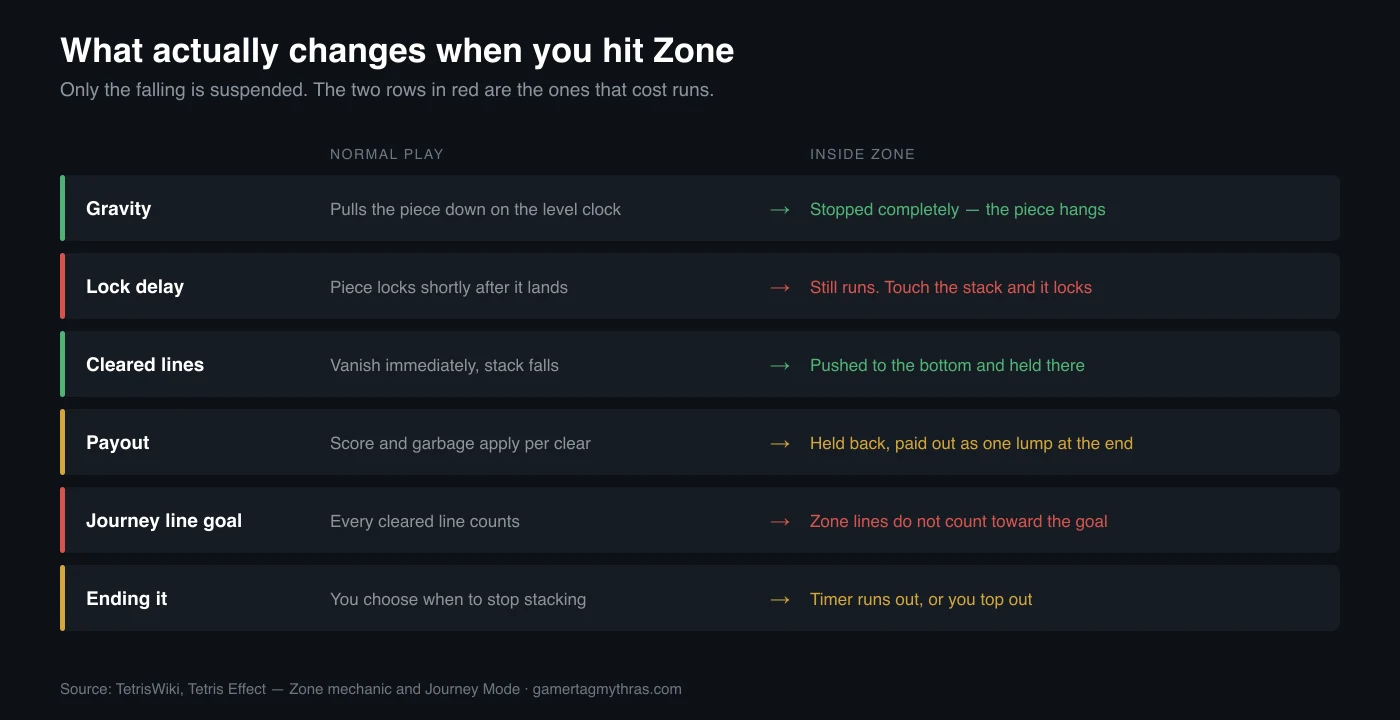
When you trigger it, gravity stops. The piece stops falling and hangs wherever you put it. Any line you complete does not clear — it is pushed to the bottom of the playfield and held there, stacking up while you keep working above it. When Zone ends, every completed line at the bottom detonates at once.
Two details do the damage:
Lock delay still runs. Gravity is off; the lock timer is not. Rest a piece on top of your stack and it will lock after its delay exactly as it would in normal play. Only the falling is suspended — so a Zone spent deliberating can end with a taller board than it began with, one lock at a time. Our gravity and lock delay guide covers how that timer behaves across Guideline games.
You do not choose when it ends. Zone ends when the time meter runs out, or when you top out. There is no early cash-out. In Journey Mode the maximum possible Zone duration is 20 seconds, and you only get the full 20 by triggering at a full meter.
One cosmetic tell that is genuinely useful: once you have filled 8 lines during a Zone, a screen-wide colour inversion called Zone Brilliance kicks in. It is your in-game signal that you have crossed into Octoris territory. If you find it disorienting, the graphics settings let you set its severity to MIN, MID or MAX rather than turning it off entirely.
The Journey Mode trap: Zone lines do not count
Journey Mode runs 27 stages across 7 areas, each stage split into three sections with a different speed level. The line goal per stage depends on difficulty: 30 lines on Beginner, 36 on Normal, 48 on Expert. The final stage, Metamorphosis, wants 90 lines regardless of difficulty.
Here is the rule that catches people: only non-Zone cleared lines count toward the stage goal.
Bank a 16-line Decahexatris in the middle of a Journey stage and you have advanced your progress by exactly zero. The lines are gone, your board is clean, your score went up — and the goal counter did not move. Zone in Journey Mode is a survival and scoring tool, never a progress tool. If you are grinding stage completions, every Zone you trigger is 20 seconds you are not spending on the counter.
The named clears, and the ceiling that kept moving
Zone clears get their own escalating names, and the top of the ladder is a genuine piece of Tetris history rather than a marketing flourish.
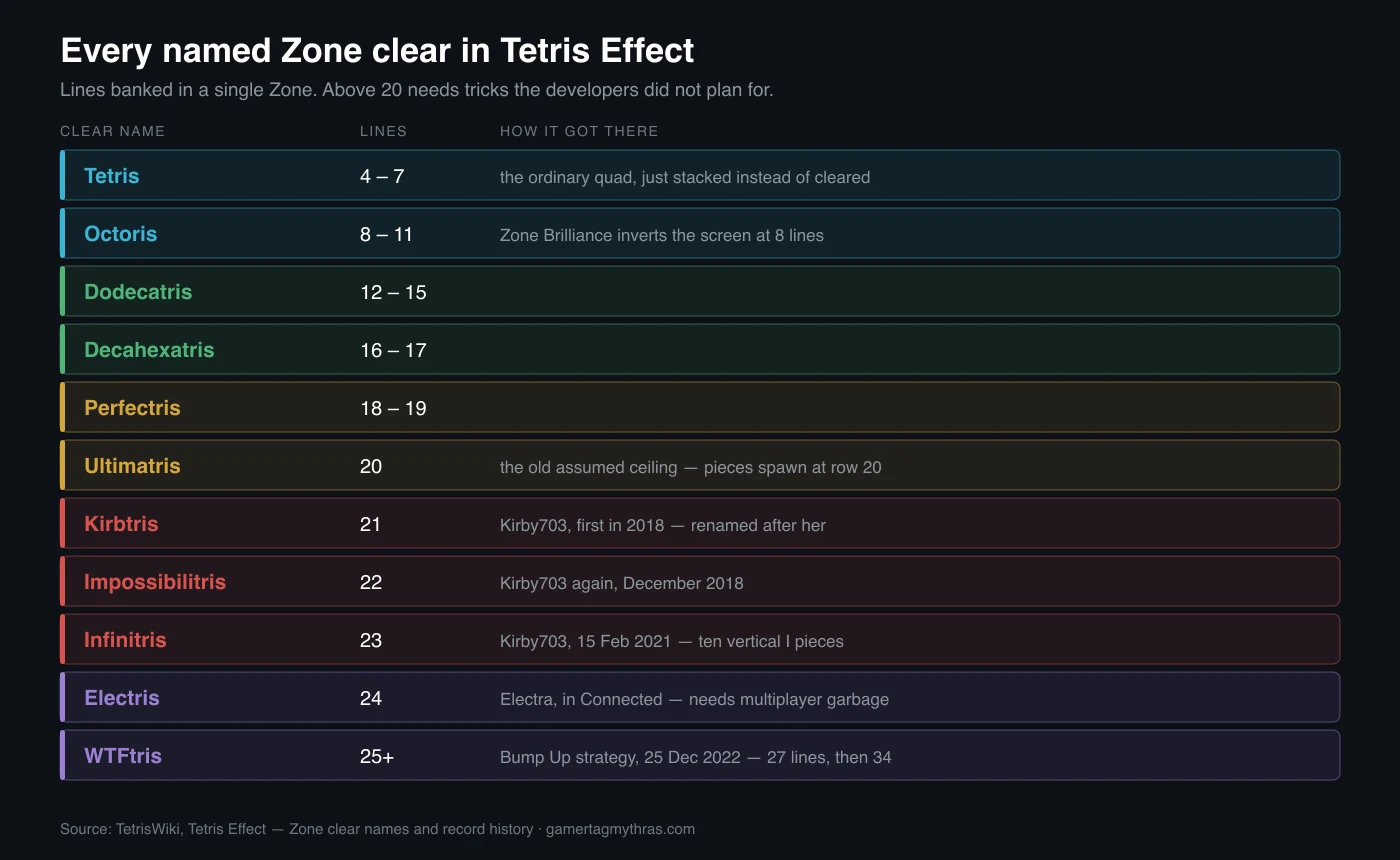
Everything up to Ultimatris at 20 lines was assumed to be the ceiling, for a sound reason: pieces spawn at row 20, so 20 rows is all the height you have to work with. Then players noticed the last piece of a Zone could clear several rows at once, usually set up with initial rotation or initial hold.
The record history from there is short and stubborn. Kirby703 cleared 21 lines first, in 2018 — the developers later renamed that tier a Kirbtris, after having initially displayed it as an Ultimatris. Kirby703 took 22 in December 2018, displayed as an Impossibilitris. Then on 15 February 2021, again Kirby703, 23 lines — an Infinitris, built by laying ten I pieces vertically across the top of the screen.
Twenty-three was described at the time as the maximum theoretically possible, and in solo play it is. Connected broke it. The multiplayer modes added garbage mechanics and boss blitz attacks, which means rows can arrive from outside your own stacking. A player named Electra reached 24 and then 25 in Connected mode, and 24 became the Electris. On 25 December 2022, a group of players credited by TetrisWiki as knighting, Sionara, SGFerox and box worked out a strategy built on Bump Up — a boss blitz that adds rows of garbage to the bottom of the playfield — and cleared 27. That tier is the WTFtris, and a 34-line Zone was documented six days later.
Scoring inside Zone
Points earned during Zone are multiplied, and the multiplier has two independent sources:
- +1x for reaching an Octoris (8 lines) or more in the Zone.
- +1x for having triggered at a full meter, which is also what buys you the full 20 seconds.
Stack both and you cap out at a 3x multiplier, the highest available. Miss either and you are leaving a whole multiple on the table.
The payout is also deferred. Points from Zone line clears are not added to your score display as they happen — they are held until Zone ends, and you are then paid a bonus of +100 per line cleared during the Zone on top of everything else. This is why a Zone that ends by topping out feels so bad: the lines were banked, the multiplier was live, and the run ended before the register opened.
Note what the two multiplier conditions have in common. Both reward waiting — waiting for a full meter before triggering, then waiting inside the Zone until you have at least 8 lines down. A half-charged Zone spent on a quick Tetris to survive earns neither.
Zone Battle: what your Zone is actually worth
Zone Battle is standard versus with Zone bolted on. Lines banked during your Zone convert into an attack against your opponent, and the size of that attack comes from a published table with two inputs: how many lines you banked, and how charged the meter was when you triggered.
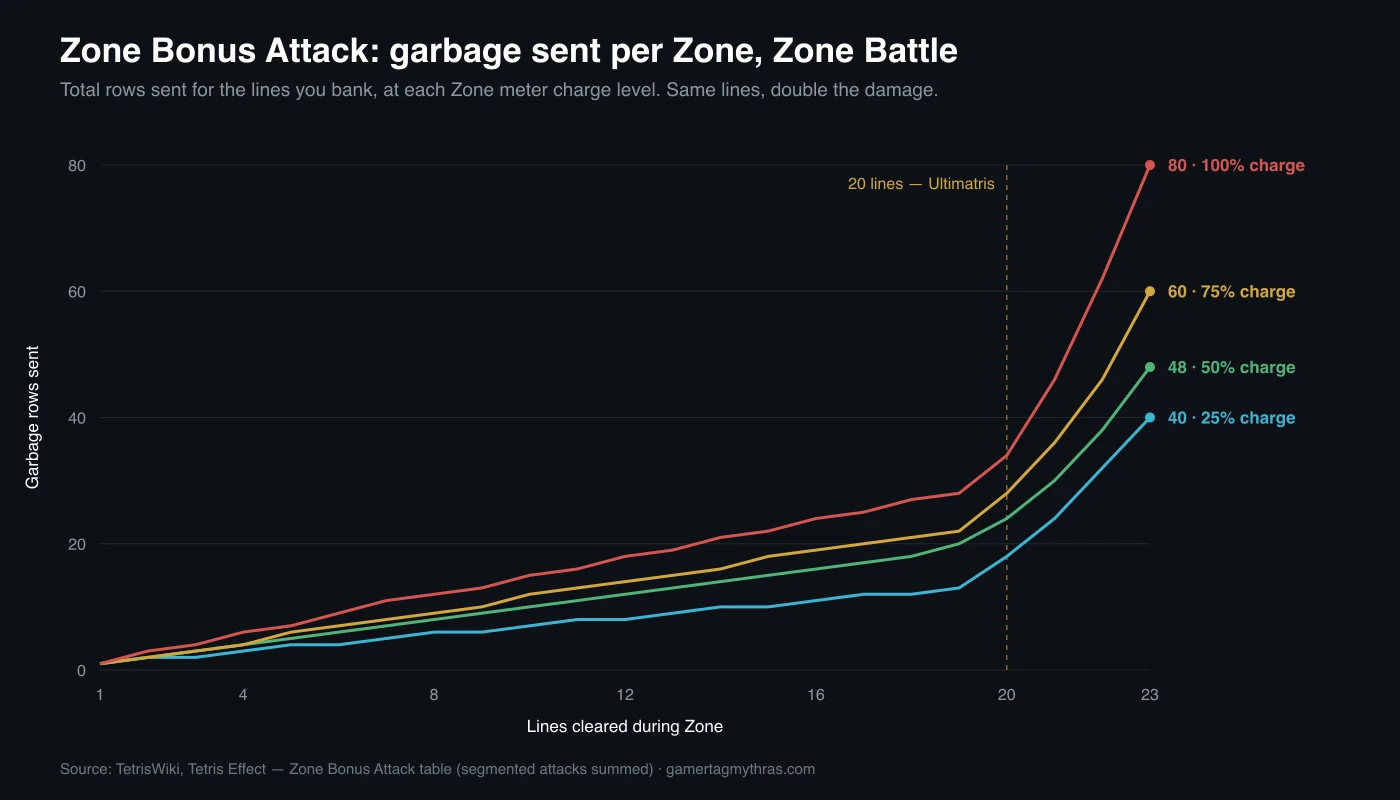
Read the gap between the curves, because it is the whole argument. Twenty-three lines sends 40 rows at a quarter charge and 80 rows at a full charge. Identical stacking, identical line count, exactly double the damage, decided entirely by whether you were patient enough to fill the meter first.
The bottom of the table tells the other half of the story. At 1 line the attack is 1 row at every charge level — a quarter charge and a full charge send the same thing. At 4 lines, a Tetris banked in Zone, you get 3 rows at a quarter charge and 6 at a full one. That is the entire return on a resource that took 32 clears to build and up to 20 seconds to spend.
Efficiency per line makes it starker. Four lines at a full charge is 1.5 rows of garbage per line banked. Twenty-three lines at a full charge is roughly 3.5 rows per line. Going deep does not just send more — it sends more per line you put in.
One structural detail that matters in practice: the table sends several of the larger attacks as multiple separate garbage waves, not one wall. The 80-row maximum arrives as four 20-row attacks rather than a single 80. Separate waves are handled, cancelled and dug out differently from one solid block, so the shape of your attack changes as well as its size. And the Zone bonus is applied after the normal garbage from those clears, not instead of it.
Two more Zone Battle rules worth knowing. Incoming garbage is delayed — it does not appear on your field until the first drop you make without clearing a line, which is what makes a fast clean response so valuable. And the match runs in phases keyed to your score: garbage holes start in clean columns, become slightly more random at 20,000 points, and very random at 60,000. Across those phases the meter also needs more lines to fill and the maximum Zone duration gets shorter. Late-game Zones are harder to earn and shorter to spend.
The 20-line cliff
There is a step in the table right where the old ceiling used to be. Going from 19 to 20 banked lines at a full charge takes the attack from 28 rows to 34. At a quarter charge the same step is 13 to 18. Every charge column jumps at 20.
Above that the curve stops behaving politely: 21 lines at a full charge is 46 rows, 22 is 62, 23 is 80. The last three lines of a maximal Zone are worth more than the first fifteen combined.
This is the practical case for learning to stack inside Zone rather than treating it as a dump. If your habit is to trigger, clear a quick Tetris and get out, you are living at the flat left-hand end of a curve that does almost all of its work on the right.
Zone as a shield
The defensive use is real and it is not the same as panicking. In Zone Battle you can enter the Zone specifically to block an incoming attack, clearing enough lines during it to cancel the garbage heading your way.
The distinction that matters is deliberate versus reflexive. Triggering at 40% charge because a wall of garbage just landed is the reflexive version, and the table pays it accordingly. Holding a full meter as a known answer to the next big attack is the deliberate version — you get the cancel, the full 20 seconds, the 3x scoring multiplier and a counter-attack worth double, all from the same button press.
That is the actual skill: not knowing what Zone does, but being willing to sit on a charged meter while your board is uncomfortable. If your stacking under pressure is not good enough to survive without cashing out early, that is a downstacking problem rather than a Zone problem, and stacking fundamentals is the fix.
Connected co-op runs a different Zone
Connected mode puts three players against an AI boss, each on their own playfield, across five Areas. It changes the Zone enough that habits from Zone Battle do not carry over.
The meter is shared between all three players, with each segment coloured by who contributed it. When it fills, Zone triggers automatically — nobody chooses the moment — and the three playfields merge into one, with every block collapsing to the bottom under cascade gravity. The players then take turns dropping pieces into that shared board in round-robin order, left to right.
The scoring rule flips too. In Zone Battle, clear types matter. In Connected, only the total number of lines cleared counts toward the Zone attack. Special purple pieces appear at random, more often in the early phases, and cascade blocks down to eliminate gaps in the merged stack.
Three more Connected specifics:
- When the fields separate again, any complete lines are eliminated without contributing to the next Zone meter.
- Each following Attack phase needs more clears to fill the meter than the one before it.
- The boss can absorb your work. In Defense mode, every 10 lines the boss clears becomes a defense orb worth roughly one line of solid garbage, and those orbs offset your Zone attack partially or entirely.
That last one is why a slow, small Zone against a defending boss can amount to nothing at all.
How to actually use your meter
- Default to holding at 100%. The full-charge column is worth up to double the quarter-charge column for the same lines, and a full-charge trigger is what grants the 20-second duration and the second scoring multiplier.
- Do not spend a Zone on four lines. Six rows at full charge is a bad trade for a resource that costs 32 clears in Zone Marathon.
- Aim past 8 first, then past 20. Octoris is the scoring multiplier threshold and the Zone Brilliance tell; 20 is where the attack table steps up.
- Remember lock delay. Zone is not a freeze. Do not rest pieces on the stack while you think.
- In Journey Mode, count what Zone does not do. Zone lines never move the stage goal.
- In Connected, clear volume, not fancy clears. Only the line total feeds the Zone attack there.
More of our Tetris breakdowns live on the Tetris coverage hub.
Quick Action Checklist
- The Zone meter fills a quarter per 8 line clears in Zone Marathon — 32 clears for a full bar.
- Gravity stops in Zone; lock delay does not.
- Cleared lines stack at the bottom and detonate when Zone ends.
- Full-charge trigger buys 20 seconds in Journey Mode and a +1x score multiplier.
- Reaching 8 lines in Zone adds another +1x, for a 3x cap, and flips on Zone Brilliance.
- Zone lines do not count toward Journey Mode stage goals.
- In Zone Battle, 23 lines sends 40 rows at 25% charge and 80 at 100%.
- The attack table steps up at 20 lines and climbs steeply to 23.
- Large Zone attacks arrive as multiple separate waves, not one block.
- In Connected, the meter is shared, the fields merge, and only total lines count.
Frequently Asked Questions
How does the Zone meter charge in Tetris Effect?
What is the maximum number of lines you can clear in one Zone?
What are all the named Zone clears in order?
Does Zone stop the game completely?
Why did my Journey Mode stage not progress after a big Zone clear?
Is it better to trigger Zone early or wait for a full meter?
How much does a Tetris cleared inside Zone actually send?
How is Zone different in Connected co-op mode?
Keep Reading
Related Guides
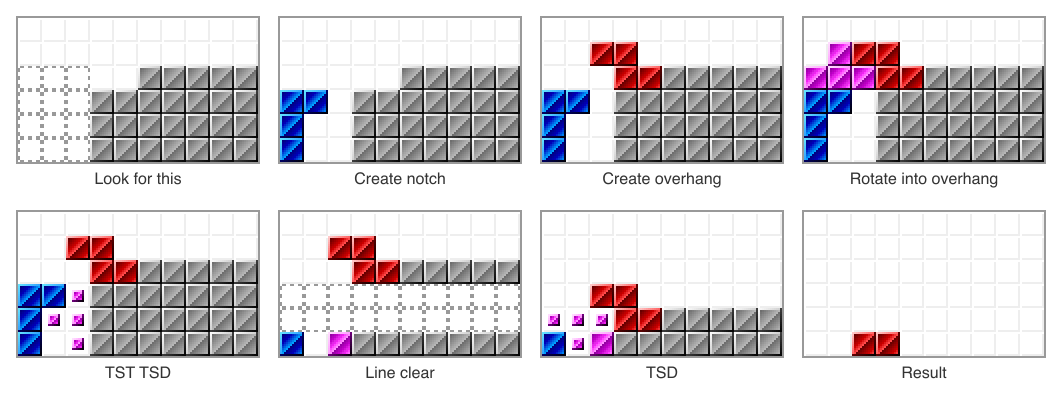
Tetris Mid-Game T-Spins: STSD, Imperial Cross, Kaidan
Once the opener is spent, the board decides your T-spins. Hard Drop files 63 pages of mid-game T-spin setups; this guide covers three families: lend your well to a T-spin, stack two TSD slots, or kick a T two rows deeper to save a bad board.
Tetris Downstacking: How to Dig Out of Garbage
Garbage is not one obstacle, it is two. Where the hole column sits from row to row decides whether six lines cost you one piece or six, and TETR.IO scores the lines you dig out at exactly the same rate as the lines you send.
TETR.IO Ranks Explained: TR, Percentiles and Cutoffs
A Tetra League letter is not a skill score, it is a slice of the leaderboard — and TETR.IO publishes exactly how big each slice is, what TR it currently costs, and how fast the people inside it play.
Tetris All-Spin Explained: S, Z, L, J and I Spins
A Z piece rotated into a slot nothing else reaches is either a scored spin or an ordinary Double, and which one it is has nothing to do with you. It is a setting, and most Tetris games have it switched off.
Tetris Stacking Fundamentals: Build a Board That Wins
Most players do not lose to speed. They lose to a board they built themselves three minutes earlier. Here is how stacking actually works in modern Guideline Tetris, and the habits that stop you from burying your own well.
TETR.IO Quick Play Explained: The Zenith Tower, Climb Speed, and HYPERSPEED
Quick Play looks like a battle royale and scores like a speedrun. There is no round to win and nobody to outlast — only altitude, and altitude is bought mostly with the lines you send at other people.