Roblox Particle Effects Guide: Emitters, Beams & Trails
A game without particles reads as unfinished no matter how good the build is. ParticleEmitter, Beam, and Trail are the three effect classes that add fire, magic, dust, and speed lines — and none of them need a single line of code to start.
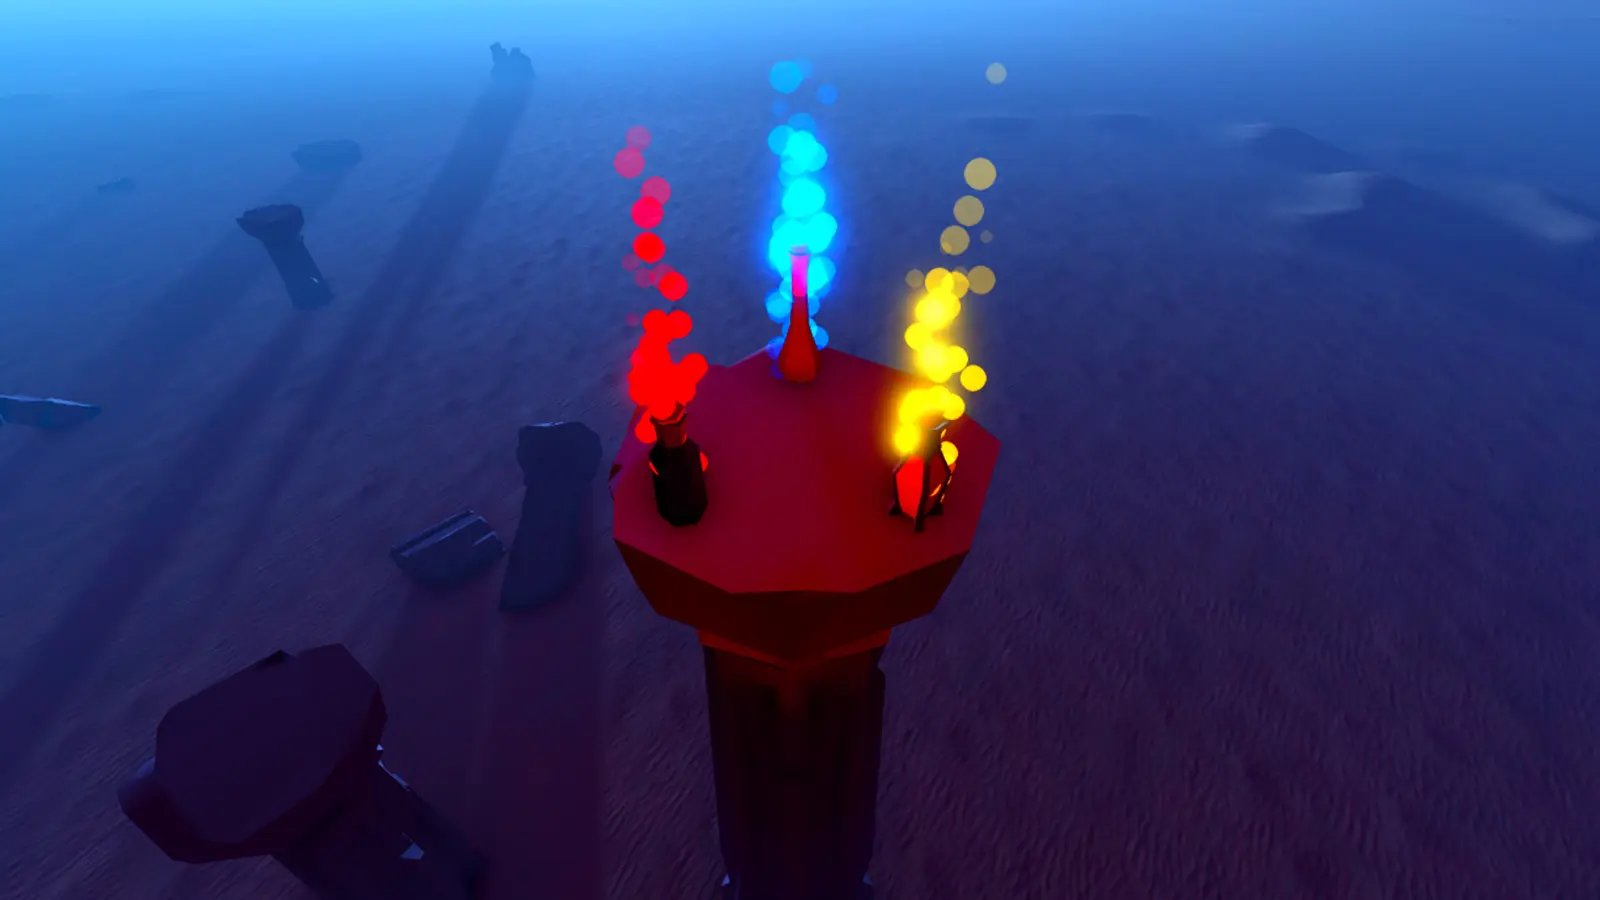
Load two identical Roblox obbies side by side — same layout, same parts, same lighting. One has a faint dust haze drifting off the lava, tiny embers on the torches, and a soft trail behind the winning platform's spinning key. The other has none of that. Players will tell you the first one "just looks better" and won't be able to say why. That why is particles, and here's the part that should reframe how you think about them: the difference between those two obbies is maybe fifteen minutes of work and zero lines of code.
Roblox gives you three built-in effect classes — ParticleEmitter, Beam, and Trail — that live in the Explorer like any other instance. You add one, tweak a handful of properties in the Properties window, and you have fire, magic, dust, water spray, or speed lines. No scripting required to get started, though a couple of lines unlock the good stuff. If you can already navigate Studio, you have everything you need. This guide covers all three classes, the exact properties that matter, the hard engine limits Roblox enforces, and the performance traps that turn a pretty effect into a frame-rate wrecking ball.
Particles are the cheapest polish in the engine
Every other kind of polish costs real time. Custom animations mean rigging. Good UI means tweening every panel and testing on mobile. Atmosphere means tuning lighting and fog for an hour. Particles are different: a single ParticleEmitter dropped onto a part starts spitting out a default white sparkle immediately, and from there you're just dialing knobs until it looks right.
The reason this works is that particles are billboards — flat images that always turn to face the camera (by default), spawned in bulk and animated over their short lives by the engine, not by you. You describe the behavior once — how fast they spawn, how long they live, how they move, how they change color and size — and the engine handles thousands of individual particles per frame. Your job is art direction, not math. That's an unusually good trade for how much visual weight it adds.
The three effect classes, and when each wins
People lump these together as "particles," but they solve three genuinely different problems. Picking the wrong one is the most common beginner mistake — trying to fake a laser beam with a stream of fast particles when Beam exists, or hand-spawning particles behind a projectile when Trail does it for free.
ParticleEmitter: volume and atmosphere
ParticleEmitter is the volume tool. It spawns many small images from a source and is what you want for anything that reads as a cloud or stream of stuff: fire, smoke, sparks, dust, rain, magic swirls, explosions, healing glows. Parent it to a BasePart or an Attachment and it emits from there. This is the class you'll use ninety percent of the time, and it's the one with the deepest property list.
Beam: connections between two points
Beam draws a textured ribbon between two attachment points, and it can curve. That "between two points" framing is the whole trick — anything that visually connects two things is a Beam, not a particle stream. Lasers, tethers, electricity arcs, tractor beams, a glowing rope bridge, a targeting line from a turret to its victim. Because it curves via Bézier control, it's also great for hanging cables and energy that droops. If you find yourself wanting a straight-ish line from A to B, reach for Beam first.
Trail: motion that leaves a mark
Trail renders a ribbon that follows a moving object, connecting two attachments as they travel through space. It's the speed-line class: sword swings, projectile streaks, the whoosh behind a sprinting character, tire marks, comet tails. The key difference from a particle stream is that a Trail is one continuous connected surface that reacts to actual movement, so it looks coherent at speed where individual particles would scatter and stutter.
Building your first emitter in 60 seconds
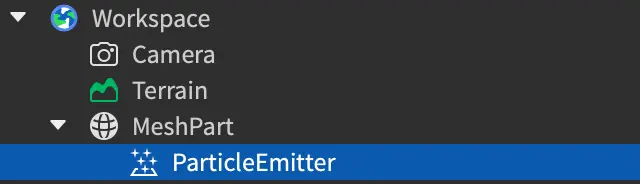
No code needed for this. In Studio, select the part you want the effect to come from, hover it in the Explorer, click the plus, and insert a ParticleEmitter. The moment it exists, the part starts shedding the default white sparkle texture. That's your blank canvas.
From there the workflow is pure Properties-window tweaking:
- Texture — swap the default sparkle for your own image (PNG with a transparent background is the recommended format) or a texture from the Toolbox. This one property changes the effect more than any other.
- Rate — how many particles spawn per second. Turn it down for a lazy wisp, up for a raging fire.
- Color and Size — tint and scale the particles, either as a flat value or as a gradient across each particle's life (more on that below).
- Lifetime and Speed — how long each particle survives and how fast it flies out.
That's a complete, shippable effect with zero scripting. Code only enters the picture when you need effects to fire on cue — a burst on impact, a glow that switches on when a player picks up a buff — and even then it's a few lines. If you're new to that side, the Luau scripting basics guide covers the syntax.
The properties that actually change the look
There are a lot of ParticleEmitter properties. Most beginners get overwhelmed and randomly slam sliders. Don't — a small cluster of them does the heavy lifting, and knowing the engine's hard limits keeps you from fighting invisible ceilings.
Rate, Lifetime, and Speed: the shape of the flow
These three define the motion of your effect before you ever touch color.
- Rate is particles emitted per second, and there's a real ceiling: a single emitter creates up to 400 particles per second, and only 100 per second on mobile. Blow past that on desktop and mobile players silently get a quarter of your effect. Design for the mobile number if your game ships to phones.
- Lifetime is how many seconds each particle lasts, settable as one value or a Min/Max range for natural variation. The engine caps this at a maximum lifetime of 20 seconds — no infinitely lingering particle, by design.
- Speed is the launch velocity in studs per second. Negative values make particles travel in reverse (sucking inward, which is great for a portal or a charge-up). Note that changing Speed doesn't retroactively affect particles already in flight.
Two supporting properties shape the spray: SpreadAngle (X and Y) widens the cone particles emit into, and Acceleration applies a constant velocity change per second — set it to a downward Vector3 and your sparks fall like real embers instead of floating in a vacuum. Drag bleeds off speed over time, defined as the seconds it takes a particle to lose half its velocity.
Size and Color as sequences, not single values
This is the upgrade that separates a flat effect from a living one. Size and Color don't have to be constants — they can be a NumberSequence and a ColorSequence respectively, meaning the value changes across each particle's lifetime.
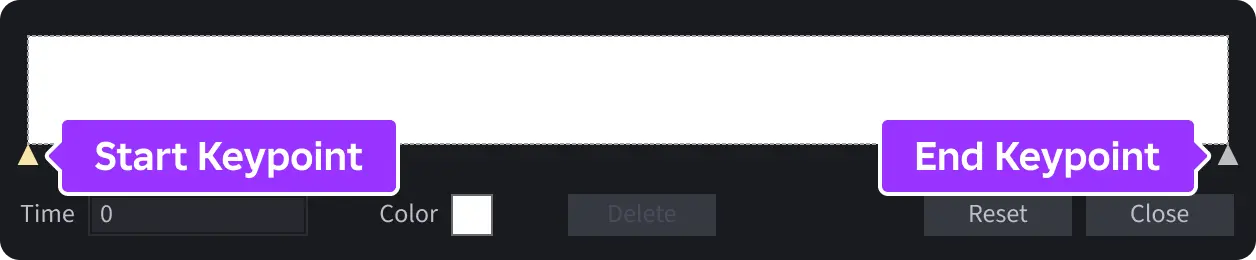
A ColorSequence uses keypoints (shown as triangles on the gradient bar) to define colors at specific points in the particle's life. Fire is the classic example: bright yellow at birth, orange in the middle, deep red as it dies. That single gradient sells the whole effect.
Size works the same way with a NumberSequence — particles that start small, swell, then shrink to nothing read as soft smoke, while start-big-shrink-fast reads as a sharp spark. NumberSequences add one extra trick: the envelope. Drag the envelope lines away from a keypoint and you give that point a random range instead of an exact value, so not every particle is the same size. That randomness is what stops an effect from looking like a repeating stamp.
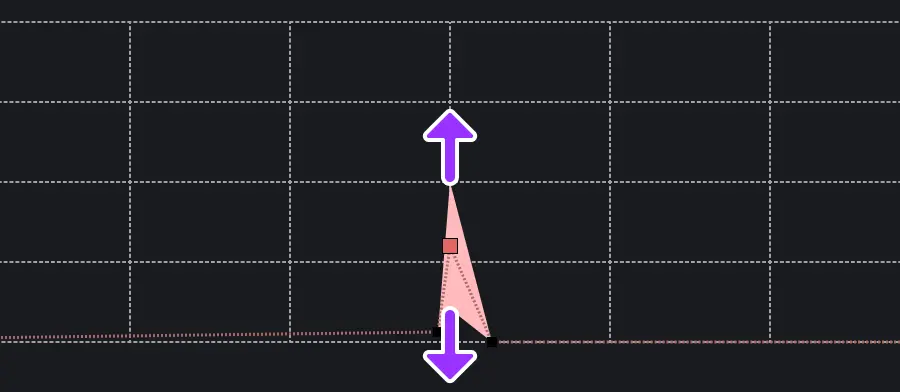
Transparency is also a NumberSequence, ranging from 0 (fully opaque) to 1 (fully clear). Fading particles in at birth and out at death — a transparency curve that dips low in the middle and rises at both ends — is the single most effective way to kill the ugly "pop" of particles blinking in and out of existence.
LightEmission and blending: the glow dial
LightEmission is the property people fumble for when they want their fire or magic to glow. It controls blending mode: a value of 0 uses normal blending, and a value of 1 uses additive blending, where overlapping particles add their brightness together and light up. Additive is why a dense cluster of fire particles reads as an intense hot core. For anything meant to emit light — fire, energy, lasers — push LightEmission up. For anything meant to block light — smoke, dust, mud — leave it at 0, because smoke that glows looks fake.
Its partner is LightInfluence, which sets how much the surrounding environment's lighting tints the particles. Set it to 0 and your particles keep their exact colors regardless of the scene (right for glowing magic); raise it and they pick up the ambient light (right for dust that should sit naturally in a dim room). Pair these two thoughtfully with your scene's lighting and atmosphere and effects stop looking pasted-on.
Bursts: Emit() for explosions and one-shots
Rate is for continuous streams. But half the effects you actually want are one-shot: an explosion, a hit spark, a puff of dust when a player lands, a poof when an enemy dies. For those you don't want a constant emitter — you want a single burst on command, and that's what ParticleEmitter:Emit() does. Call it with a count and the emitter instantly spawns that many particles in one shot, regardless of its Rate.
The standard recipe: set the emitter's Enabled property to false so it never streams on its own, then call Emit with the burst size when the event happens.
local emitter = script.Parent.ParticleEmitter
emitter.Enabled = false -- no constant stream

local function playHit()
	emitter:Emit(25) -- 25 particles, right now
end
This is the pattern behind nearly every impact effect in a polished game. A projectile hits a wall, a server event confirms it and tells clients to fire, and each client runs Emit locally so the spark is instant and smooth. One important note about Enabled: switching it to false stops new particles from spawning but leaves already-emitted particles alive to finish their lifetimes, so a stream fades out naturally instead of vanishing. If you need every particle gone immediately, the Clear method wipes them.
Beams and Trails need attachments
Here's the detail that trips up everyone building their first laser or sword trail: Beam and Trail both require two Attachment objects to render at all. They connect Attachment0 to Attachment1. Remove or forget either attachment and the effect simply doesn't draw — no error, no warning, just nothing. This is the number-one "why is my beam invisible" cause.
For a Beam, you typically parent an attachment inside each of the two parts you're connecting, then assign them to the beam's Attachment0 and Attachment1 properties. The knobs that matter most:
- Width0 and Width1 set the beam's thickness in studs at each end — taper a laser by making one end thinner.
- CurveSize0 and CurveSize1 bend the beam into a cubic Bézier curve using the attachments' orientation, which is how you get drooping cables or arcing energy instead of a rigid line.
- Texture, TextureLength, and TextureMode (Wrap, Static, or Stretch) control how the image repeats along the beam, and FaceCamera makes the ribbon always turn toward the viewer so it never looks paper-thin edge-on.
For a Trail, the two attachments go on the same moving object, spaced apart — the trail fills the ribbon between them as the object moves. Lifetime controls how long the trail persists behind the object (short for a snappy sword swing, longer for a lazy comet tail), while Texture, TextureLength, and TextureMode work as they do on beams. Color and Transparency accept the same ColorSequence and NumberSequence treatment as particles, so a sword trail can fade from white-hot at the blade to transparent at the tail.
A quick gut check when you're deciding: if the two connection points are on different objects, it's a Beam; if they're on the same moving object, it's a Trail.
Performance: where particles go to die
Particles are cheap per-unit and ruinous in bulk. The failure mode is always the same — an effect looks incredible on your gaming PC and turns a mid-range phone into a slideshow. A few disciplines keep that from shipping:
- Respect the mobile cap. The 400/sec desktop limit is 100/sec on mobile. If a fire looks right at Rate 300 on your machine, most of your players are seeing a third of it and paying a frame cost. Tune to look good at the mobile number.
- Fewer, bigger particles beat many tiny ones. A convincing smoke plume can be a dozen large, soft, semi-transparent particles rather than hundreds of small ones. Overdraw — lots of transparent particles stacked over the same pixels — is the real killer, and big count is what drives it.
- Prefer Emit bursts over always-on emitters. An impact spark that fires 20 particles on demand costs nothing when idle. A hundred torches each streaming at full Rate across a map costs constantly, whether the player is looking or not.
- Turn off distant effects. A particle emitter behind the player or across the map is pure waste. Disable emitters that are out of view or far away and re-enable them when they matter.
- Watch the whole map, not one effect. Any single effect can look fine while fifty of them together tank performance. Test on the weakest device you support, in the busiest area, with a full server's worth of action.
Get this part right and particles stay what they should be — the highest-impact, lowest-effort polish in your whole toolkit — instead of the reason your finished game runs badly. Drop one emitter on a torch today and see how much more alive the scene feels.
Quick Action Checklist
- Add a ParticleEmitter to a part in the Explorer and swap its Texture first — that one property defines the effect
- Design your Rate for the mobile cap of 100 particles/second, not the 400/second desktop ceiling
- Remember Lifetime maxes out at 20 seconds and use a Min/Max range for natural variation
- Make Size a NumberSequence and Color a ColorSequence so particles change across their life; drag envelope lines for randomness
- Fade particles in and out with a Transparency sequence to kill the "pop" at birth and death
- Push LightEmission toward 1 (additive) for fire and magic; keep it at 0 for smoke and dust
- Use
emitter.Enabled = falseplusemitter:Emit(count)for one-shot bursts like impacts and explosions - Give every Beam and Trail two Attachment objects — no attachments means no render
- Use a Beam to connect two different objects and a Trail to follow one moving object
- Test particle-heavy areas on your weakest supported device with a full server before shipping
Frequently Asked Questions
What is the difference between ParticleEmitter, Beam, and Trail in Roblox?
How many particles can a Roblox ParticleEmitter emit per second?
How do I make a burst of particles in Roblox instead of a constant stream?
Why is my Roblox Beam or Trail not showing up?
How do I make Roblox particles glow?
Keep Reading
Related Guides

Roblox BadgeService Guide: Award, Check, Debug
Call AwardBadgeAsync on a player who isn't currently in your server and it fails one of five documented requirements — silently, the same way it fails for a disabled badge or a place outside the badge's own experience. Here is every BadgeService method, which four are dead, the rate limit two of them share despite a 10x difference in batch size, and the deprecated check that Roblox says will now always return true.
Roblox Luau Type Checking: nocheck, nonstrict, strict
Roblox says every script used to default to no typechecking. That is no longer how it works: a Workspace property now sets the default mode, projects using only nocheck and nonstrict were moved to the New Type Solver automatically, and strict mode projects were not. Here is what each mode reports, what the new solver changed, and the annotation syntax that covers most code.
Roblox Text Filtering: FilterStringAsync Done Right
Chat is filtered for you. Pet names, sign text, shop names and anything you pull off an external API are not — and Roblox documents that it takes games down until filtering is added. Here is the actual API, the getter that is now dead, and the pattern that ships.
Roblox Terrain Editor: Build a World in Minutes
Terrain is the fastest way to turn an empty baseplate into somewhere worth standing. Generate makes a mountain range in one click, the brush tools carve it into a level, and none of it requires a single mesh.
Best Roblox Games to Play in 2026
Roblox's front page is engagement bait. This is the filtered version: the games with real, sustained player counts and actual staying power, sorted by what you're in the mood for.
How to Get Robux Safely (Legit Ways + Scams to Avoid)
There is no free Robux generator. There never was. Here are the actual legit ways to get Robux without overpaying, the earning methods that really work, and the scams that exist purely to steal your account.