Ocarina of Time Spirit Temple: The Two-Age Walkthrough
The Spirit Temple is the one dungeon in Ocarina of Time that shuts the door in your face on purpose. It needs two Links, two shopping trips and one warp song, and it hands over two major items instead of one. Here is the whole run, split by age.
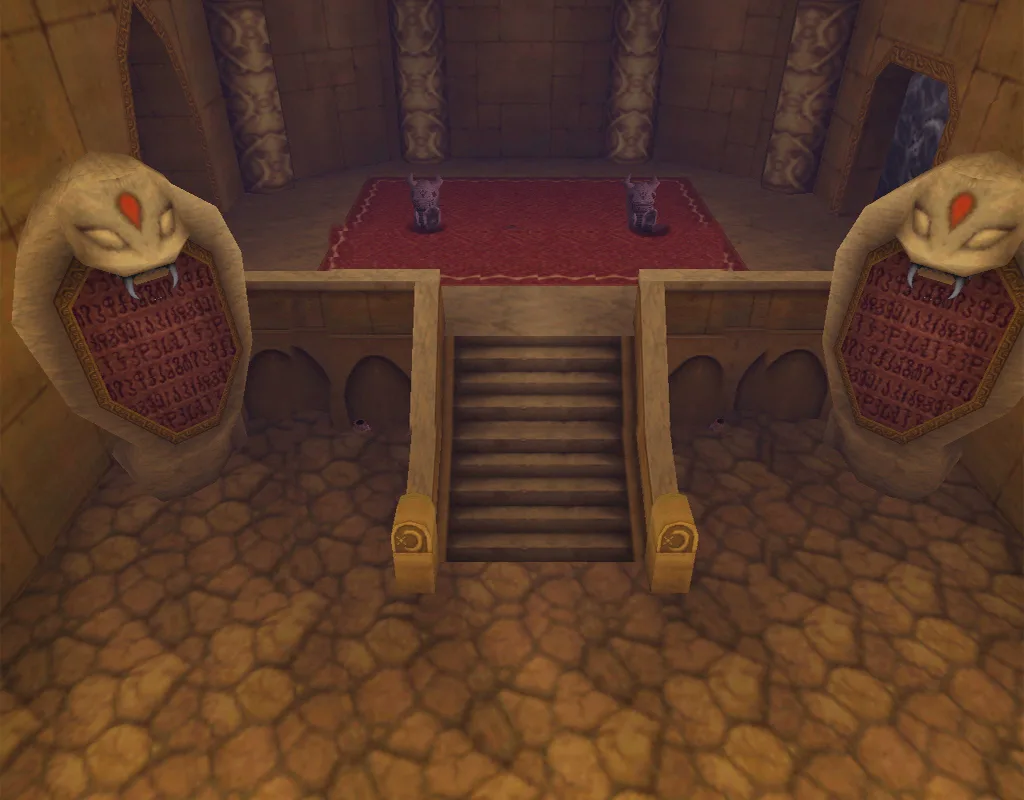
Every other dungeon in Ocarina of Time lets you in. The Spirit Temple takes one look at adult Link, notes that he is too big for the left-hand crawlspace and too weak for the right-hand block, and sends him back into the sandstorm.
That is not a difficulty spike, it is the whole design. This is the dungeon built around the game's central mechanic, where the answer to a room you cannot solve is not a better item but a different Link, and the thing you fetch as a seven-year-old unblocks your adult self seven years later. It is also, per Zelda Wiki's count, the one dungeon that hands over two major items instead of one.
Two trips. Here is what to do on each.
Spirit Temple at a glance
| Detail | What it is |
|---|---|
| Location | Inside the Goddess of the Sand at the Desert Colossus |
| Entry song | Requiem of Spirit |
| Dungeon items | Silver Gauntlets (child), Mirror Shield (adult) |
| Mini-bosses | Iron Knuckle, three of them |
| Boss | Twinrova, the Sorceress Sisters Koume and Kotake |
| Small Keys | Five in the original, seven in Master Quest |
| Gold Skulltulas | Five |
| Reward | Spirit Medallion and a Heart Container |
Three mini-bosses is the joint highest count in the game alongside the Forest Temple, except the Forest Temple varies its three. Here it is the same armoured Gerudo three times, and the third one turns out to be a character you have already met.
Getting there: two trials and one song
The Gerudo guard at the desert gate wants the Gerudo Token, then tells you there are two trials between you and the Colossus.
Trial one, the River of Sand. A river of quicksand cuts the wasteland in half and you cannot walk it. Float across on the Hover Boots or grab a crate on the far bank with the Longshot. Past it a line of flags marks the route, and straying too far from them dumps you back at the entrance. Follow the shop sign off to the side for the Carpet Merchant, who sells Bombchu for 200 Rupees from a carpet hovering off a ledge.
Trial two, the Phantom Guide. At the end of the flags is a stone monument whose plaque promises that one with the "eye of truth" gets a ghostly escort. Climb up, switch on the Lens of Truth, and a Poe appears to lead you in. Stick close — drifting off its path loses you in the sandstorm, and Leevers turn up specifically to pull you off the line. The Poe walks you out, not back, and says so.
You arrive as an adult, bounce off both temple doors, and step outside to find Sheik, who teaches the Requiem of Spirit — A, C-Down, A, C-Right, C-Down, A on N64. That song is the whole point of the detour: it warps you to the Colossus at any age, which is how child Link gets back out here later. Every melody is in our songs guide.
Two jobs before you go in. Play the Song of Storms on the rock platform by the dried-up oasis southeast of the temple to fill it with water and fairies, and bomb the cracked wall north of that oasis for the Great Fairy who grants Nayru's Love, covered in our Great Fairy guide.
The entrance room tells you the whole plan
The first chamber has two exits and two carved statues, and the statues are not decoration. One reads that if you want to travel to the future, you should return here with the power of silver from the past. The other states that one with silver hands shall move a giant block.
That is the dungeon's structure written on the wall before you have taken a step. West is a crawlspace only child Link fits through, east is a marble block only the Silver Gauntlets shift, and you cannot do either yet.
Two shopping trips, not one
Child Link needs the Boomerang for crystal switches behind fencing and for Gold Skulltulas, bombs or Bombchu for an Armos and a boulder, Deku Sticks for torches, and the Slingshot for Bubbles. Bring Din's Fire too: the Dungeon Map chest in the main chamber only materialises when you set the spell off between two unlit torches on the centre platform.
Adult Link needs the Silver Gauntlets, Longshot, Hover Boots, Megaton Hammer for a rusted switch, Bow, the Lens of Truth for an invisible Floormaster, and both the Song of Time and Zelda's Lullaby. The Scarecrow's Song is not demanded but solves one awkward gap, and the Biggoron's Sword shortens every Iron Knuckle considerably — its trade quest is in our Biggoron's Sword guide.
The child half: west wing to the Silver Gauntlets
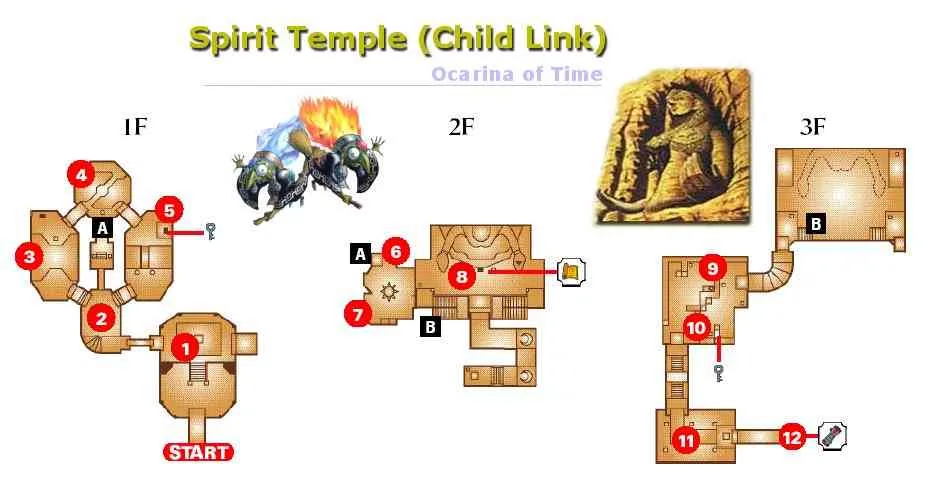
Warp in with the Requiem as a child and Nabooru is in the entrance chamber, trying to get through the crawlspace herself. She asks you to fetch the Silver Gauntlets, is very clear they will not fit a kid, and says why she wants them: Ganondorf is using the temple as a hideout, and only the Gauntlets get her deep enough inside to wreck the place. This is the only time child Link meets her.
Through the crawlspace, the west wing deliberately replays the toolkit of the three child dungeons. Keese and an Armos answered with bombs. A crystal switch behind chain fencing that the Boomerang curves around if you aim slightly wide. Torches lit with a Deku Stick. A statue shoved onto a floor switch. A boulder bombed away so sunlight can reach a door.
Anubis, the enemy that copies you
The one genuinely new enemy is the Anubis, the floating jackal mummy, and it is a puzzle wearing an enemy's model. It only moves when you move, and it moves in the opposite direction. Hit it with a sword and it answers with fire.
Your sword cannot kill it — only fire can, which is why the game guarantees a fire trap in any room an Anubis lives in. You walk backwards to steer the thing into the flames. A Fire Arrow or Din's Fire also does it, and a dead Anubis stays dead, which puts it in the small set of Ocarina enemies that do not respawn.
The two child Small Keys
Both child-side keys come out of torch puzzles rather than combat.
- In the silver rupee room patrolled by a Wallmaster, collect all five rupees, then light the room's two torches with a Deku Stick to drop the chest holding Small Key one.
- Further in, past a Beamos and another silver rupee set, three torches lit with a Deku Stick produce Small Key two. That room's exit opens by pushing a sun-face block into the shaft of sunlight coming through the north wall.
Three of the temple's five Gold Skulltulas live in this wing and all three go down to the Boomerang, which you are already holding. Our Gold Skulltula guide covers the other ninety-seven.
Iron Knuckle, first contact
At the end of the wing an Iron Knuckle is sitting on a throne, and it gets up. It has 31 hit points, more than the temple's own boss carries, and its axe swing takes four hearts. Its attacks cannot be blocked, so the shield is a comfort blanket and nothing more.
The pattern is slow and readable: wind-up, swing, exposed. Bait the swing, sidestep or backflip clear, close in, land your hits, get out before the next one. As a child with the Kokiri Sword this takes a while. Stone furniture in the room breaks apart during the fight and drops recovery hearts.
Beat it and the door beyond opens onto a ledge where a chest holds the Silver Gauntlets. Kaepora Gaebora turns up for his last conversation of the game, then Koume and Kotake abduct Nabooru in front of you. Warp out, take the Master Sword back, return grown.
The adult half: east wing to the Mirror Shield
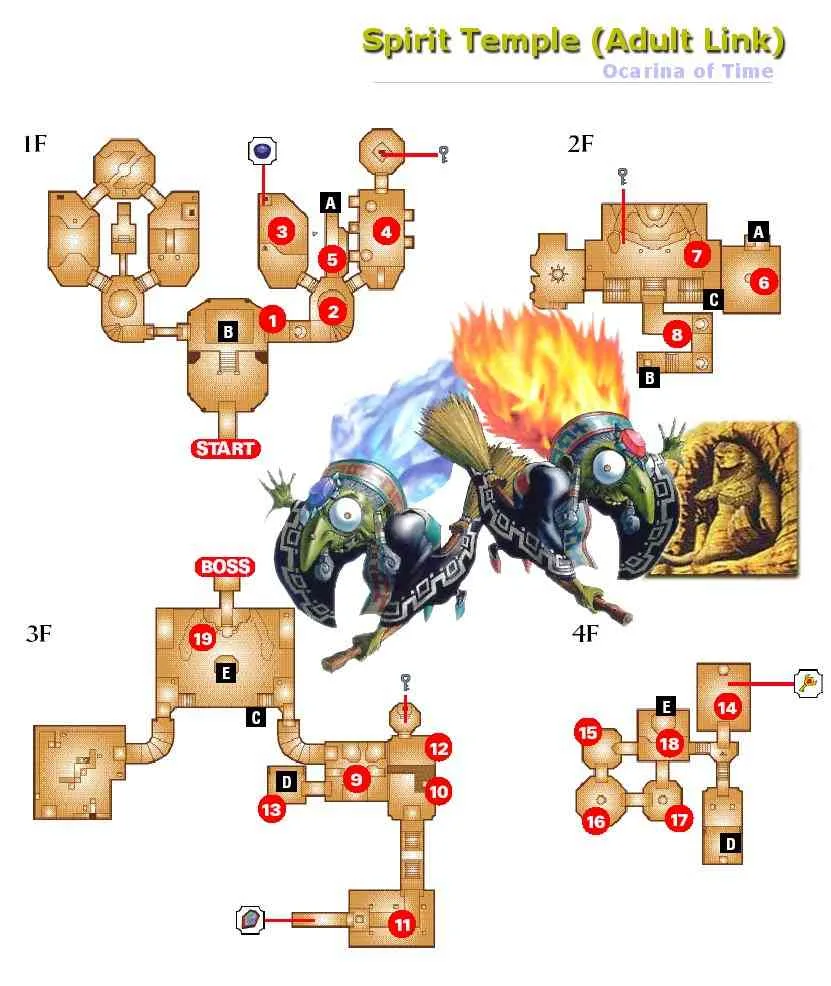
Requiem back in as an adult, equip the Gauntlets, and shove the marble block in the east passage until it drops into a crevice. The east wing is a different game: bigger rooms, vertical space, and light.
Early on you clear a Wolfos, stand on a Triforce tile and play Zelda's Lullaby to make a distant chest appear, then Longshot across for the Compass. Then a Hover Boots room with five silver rupees in wall alcoves and rolling boulders below, a blue block cleared with the Song of Time to expose a Gold Skulltula, and a Like Like ambush whose chest holds a Small Key.
Sun faces, snake mirrors, and a shield that aims
The east wing's signature is sunlight. Shafts of it come through the ceiling, sun-face switches sit on the walls, and the puzzle is always the same question: how do I get the beam from there to there.
Two tools answer it. The first is a rotating stone cobra with a mirror set into it — turn it and the reflected beam sweeps the wall, where one sun face burns away a barrier and reveals treasure and another opens the way on. The second is the Mirror Shield: stand in a sunbeam, hold the shield up, and steer the reflection with the control stick onto the switch you want.
The shield sits behind the temple's second Iron Knuckle, in a chest on another outdoor ledge, and it does more than aim light. It deflects Beamos beams, destroys Octorok and Deku Scrub projectiles outright rather than bouncing them back, and cannot be eaten by Like Likes. Version footnote: the N64 original's face carried a star-and-crescent design, swapped in later releases for the Crest of the Gerudo under Nintendo's policy on real-world religious imagery.
Between the shield and the Boss Key comes the temple's nastiest platforming, a moving wall studded with spikes where sections slide while you climb. Start early on a stationary panel and shuffle sideways as the spiked sections pass. Earlier in the wing, on the way to the shield, there is an invisible Floormaster the Lens of Truth pulls out of thin air, and a gap where summoning Pierre with the Scarecrow's Song turns a hopeless jump into one Longshot pull.
The three adult Small Keys and the Boss Key
| Key | Where |
|---|---|
| 3 | Chest in the Like Like room |
| 4 | Chest summoned by playing Zelda's Lullaby on the Triforce tile out on the statue's hand, then pulled in with the Longshot |
| 5 | Chest in a room opened by reflecting light onto a sun-face switch |
The Boss Key is its own short sequence. A fake door goes down to the Megaton Hammer, an eye switch takes an arrow, platforms appear, and the flames ringing the big chest die when you hit the switch controlling them.
The third Iron Knuckle is someone you know
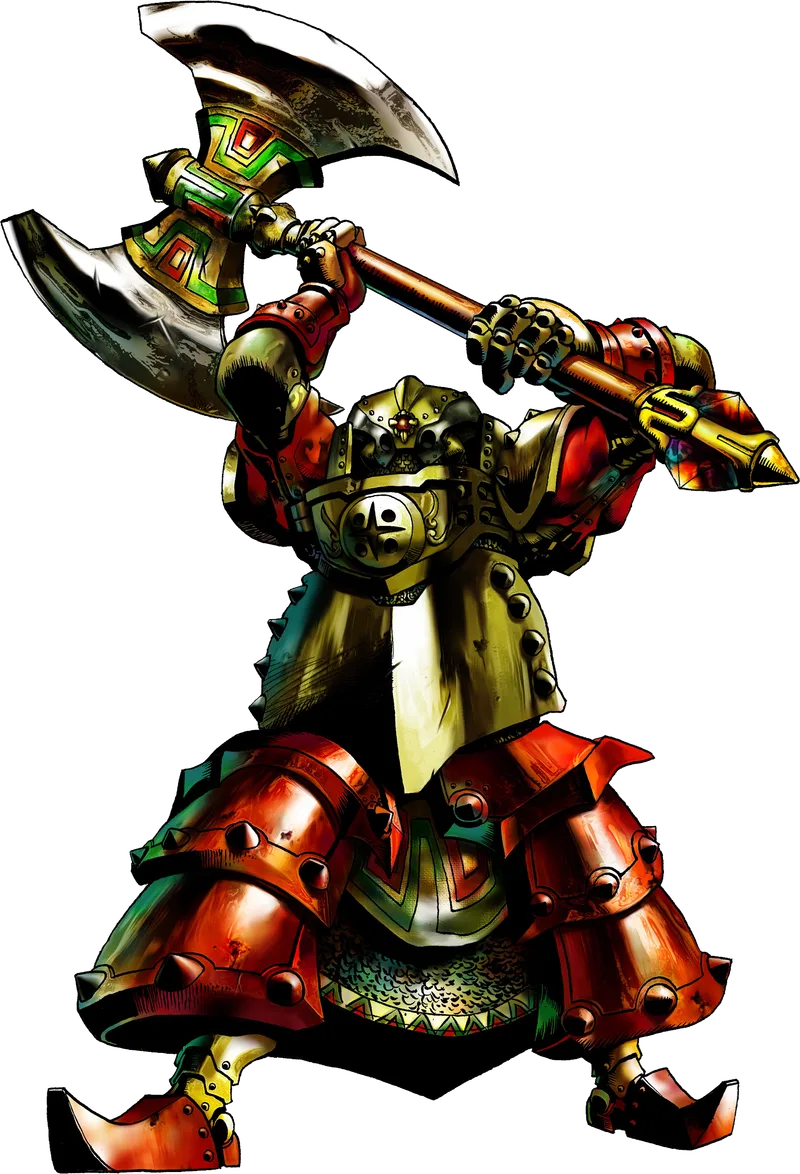
The last thing between you and Twinrova is a third Iron Knuckle, and this one is Nabooru, brainwashed and welded into the armour. Same 31 hit points, same four-heart axe, one important difference: it counterattacks instantly if you hit it from behind. The back-stab that works on the first two is a trap here.
Strip the armour off and Nabooru is underneath. Koume and Kotake take her a second time, and you chase them through the boss door.
Twinrova: the two-phase shield fight
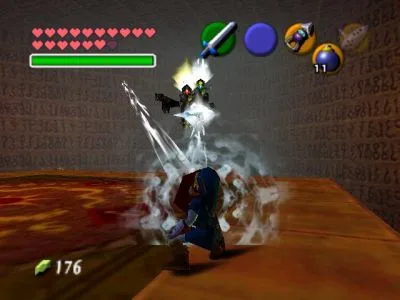
The arena is a large central platform ringed by four smaller ones, and climbing onto the centre is what starts the fight, so take a breath first. Twinrova has 24 hit points, and both beams cost you two hearts on contact.
Phase one. Koume throws fire, Kotake throws ice, taking turns. Catch a beam on the Mirror Shield and it reflects, so aim it into the other sister. Four hits and they perform their Double Dynamite Attack and fuse into Twinrova.
Phase two is where the fight lives. The shield no longer reflects, it stores, and you need three consecutive charges of the same element. Twinrova alternates deliberately to break the streak: bank a fire then an ice and everything in the shield discharges. Block only the element you are collecting and eat the hit on the other. Three in a row fires the stored blast back, she drops onto an outer platform, and you get a long free combo.
Repeat until she goes down and Nabooru wakes as the Sage of Spirit with the Spirit Medallion. Damage windows for every fight in the game are in our boss guide.
Master Quest rebuilds it around your songbook
On the Master Quest layout, this is one of the more thoroughly redesigned dungeons.
- Seven Small Keys instead of five, plus a fourth Iron Knuckle — a black one — in a room with two Gold Skulltulas behind smashable stone thrones.
- Wallmasters appear in several rooms. Beamos, Red Bubbles and Stalfos come in greater numbers, Dinolfos replace Lizalfos, giant Green Bubbles replace White Bubbles, Armos are gone, and only one Anubis survives.
- A key only child Link can take sits behind adult work. You run the first half backwards as an adult to make its chest appear, then come back young to collect it.
- An optional room asks for five of the six non-warp songs, everything but Saria's Song, with objects hinting at each: a Time Block for the Song of Time, a sun for the Sun's Song, a Lon Lon Ranch crate for Epona's Song.
- The Scarecrow's Song is generally thought to be mandatory here, but a torch can be hit with the Hookshot instead. The red targeting marker never appears on that torch, so nothing signposts it.
Four things the temple hides in plain sight
- Both dungeon items are technically outside the dungeon. The Silver Gauntlets and Mirror Shield chests sit on ledges in the Desert Colossus rather than the temple interior, which is what made the old glitch routes to them possible. Ocarina of Time 3D patched it by only spawning those chests once Link reaches their platforms.
- The colossus statue inside the temple has Longshot targets on its nipples. Zelda Wiki files this under developer joke, and it is hard to argue.
- Spirit was probably meant to come before Shadow. The Spirit Medallion sits ahead of the Shadow Medallion on the Quest Status subscreen and on file select, and the Requiem ahead of the Nocturne — but Navi only points you at the desert once the Shadow Temple is done, which suggests the running order changed late.
- You can do them in either order anyway. Once Sheik has handed over both songs, Shadow and Spirit are a genuine fork, and going Spirit first carries the Mirror Shield into the Shadow Temple.
Quick Action Checklist
- Cross the wasteland with Hover Boots or Longshot, then the Lens of Truth on the monument for the Phantom Guide.
- Learn the Requiem of Spirit, warp back as a child with Boomerang, bombs, Deku Sticks, Slingshot and Din's Fire.
- Steer Anubis into the room's fire trap; swords do nothing to it.
- Two child Small Keys, both from Deku Stick torch puzzles. Push the sun-face block into the sunlight to open the way on.
- Bait the first Iron Knuckle (31 HP, four-heart axe, unblockable), then take the Silver Gauntlets off the outdoor ledge.
- Return as an adult with Longshot, Hover Boots, Megaton Hammer, Lens of Truth, Bow, Song of Time and Zelda's Lullaby, and shove the marble block.
- Rotate the snake mirrors and angle the Mirror Shield onto sun-face switches for three more keys, then the Boss Key.
- Do not hit the Nabooru Iron Knuckle from behind — that one counterattacks instantly.
- Twinrova: reflect each sister's beam into the other four times, then bank three of one element in a row.
Frequently Asked Questions
Why can adult Link not get into the Spirit Temple in Ocarina of Time?
How many Small Keys are in the Spirit Temple?
What items do you need for the Spirit Temple?
How do you kill an Anubis in Ocarina of Time?
How do you beat the Iron Knuckle in the Spirit Temple?
How do you beat Twinrova in Ocarina of Time?
Should you do the Spirit Temple before or after the Shadow Temple?
What is different about the Spirit Temple in Master Quest?
Keep Reading
- Zelda Wiki — Spirit Temple, the two-age structure and Master Quest redesign
- Zelda Wiki (Fandom) — Spirit Temple key counts, Gold Skulltulas and Iron Knuckle count
- Zelda Wiki — Iron Knuckle health, axe damage and the Nabooru counterattack
- Zelda Wiki — Twinrova health, beam damage and the two-phase Mirror Shield fight
- Zelda Wiki — Anubis movement mirroring and fire-only weakness
- Zelda Wiki — Haunted Wasteland, the River of Sand and the Phantom Guide
- Zelda Wiki — Mirror Shield light reflection, Like Like immunity and the design change
- Zelda Wiki — Silver Gauntlets, the entrance statue inscriptions and Nabooru's request
- Jegged — room-by-room Spirit Temple walkthrough, key and puzzle order
- Thonky — adult Spirit Temple walkthrough, Small Key and Boss Key sequence
Related Guides
Ocarina of Time Ice Cavern Walkthrough: Every Room
Skip the Ice Cavern and the Water Temple becomes uncrossable — the Iron Boots live nowhere else in the game. It's also a genuinely strange dungeon: per Zelda Wiki, it's tied with the Gerudo Training Ground as the smallest in Ocarina of Time, and every room but the mini-boss chamber connects by open hallway instead of a door. Here's the room-by-room route: the Ice Scythe hub and its five Silver Rupees, all three Gold Skulltulas, the White Wolfos fight, and the underwater shortcut on the way out.
Ocarina of Time Jabu-Jabu's Belly Walkthrough: Every Room
Inside Jabu-Jabu's Belly is the third dungeon in Ocarina of Time and the odd one out: no map-and-compass hunt for its own sake, and an escort mission where the person you're escorting can drown. Here is how to actually get in (it takes a diving contest and a message in a bottle), the full route through the Fork in the Guts, the Big Octo fight, and every phase of the Barinade boss fight, including the scripted invulnerability window partway through.
Ocarina of Time Dodongo's Cavern Walkthrough: Every Room
Dodongo's Cavern is one enormous lock with a giant dead Dodongo for a keyhole, and the entire dungeon is you gathering the means to open its mouth. Here is the route through the Entrance, Eastern, Western and Northern Rooms, every chest, the Bomb Bag, all five Gold Skulltulas — two of which child Link cannot reach on the way through — and the King Dodongo fight.
Ocarina of Time Deku Tree Walkthrough: Every Room
Inside the Deku Tree is the first dungeon in Ocarina of Time and the game's own tutorial, teaching doors, vines and switches in about twenty minutes. It is also easy to half-explore, because several of its rewards sit behind puzzle steps the game never spells out. Here is every chest, all four Gold Skulltulas (one of which needs an item you don't have yet), and the fastest way through Gohma.
Ocarina of Time Dungeon Order: The Full Route, Explained
Ocarina of Time looks like an open adventure and plays like a corridor. Eight required dungeons, three side dungeons, and exactly one place where the game genuinely lets you pick. Here is the whole route with the reasons behind each lock.
Ocarina of Time Bottom of the Well: Lens of Truth Guide
The Lens of Truth sits at the bottom of a Kakariko well that is full of water for the entire first act. Here is how you empty it: the time loop that unlocks the well, the six-step run to the Lens chest, and the ten other things buried down there.